Version 3.3.0 of this plugin added FCM support (which is the successor of GCM).
Although using push messages in your Firebase app is really easy setting it up is not. Traditionally, especially for iOS.
If you didn't choose this feature during installation you can add "messaging": true to <app-root>/firebase.nativescript.json and remove the <app-root>/platforms folder.
If you want to use a specific icon for the push notification, it has to be configured in the tag in the AndroidManifest.xml
<meta-data android:name="com.google.firebase.messaging.default_notification_icon"
  android:resource="@drawable/your_drawable_name" />
<meta-data android:name="com.google.firebase.messaging.default_notification_color"
  android:resource="@color/ns_primary" />
There is a little quirk: you will currently not get the title and body if the notification was received while the application was in the background, but you will get the data payload.
Open /platforms/ios/yourproject.xcworkspace (!) and go to your project's target and head over to "Capabilities" to switch this on (if it isn't already):

Without this enabled you will receive push messages in the foreground, but NOT in the background / when the app is killed.
The previous step created the fileplatforms/ios/YourAppName/(Resources/)YourAppName.entitlements.
Copy that file to app/App_Resources/iOS/ (if it doesn't exist yet, otherwise merge its contents),
so it's not removed when you remove and re-add the iOS platform. The relevant content for background push in that file is:
	<key>aps-environment</key>
	<string>development</string>
Note that since plugin version 5.1.8 the name of the file can either be
<YourAppName>.entitlementsorapp.entitlements.YourAppNameis the iOS folder name, see the path above.
Note that when shipping to the iOS App Store, the entitlements file needs to be updated to reflect production:
	<key>aps-environment</key>
<string>production</string>Open app/App_Resources/iOS/Info.plist and add this to the bottom:
<key>UIBackgroundModes</key>
<array>
  <string>remote-notification</string>
</array>Follow this guide to the letter. Once you've done it run tns run ios and upon starting the app it should prompt you for notification support. That also works on the simulator, but actually receiving (background) notifications is only possible on a real device.
To listen to received notifications while in the foreground or when your app moves from the background to the foreground, add a handler to init.
Any pending notifications (while your app was not in the foreground) will trigger the onMessageReceivedCallback handler.
onMessageReceivedCallback is required for push notifications to be enabled (even if the function is empty). Users will not be prompted to allow to push notifications without it.
  firebase.init({
    onMessageReceivedCallback: function(message) {
      console.log("Title: " + message.title);
      console.log("Body: " + message.body);
      // if your server passed a custom property called 'foo', then do this:
      console.log("Value of 'foo': " + message.data.foo);
    }
}); firebase.init({
onMessageReceivedCallback: (message: Message) => {
console.log(`Title: ${message.title}`);
console.log(`Body: ${message.body}`);
// if your server passed a custom property called 'foo', then do this:
console.log(`Value of 'foo': ${message.data.foo}`);
}
});You don't have to provide the handler during init - you can also do it through a dedicated function.
One scenario where you want to do this is if you don't want the "This app wants to send push notifications" popup during init, but delay it until you call this function. Second case is when you want to use Angular's Router or RouterExtensions navigate method inside your handler, otherwise the view just won't update.
  firebase.addOnMessageReceivedCallback(
    function(message) {
      // ..
    }
);If you want to send push messages to individual devices, either from your own backend or the FCM console, you need the push token.
Similarly to the message callback you can either wire this through init or as a separate function:
  firebase.init({
    onPushTokenReceivedCallback: function(token) {
      console.log("Firebase push token: " + token);
    }
  });
.. or:
  firebase.addOnPushTokenReceivedCallback(
    function(token) {
      // ..
    }
);By default, this plugin will display a notification every time it receives one. If you want to disable this
behaviour and handle the notifications yourself on the onMessageReceivedCallback, you need to set the
showNotifications option to false:
firebase.init({
  // ..
  showNotifications: false,
});
You can display or schedule notifications yourself using the plugin nativescript-local-notifications.
This might be helpful too if you or some other plugin you use is already setting the current notification center
delegate property, as in that case adding another plugin that does that would result in a conflict.
If you always want to display notifications while the application is in the foreground without sending additional
parameters/data when sending the push notification, you need to set the showNotificationsWhenInForeground option to true:
firebase.init({
  // ..
  showNotificationsWhenInForeground: true,
});Based on the publish/subscribe model, FCM topic messaging allows you to send a message to multiple devices that have opted in to a particular topic. You compose topic messages as needed, and FCM handles routing and delivering the message reliably to the right devices.
Client apps can subscribe to any existing topic, or they can create a new topic. When a client app subscribes to a new topic name (one that does not already exist for your Firebase project), a new topic of that name is created in FCM and any client can subsequently subscribe to it.
firebase.subscribeToTopic("news").then(() => console.log("Subscribed to topic"));and:
firebase.unsubscribeFromTopic("news").then(() => console.log("Unsubscribed from topic"));If - for some reason - you need to manually retrieve the current push registration token of the device, you can do:
  firebase.getCurrentPushToken().then((token: string) => {
    // may be null if not known yet
    console.log(`Current push token: ${token}`);
});If you want to report an issue regarding notifications not working, PLEASE try these CURL commands first.
curl -X POST --header "Authorization: key=SERVER_KEY" --Header "Content-Type: application/json" https://fcm.googleapis.com/fcm/send -d "{\"notification\":{\"title\": \"My title\", \"text\": \"My text\", \"badge\": \"1\", \"sound\": \"default\"}, \"data\":{\"foo\":\"bar\"}, \"priority\": \"High\", \"to\": \"DEVICE_TOKEN\"}"
- SERVER_KEY: see the image below (make sure to use the 'Legacy' server key).
- DEVICE_TOKEN: the one you got in
addOnPushTokenReceivedCallbackorinit'sonPushTokenReceivedCallback.

Note that if you don't want a badge on the app icon, remove the
badgeproperty or set it to 0.
curl -X POST --header "Authorization: key=AAAA9SHtZvM:APA91bGoY0H2nS8GlzzypDXSiUkNY3nrti4st4WOUs_w1A0Rttcx31U90YGv-p3U4Oql-vh-FzZzWUUPEwl47uvwhI4tB5yz4wwzrJA2fVqLEKZpDU42AQppYnU2-dsURqkyc9sKcjay2egWbfyNK2b-G2JQCqrLVA" --Header "Content-Type: application/json" https://fcm.googleapis.com/fcm/send -d "{\"notification\":{\"title\": \"My title\", \"text\": \"My text\", \"badge\": \"1\", \"sound\": \"default\"}, \"data\":{\"foo\":\"bar\"}, \"priority\": \"High\", \"to\": \"exbKSYOGbto:APA91bHqFX9EA6SxY7NkVKV3ajea9xYn9_2dPz2jS7DGuymoE3fMDhPZLVbTXxbQ5_tS6nxmjdmfAEACM4_L-egNneXInuvg8JfRjrCVICTa8vnccTBq8cAnIx6cME1FvER9WIDC3dC4\"}"This results in a payload of:
- App in the foreground:
{"foo":"bar", "gcm.message_id":"0:1522952720644653%3194ccac3194ccac", "foreground":true, "title":"My title", "body":"My text"} - App in the background:
{"foo":"bar", "gcm.message_id":"0:1522952737879515%3194ccac3194ccac", "title":"My title", "body":"My text", "foreground":false}
Note that on iOS, when the notification was tapped, the payload will contain notificationTapped: true. That may help you with some logic in your app.
Take note of
content_available:truehere
curl -X POST --header "Authorization: key=AAAA9SHtZvM:APA91bGoY0H2nS8GlzzypDXSiUkNY3nrti4st4WOUs_w1A0Rttcx31U90YGv-p3U4Oql-vh-FzZzWUUPEwl47uvwhI4tB5yz4wwzrJA2fVqLEKZpDU42AQppYnU2-dsURqkyc9sKcjay2egWbfyNK2b-G2JQCqrLVA" --Header "Content-Type: application/json" https://fcm.googleapis.com/fcm/send -d "{\"data\":{\"foo\":\"bar\"}, \"priority\": \"High\", \"content_available\":true, \"to\": \"exbKSYOGbto:APA91bHqFX9EA6SxY7NkVKV3ajea9xYn9_2dPz2jS7DGuymoE3fMDhPZLVbTXxbQ5_tS6nxmjdmfAEACM4_L-egNneXInuvg8JfRjrCVICTa8vnccTBq8cAnIx6cME1FvER9WIDC3dC4\"}"This results in a payload of:
- App in the foreground:
{"gcm.message_id":"0:1522952782882471%3194ccac3194ccac", "foo":"bar", "foreground":true} - App in the background:
{"gcm.message_id":"0:1522952757954843%3194ccac3194ccac", "foo":"bar", "foreground":false}
To register the app to receive interactive pushes you need to call firebase.registerForInteractivePush(model).
And you may hook to the model.onNotificationActionTakenCallback callback to know what action the user took interacting with the notification.
Each action has a type of either button or input, and you can set options to do any or all of:
- Launch the app:
foreground. - Only allow the action when the device is unlocked:
authenticationRequired. - Make the text red to indicate something will be removed/deleted/killed:
destructive.
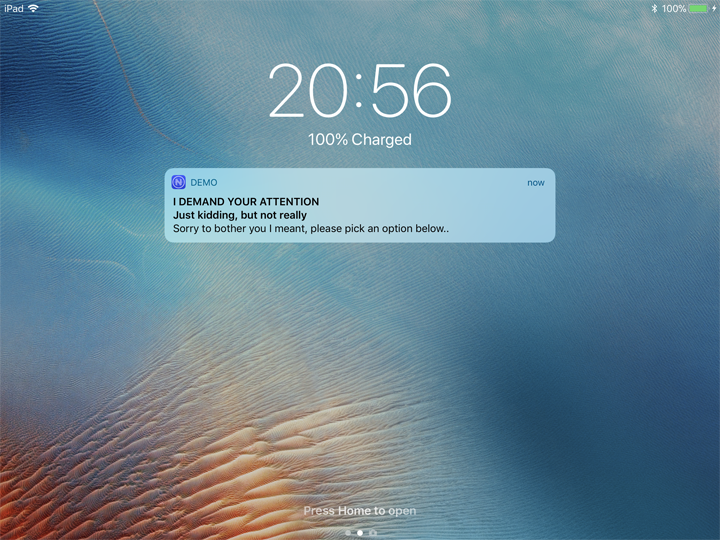
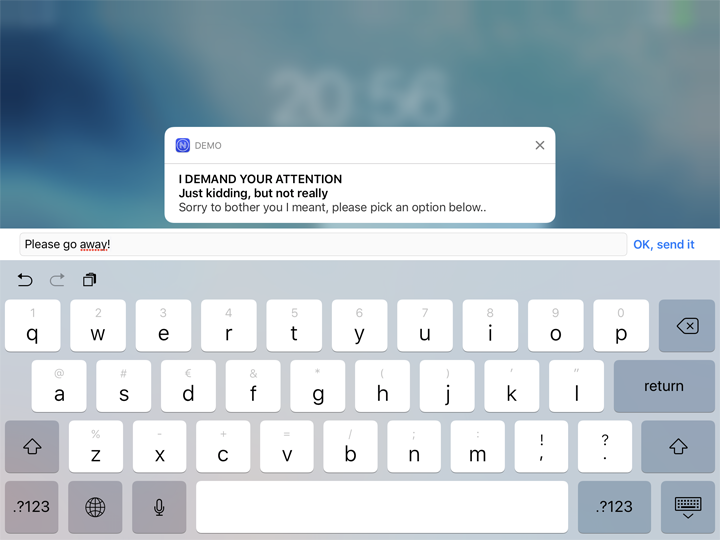
Consider this example, where an interactive push notification is received which the user expands and picks the fourth option. They then type their reply, and (because of how the action was configured) the app launches and captures the reply.

import { messaging } from "nativescript-plugin-firebase/messaging";
const model = new messaging.PushNotificationModel();
model.iosSettings = new messaging.IosPushSettings();
model.iosSettings.badge = false;
model.iosSettings.alert = true;
model.iosSettings.interactiveSettings = new messaging.IosInteractivePushSettings();
model.iosSettings.interactiveSettings.actions = [
{
identifier: "OPEN_ACTION",
title: "Open the app (if closed)",
options: messaging.IosInteractiveNotificationActionOptions.foreground
},
{
identifier: "AUTH",
title: "Open the app, but only if device is not locked with a passcode",
options: messaging.IosInteractiveNotificationActionOptions.foreground | messaging.IosInteractiveNotificationActionOptions.authenticationRequired
},
{
identifier: "INPUT_ACTION",
title: "Tap to reply without opening the app",
type: "input",
submitLabel: "Fire!",
placeholder: "Load the gun..."
},
{
identifier: "INPUT_ACTION",
title: "Tap to reply and open the app",
options: messaging.IosInteractiveNotificationActionOptions.foreground,
type: "input",
submitLabel: "OK, send it",
placeholder: "Type here, baby!"
},
{
identifier: "DELETE_ACTION",
title: "Delete without opening the app",
options: messaging.IosInteractiveNotificationActionOptions.destructive
}
];
model.iosSettings.interactiveSettings.categories = [{
identifier: "GENERAL"
}];
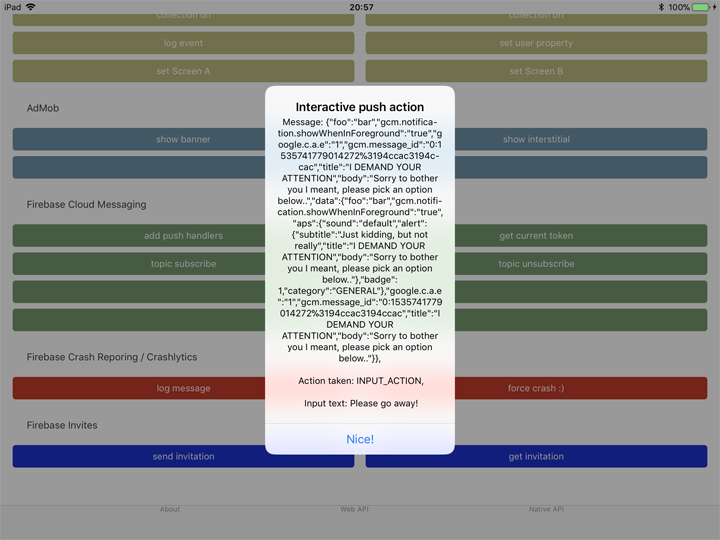
model.onNotificationActionTakenCallback = (actionIdentifier: string, message: firebase.Message) => {
console.log(`onNotificationActionTakenCallback fired! Message: ${JSON.stringify(message)}, Action taken: ${actionIdentifier}`);
};
firebase.registerForInteractivePush(model);To send an interactive push, add the "click_action" property to the notification, with a value corresponding to the category defined in the model you've registered in the app.
The payload to trigger the notification in the screenshots above is:
{
  "notification": {
    "title": "I DEMAND YOUR ATTENTION",
    "subtitle": "Just kidding, but not really",
    "text": "Sorry to bother you I meant, please pick an option below..",
    "click_action": "GENERAL",
    "badge": "1",
    "sound": "default",
    "showWhenInForeground": true
  },
  "content_available": false,
  "data": {
    "foo": "bar"
  },
  "priority": "High",
  "to": "DEVICE_PUSH_KEY>"
}
IMPORTANT Use
click_actiononly for push notifications on iOS. When such a message is tapped in the Android notification center the app WON'T be opened. This will probably be fixed in the future.
Add the showWhenInForeground flag to your payload:
{
  "notification": {
    "showWhenInForeground": true
  }
}Currently by default, when launching the app, badge is cleared. You can disable the feature by passing a flag in your init option.
firebase.init({
  autoClearBadge: false
});Make sure you require the plugin in app.ts / main.ts / main.aot.ts
before application.start(), and do init() after the app has started (not in app.ts - not even in a timeout; move it out of app.ts entirely!).
Make sure to use
require, notimportinapp.tsbecause TSC will remove the import in case you're not using it.