가이드를 보고 시작하기 전 꼭 읽어주세요!(Read the paragraph below before proceeding through this guide!)


가이드는 참고용입니다, 해당 가이드에서는 제가 테스트한 환경에 마춰 설정값들이 들어갔으며 각자의 환경에 맞게 설정값 변경 후 사용하시면 됩니다.
ex) Kubernetes deployment에 image는 제가 private한 ecr리포에 들어가있는 image uri를 쓴것처럼 각자의 환경에 맞는 image uri를 사용하시면 됩니다.
추가적으로 모든 yaml 파일 안에 있는 옵션 값들에는 주석처리가 되어있고 최신 yaml 파일들은 별도의 github 디렉터리에 있으니
해당 readme.md에 있는 yaml 파일을 그대로 복붙하지 마세요!)

(The guide itself is created just to get an idea of how a kubernetes cluster works.
Do not copy and paste everything since most of the values inside the Kubernetes yaml files are valid for my environment.
ex) Inside a Kubernetes deployment there is a image uri from my private ecr repository,
which you should change as your image uri from your private ECR repository.
Additionally, for every yaml files there are descriptions for options and updated yaml files are in separate
github directories so do not copy and paste yaml files that are in readme.md)

- AWS Console로 접근 후 Cloud9 서비스 선택(Select Cloud9 from AWS Console)
- Create Environment 선택(Select create environment)
- Cloud9 환경의 이름 지정[인스턴스명은 자유](Choose the name of your choice for your C9 environment)
- Environment type은 'New EC2 instance'로 지정(For environment type, choose New EC2 instance)
- 인스턴스 타입은 t3.micro 또는 t3.small로 지정 및 Create Environment 선택 후 Cloud9 환경 빌드(Choose between t3.micro or small and hit Create Environment)
- Platform은 Amazon Linux 2에 Timeout은 30minutes로 지정(Select Amazon Linux 2 for Platform and set 30minutes for Timeout)
- Connection은 SSM이 아닌 SSH로 변경(Change Connection as SSH not SSM)
- VPC setting은 사전에 생성한 VPC 또는 Default VPC 사용(Can either use default VPC or custom VPC)
- Create 클릭(Select Create)
- Open 하이퍼링크 클릭(Click on 'open' hyperlink)

- 아래와 같은 Cloud9 환경이 열리는 것을 확인(Check if C9 environment opens as the image below)

- Cloud9에 추가 프로그램 설치를 위해 EBS볼륨 용량 증설(Increasing size of EBS volume to install extra add-ons in Cloud9)
pip3 install --user --upgrade boto3
export instance_id=$(curl -s http://169.254.169.254/latest/meta-data/instance-id)
python -c "import boto3
import os
from botocore.exceptions import ClientError
ec2 = boto3.client('ec2')
volume_info = ec2.describe_volumes(
    Filters=[
        {
            'Name': 'attachment.instance-id',
            'Values': [
                os.getenv('instance_id')
            ]
        }
    ]
)
volume_id = volume_info['Volumes'][0]['VolumeId']
try:
    resize = ec2.modify_volume(
            VolumeId=volume_id,
            Size=30
    )
    print(resize)
except ClientError as e:
    if e.response['Error']['Code'] == 'InvalidParameterValue':
        print('ERROR MESSAGE: {}'.format(e))"
if [ $? -eq 0 ]; then
    sudo reboot
fikubectl 설치(Install kubectl)
sudo curl --silent --location -o /usr/local/bin/kubectl \
   https://s3.us-west-2.amazonaws.com/amazon-eks/1.21.5/2022-01-21/bin/linux/amd64/kubectl

sudo chmod +x /usr/local/bin/kubectl
awscli 업데이트(Update awscli from version 1 to version 2)
curl "https://awscli.amazonaws.com/awscli-exe-linux-x86_64.zip" -o "awscliv2.zip"
unzip awscliv2.zip
sudo ./aws/install
jq, envsubst, bash-completion 설치(Install jq, envsubst and bash-completion)
sudo yum -y install jq gettext bash-completion moreutilsyq 설치(Install yq)
echo 'yq() {
  docker run --rm -i -v "${PWD}":/workdir mikefarah/yq "$@"
}' | tee -a ~/.bashrc && source ~/.bashrc
설치한 바이너리의 경로 및 실행 가능여부 확인(Checking binary path and validation check)
for command in kubectl jq envsubst aws
  do
   which $command &>/dev/null && echo "$command in path" || echo "$command NOT FOUND"
  done
AWS 로드밸런서 버전 지정(Adding load balancer's version)
echo 'export LBC_VERSION="v2.4.1"' >>  ~/.bash_profile
echo 'export LBC_CHART_VERSION="1.4.1"' >>  ~/.bash_profile
. ~/.bash_profile- Create role 선택(Select create role)

- AWS Service -> EC2 선택(Select AWS Service then EC2)

- Add Permissions에서 AdministratorAccess 선택(Select Add Permission and add AdministratorAccess)

- Role 이름 지정 후 'AdministratorAccess' policy가 적용되어 있는지 확인
(Choose role name and check if the role has AdministratorAccess in policy)

- 워크스페이스 인스턴스 선택 후 Actions -> Security -> Modify IAM role(Select C9 instance -> Actions -> Security -> Modify IAM role)

- 생성한 IAM role 선택 후 Update IAM Role(Select the IAM role you created then update IAM role)

- AWS가 관리하는 일시으로 부여하는 credential 삭제(Remove temporary credentials)
aws cloud9 update-environment  --environment-id $C9_PID --managed-credentials-action DISABLE
rm -vf ${HOME}/.aws/credentials- 계정ID, 리전, 가용영역을 환경변수로 저장(Save acccount id, region and availability zone as environment variables)
export ACCOUNT_ID=$(aws sts get-caller-identity --output text --query Account)
export AWS_REGION=$(curl -s 169.254.169.254/latest/dynamic/instance-identity/document | jq -r '.region')
export AZS=($(aws ec2 describe-availability-zones --query 'AvailabilityZones[].ZoneName' --output text --region $AWS_REGION))- 리전이 제대로 설정되어있는지 확인(Check if region is set as environment variable)
test -n "$AWS_REGION" && echo AWS_REGION is "$AWS_REGION" || echo AWS_REGION is not set- bash_profile에 해당 변수들 저장(Save variables in bash_profile)
echo "export ACCOUNT_ID=${ACCOUNT_ID}" | tee -a ~/.bash_profile
echo "export AWS_REGION=${AWS_REGION}" | tee -a ~/.bash_profile
echo "export AZS=(${AZS[@]})" | tee -a ~/.bash_profile
aws configure set default.region ${AWS_REGION}
aws configure get default.region- IAM role(역할)이 유효한지 확인(Validation check for IAM role)
aws sts get-caller-identity --query Arn | grep sample-role # ec2에 추가한 iam role 이름(iam role name) && echo "IAM role valid" || echo "IAM role NOT valid"만약 IAM role NOT valid가 뜬다면 '워크스페이스를 위한 IAM role(역할) 생성' 섹션으로 돌아가서 해당 단계부터 다시 진행
If command returns IAM role NOT valid go back to 'Creating IAM role for C9 environment' and redo the following steps- eksctl 바이너리 설치(Install eksctl binaries)
curl --silent --location "https://github.com/weaveworks/eksctl/releases/latest/download/eksctl_$(uname -s)_amd64.tar.gz" | tar xz -C /tmp

sudo mv -v /tmp/eksctl /usr/local/bin- eksctl 비전 확인(Check eksctl version)
eksctl version- eksctl bash-completion 활성화(Enable eksctl bash-completion)
eksctl completion bash >> ~/.bash_completion
. /etc/profile.d/bash_completion.sh
. ~/.bash_completion- eks클러스터 배포를 위한 yaml파일을 생성(Create yaml file to deploy eks cluster)
cat << ZZZ > eksctl-cluster.yaml
apiVersion: eksctl.io/v1alpha5
kind: ClusterConfig

metadata:
  name: example-cluster     # 클러스터명(cluster name)
  region: ap-northeast-2    # 리젼(region name)
  version: "1.23"           # 쿠버네티스 클러스터 비젼(k8s cluster version)
  tags:                     # 클러스터 생성과 동시에 생성되는 태그들(cluster tags)
    karpenter.sh/discovery: example-cluster     # Karpenter를 사용하기 위해 필요한 태그)need this tag for Karpenter later

vpc:
  id: "vpc-12345678"        # 클러스터 배치할 VPC id(VPC id for deploying eks cluster)
  subnets:
    public:                 # 공인, 비공인 서브넷 지정(For public subnet, leave it public if private, write privatee instead)
      ap-northeast-2a:      # 가용용역 지정(Choosing availability zone)
        id: "subnet-12345678"
      ap-northeast-2c:
        id: "subnet-87654321"

managedNodeGroups:
- name: example-nodegroup   # 클러스터 노드그룹 이름(Name of the EKS node group)
  desiredCapacity: 2        # 원하는 노드 개수
  minSize: 1                # 최소 구동되어야하는 노드 개수
  maxSize: 10               # 최대로 구동 가능한 노드 개수
  instanceType: c5a.large   # 노드의 인스턴스 크기
  ssh:
    enableSsm: true         #노드에 ssh 가능 여부(ssh availability for EKS nodes)
iam:
  withOIDC: true
ZZZ- eks클러스터 생성(Create EKS cluster)
eksctl create cluster -f eksctl-cluster.yaml- kubernetes 노드 확인(Check k8s node)
kubectl get nodes # yaml 파일에 desiredCapacity를 3으로 명시했기 때문에 3개의 node가 있는지 확인- kubeconfig 파일 변경(Modify kubeconfig file)
aws eks update-kubeconfig --name sample-eks-cluster # 지정했던 EKS 클러스터명 --region ${AWS_REGION}- Worker Role 이름을 변수로 저장(Add Worker role name as environment variable)
STACK_NAME=$(eksctl get nodegroup --cluster sample-eks-cluster # 지정했던 EKS  -o json | jq -r '.[].StackName')
ROLE_NAME=$(aws cloudformation describe-stack-resources --stack-name $STACK_NAME | jq -r '.StackResources[] | select(.ResourceType=="AWS::IAM::Role") | .PhysicalResourceId')
echo "export ROLE_NAME=${ROLE_NAME}" | tee -a ~/.bash_profile- kubernetes frontend workload로 사용 할 namespace 생성(Create frontend namespace)
kubectl create ns frontend- kubernetes backend workload로 사용 할 namespace 생성(Create backend namespace)
kubectl create ns backend- kubernetes frontend, backend ns 생성됬는지 조회(Check if frontend and backend namespaces are created)
kubectl get ns --sort-by=.metadata.creationTimestamp | tac
- Cloud9 환경에서 frontend 및 backend 디렉터리 생성(Create frontend and backend directories)
mkdir frontend
mkdir backend- krew 설치(cloud9 환경이 아닐 시 'git --version'을 통해 git이 설치되어있는지 확인)(Install krew)
(
  set -x; cd "$(mktemp -d)" &&
  OS="$(uname | tr '[:upper:]' '[:lower:]')" &&
  ARCH="$(uname -m | sed -e 's/x86_64/amd64/' -e 's/\(arm\)\(64\)\?.*/\1\2/' -e 's/aarch64$/arm64/')" &&
  KREW="krew-${OS}_${ARCH}" &&
  curl -fsSLO "https://github.com/kubernetes-sigs/krew/releases/latest/download/${KREW}.tar.gz" &&
  tar zxvf "${KREW}.tar.gz" &&
  ./"${KREW}" install krew
)- krew 디렉터리를 환경변수에 저장(Save krew directory as environment variable)
export PATH="${KREW_ROOT:-$HOME/.krew}/bin:$PATH"- krew의 ns기능 설치(Install ns via krew)
kubectl krew install ns
- ns사용방법(ns 앞에 작업하고 싶은 namespace명을 명시하고 ns 앞에 -를 붙여서 이전 namespace로 이동)(How to use ns)
kubectl ns frontend
kubectl ns -
- AWS Load Balancer 컨트롤러를 배포하기 전, 클러스터에 대한 IAM OIDC(OpenID Connect) identity Provider 생성(Creating IAM OIDC)
eksctl utils associate-iam-oidc-provider \
    --region ${AWS_REGION} \
    --cluster sample-eks-cluster # 지정한 EKS 클러스터명(EKS cluster name) \
--approve- 클러스터의 OIDC provider URL을 해당 명령어로 확인(Check OIDC provider url)
aws eks describe-cluster --name sample-eks-cluster # 지정한 EKS 클러스터명(EKS cluster name) --query "cluster.identity.oidc.issuer" --output text- 명령어 결과 나오는 값은 아래와 같은 형식임을 확인(URL should look like the image below)

- 위의 결과 값에서 /id/ 뒤에 있는 값을 복사한 후, 아래의 명령어를 실행(Copy everything after /id/ and use the command below shown in the image)

결과 값이 출력되면 IAM OIDC identity provider가 클러스터에 생성이 되어있는 상태이며, 아무 값도 나타나지 않으면 생성 작업을 수행- AWS Load Balancer Controller에 부여할 IAM Policy를 생성하는 작업을 수행(Create IAM policy for load balancer controller)
curl -o iam-policy.json https://raw.githubusercontent.com/kubernetes-sigs/aws-load-balancer-controller/v2.4.4/docs/install/iam_policy.json
aws iam create-policy \
    --policy-name AWSLoadBalancerControllerIAMPolicy \
--policy-document file://iam-policy.json- AWS Load Balancer Controller를 위한 ServiceAccount를 생성(Create ServiceAccount for load balancer controller)
eksctl create iamserviceaccount \
    --cluster sample-eks-cluster # 지정한 EKS 클러스터명(EKS cluster name) \
    --namespace kube-system \
    --name aws-load-balancer-controller \
    --attach-policy-arn arn:aws:iam::$ACCOUNT_ID:policy/AWSLoadBalancerControllerIAMPolicy \
    --override-existing-serviceaccounts \
--approve- AWS Load Balancer controller를 클러스터에 추가하는 작업 수행(Add load balancer controller to EKS cluster)
kubectl apply --validate=false -f https://github.com/jetstack/cert-manager/releases/download/v1.5.4/cert-manager.yaml- Load balancer controller yaml 파일을 다운로드(Download yaml file for load balancer controller)
wget https://github.com/kubernetes-sigs/aws-load-balancer-controller/releases/download/v2.4.4/v2_4_4_full.yaml- yaml 파일에서 클러스터의 cluster-name을 편집(edit 'cluster-name' section from the cluster yaml file)
spec:
    containers:
    - args:
        - --cluster-name=sample-eks-cluster # 생성된 클러스터 입력(eks cluster name)
        - --ingress-class=alb
        image: amazon/aws-alb-ingress-controller:v2.4.4
- yaml 파일에서 ServiceAccount yaml spec을 삭제. AWS Load Balancer Controller를 위한 ServiceAccount를 이미 생성했기 때문에 아래 내용을 삭제 후 yaml 파일 저장 (We've created 'ServiceAccount' section previously, so remove the config shown below)
---
apiVersion: v1
kind: ServiceAccount
metadata:
  labels:
    app.kubernetes.io/component: controller
    app.kubernetes.io/name: aws-load-balancer-controller
  name: aws-load-balancer-controller
namespace: kube-system- AWS load balancer controller 파일을 배포(Apply the load balancer yaml file)
kubectl apply -f v2_4_4_full.yaml- 배포가 성공적으로 되고 컨트롤러가 실행되는지 아래의 명령어를 통해 확인. 결과 값이 도출되면 정상!(Verify the status of load balancer controller)
kubectl get deployment -n kube-system aws-load-balancer-controller- 아래의 명령어를 통해 service account가 생성됨을 확인(Verify the status of service account)
kubectl get sa aws-load-balancer-controller -n kube-system -o yaml- 속성 값을 파악(Find aws load balancer pod and save it as environment variable)
ALBPOD=$(kubectl get pod -n kube-system | egrep -o "aws-load-balancer[a-zA-Z0-9-]+")
kubectl describe pod -n kube-system ${ALBPOD}- frontend-deployment.yaml 파일 확인 및 frontend-deployment.yaml frontend 디렉터리로 이동(Create and check frontend-deployment.yaml file and move the manifest file to frontend directory)
cat <<ZZZ> frontend-deployment.yaml
apiVersion: apps/v1
kind: Deployment
metadata:
  name: example-frontend
  labels:
    app: example-frontend
  namespace: frontend
spec:
  replicas: 3
  selector:
    matchLabels:
      app: example-frontend
  strategy:
    rollingUpdate:
      maxSurge: 25%
      maxUnavailable: 25%
    type: RollingUpdate
  minReadySeconds: 30
  template:
    metadata:
      labels:
        app: example-frontend
    spec:
      containers:
      - image: # frontend image uri from ecr
        imagePullPolicy: Always
        name: example-frontend
        ports:
        - containerPort: 8110
          protocol: TCP
ZZZ
mv frontend-deployment.yaml ./frontend/frontend-deployment.yaml- frontend-deployment.yaml 파일을 사용해 deployment를 frontend namespace에 생성(pwd로 현재 경로 확인)(Create frontend-deployment using frontend-deploy.yaml)
kubectl apply -f ./frontend/frontend-deployment.yaml- frontend namespace에 frontend deployment가 생성됬는지 확인(Verify that frontend deployment is create in frontend namespace
kubectl get deploy example-frontend -n frontend
kubectl get po -n frontend
- frontend-service.yaml 파일 확인 및 frontend-service.yaml 파일 frontend 디렉터리로 이동(Create and check frontend-service.yaml and move the manifest file to frontend directory)
cat <<ZZZ> frontend-service.yaml
apiVersion: v1
kind: Service
metadata:
 name: example-frontend-service
 namespace: frontend
spec:
 selector:
   app: example-frontend
 type: ClusterIP
 ports:
  -  protocol: TCP
     port: 443
     targetPort: 3000
ZZZ
mv frontend-service.yaml ./frontend/frontend-service.yaml- frontend-service.yaml 파일을 사용해 service를 frontend namespace에 생성(Create service using frontend-service.yaml in frontend namespace)
kubectl apply -f ./frontend/frontend-service.yaml- frontend namespace에 frontend service가 생성됬는지 확인(Verify that frontend-service is created in frontend namespace)
kubectl get svc example-frontend -n frontend
- example-ingress-frontend 파일 확인 및 example-ingress-frontend 파일을 frontend 디렉터리로 이동(Check example-ingress-frontend.yaml file and move the manifest file to frontend namespace)
cat <<ZZZ> example-ingress-frontend.yaml

apiVersion: networking.k8s.io/v1
kind: Ingress
metadata:
  name: frontend-example-ingress
  namespace: frontend
  annotations:
    kubernetes.io/ingress.class: alb
    alb.ingress.kubernetes.io/scheme: internet-facing
    alb.ingress.kubernetes.io/target-group-attributes: stickiness.enabled=true,stickiness.lb_cookie.duration_seconds=10800
    alb.ingress.kubernetes.io/target-type: ip
    alb.ingress.kubernetes.io/group.name: example-ingress
    alb.ingress.kubernetes.io/group.order: '10'
    alb.ingress.kubernetes.io/certificate-arn:
    alb.ingress.kubernetes.io/ssl-policy: ELBSecurityPolicy-2016-08
    alb.ingress.kubernetes.io/ssl-redirect: '443'
    alb.ingress.kubernetes.io/listen-ports: '[{"HTTP": 80}, {"HTTPS": 443}]'
spec:
  rules:
  - host: www.example.com                         # Domain name
    http:
      paths:
        - pathType: Prefix
          path: /
          backend:
            service:
              name: example-frontend-service      # Service name
              port:
                number: 443                       # Listener port
ZZZ
mv carflix-ingress-frontend.yaml ./frontend/carflix-ingress-frontend.yaml- example-ingress-frontend.yaml 파일을 사용해 ingress를 frontend namespace에 생성(Create Ingress in frontend namespace using example-ingress-frontend.yaml)
kubectl create -f ./frontend/carflix-ingress-frontend.yaml- frontend namespace에 frontend ingress가 생성됬는지 확인(Verify if frontend ingress is created in frontend namespace)
kubectl get ingress -n frontend
- 콘솔로 들어가 AWS ALB가 frontend ingress를 통해 생성됬는지 확인(Inspect frontend ingress AWS ALB via AWS console)

- View/edit rules 눌러서 세부규칙 확인(Select view/edit rules to check detailed rules)

- 타겟그룹 선택(Select target group)

- frontend pod 3개가 정상적으로 할당되어있는 것을 확인(Check if 3 frontend pods are healthy)

- 로드밸런서 주소로 접속 후 frontend 애플리케이션이 잘 보이는지 확인(Check if frontend application is returning error using load balancer's dns address)

* 로드밸런서는 80번 포트로 listener가 설정되어 있지만 쿠버네티스 내부 service가 443번 포트로 listener가 설정되어 있기 때문에 통신 오류가 발생
* 해당 문제를 해결하기 위해 Load balancer의 target group 규칙을 수정(listener 80 -> 443으로 리다이렉트)
* ENG) Currently ALB is listening on port 80 but inside the Kubernetes cluster, the frontend service is listening on 443
so there should be an error like above. To troubleshoot this, in this case we'll change the ALB's target group rule
therefore it will redirect port 80 traffic to port 443. - target group 수정(Edit target group)

- Edit 버튼 클릭(Edit)

- 기존 Default actions 'Return fixed response' 삭제(Delete Default actions 'Return fixed response'
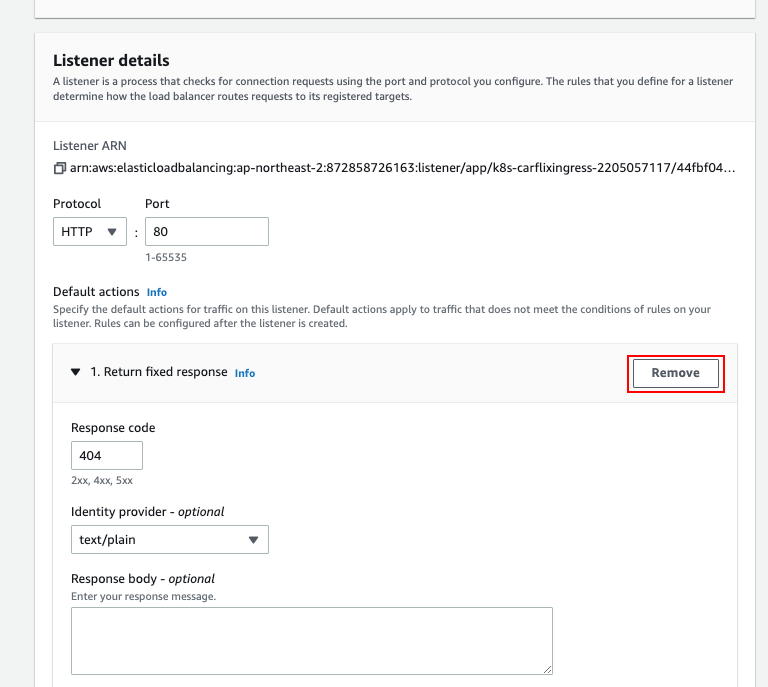
- Default actions에서 Add action -> Redirect 선택(Select add action from default action then select redirect)

- Protocol은 HTTPS, Port는 443, 그리고 Custom host, path, query 선택 후 Host, Path, Query 값은 기본값 유지. Status code는 301
- (Select HTTPS for protocol, 443 for port, choose custom host, path, query and leave it as default value and type 301 for status code)

* EC2 -> Load Balancer -> Load Balancer 선택 -> Listener 탭 선택 -> View/Edit rules
HTTP 80: default action 규칙이 아래와 같이 변경되어 있는지 확인(파란줄 부분 확인)
* ENG) Select EC2 -> Load Balancer -> Select the Load balancer created -> Go to Listener tab -> View/Edit rules
Verify if default action for HTTP 80 has changed(Check blue line)
- AWS Console에서 Certificate Manager(ACM) 검색 -> List certificates -> Request (Search ACM from AWS Console -> List certificates -> Request)

- Request a public certificate -> Next

- Fully qualified domain name(FQDN)애 사용할 도메인 주소 입력(여러 개의 DNS주소를 사용할 경우 sub domain에 * 사용 권장)
Validation Method는 DNS validation 사용
(Insert the domain that's for use. FYI if using multiple subdomain, would recommend using * and use DNS validation for Validation Method.)
- Key algorithm은 RSA 2048 사용 -> Request(Use RSA 2048 for Key algorithm -> Request)

- List certificates -> Certificate ID 선택(List certificates -> Certificate ID)

- Create records in Route 53 선택(Select create records in Route 53)

- Record 선택 후 Create records(Select the record then create records)

- AWS Console에서 Route 53 검색 -> Dashboard -> Hosted zone(Search Route 53 from AWS Console -> Dashboard -> Hosted zone)

- 구매한 DNS 주소 선택(외부 DNS 호스팅 업체 사용 시 Route 53으로 DNS 서비스 이전)
Select the dns address that you've purchased(If using external dns provider rather than Route 53, migrate DNS service to Route 53)
- 새로운 CNAME 레코드가 생성된 것을 확인(Verify if a new CNAME record is created)

- 다시 ACM으로 돌아와서 Certificate의 Status가 Pending에서 Issued로 변경된 것을 확인
(Go back to ACM and check if Certicate Status changed from Pending to Issued)
- AWS Console에서 EC2 검색 -> 왼쪽 선택 메뉴에서 Load Balancing -> Load Balancers 선택 -> 생성된 Load Balancer 선택 후 Listener 탭으로 이동 -> Add Listener
(Search EC2 from AWS Console -> Choose Load Balancing from sub menu -> Select Load Balancers -> Select the Load Balancer then go to Listener tab -> Add Listener)
이미 https listener가 load balancer에 있을 경우 단계 12 ~ 15번 단계 스킵
(if https listener exists in load balancer, skip step 12 ~15)
13. Protocol은 HTTPS, Port는 443, Default actions는 Forward to 선택 후 Target group은 기존 frontend target group으로 지정
(Choose HTTPS for Protocol, 443 for Port, select Forward to for Default actions then select existing frontend target group as Target group)
 14-1. 엔드유저 세션 유지를 위해 Enable group-level stickiness 체크 후 Stickiness duration은 3 hours로 지정
(To maintain session for end-users, enable group-level stickiness and set 3 hours for Stickiness duration, duration time can vary depending on your needs)
14-2. Secure policy는 'ELBSecurityPolicy-2016-08' 선택 후 Default SSL/TLS certificate은 'From ACM' 선택 및 발급 받은 인증서 선택
(Select 'ELBSecurityPolicy-2016-08 for Secure policy then select the default SSL/TLS certificate issued from AWS 'From ACM')
 15. Add 선택(Select Add)
 16. HTTPS로 리다이렉션하는 규칙을 만들었지만 Security Group에 443 포트가 오픈이 안되어있어 주황색 경고가 떠있는 것을 확인(해당 경고 없을 시 16번 ~ 19번 단계 스킵)
(If you don't see orange alert icon, skip step 16 ~ 19)
 17. 주황색 경고 아이콘 클릭 후 로드밸런서명과 일치하는 Security Group 선택(Select the security group that has orange alert icon)
 18. Security Group 선택 후 Edit inbound rules 선택(Select Security Group and select Edit inbound rules)
 19. Add rule -> Type은 HTTPS -> Source는 Custom으로 지정 후 돋보기 칸에 0.0.0.0/0으로 지정 -> Save rules
(Add rule -> HTTPS as Type -> Set Source as Custom then apply 0.0.0.0/0 0 -> Save rules)
 20. AWS Console에서 Route 53 검색 -> Hosted zones -> Create record
(Search Route 53 from AWS Console -> Hosted zones -> Create record)
 21. Record name에 www 또는 원하는 sub domain 지정 -> Record type은 A 레코드 -> Alias 활성화 ->
Alias to Application and Classic Load Balancer -> ap-northeast-2 -> 알맞는 Load Balancer명 선택 -> Create records
(Use www or subdomain of your choice -> Select A record as Record type -> Activate Alias ->
Alias to Application and Classic Load Balancer -> ap-northeast-2 -> Select the Load balancer created from EKS -> Create records)
 22. 생성한 A 레코드가 정상적으로 등록됬는지 확인(Verify if A record is created)
 23. 애플리케이션이 HTTPS로 정상적으로 동작하는지 확인(Check if HTTPS protocol is working as expected)

- backend-deployment.yaml 파일 확인 및 backend-deployment.yaml 파일을 backend 디렉터리로 이동
(Inspect backend-deployment.yaml file and move backend-deployment.yaml file to backend directory)
cat <<ZZZ> backend-deployment.yaml
apiVersion: apps/v1
kind: Deployment
metadata:
  name: example-backend
  labels:
    app: example-backend
  namespace: backend
spec:
  replicas: 1
  selector:
    matchLabels:
      app: example-backend
  strategy:
    rollingUpdate:
      maxSurge: 25%
      maxUnavailable: 25%
    type: RollingUpdate
  minReadySeconds: 30
  template:
    metadata:
      labels:
        app: example-backend
    spec:
      containers:
      - image: # image from ecr
        name: example-backend
        ports:
        - containerPort: 8082
          protocol: TCP
ZZZ
mv backend-deployment.yaml ./backend/backend-deployment.yaml- backend-deployment.yaml 파일을 사용해 deployment를 backend namespace에 생성(pwd로 현재 경로 확인)
(Create deployment in backend namespace using backned-deploy.yaml file(use pwd to check current path)
kubectl apply -f ./backend/backend-deployment.yaml- backend namespace에 backend deployment가 생성됬는지 확인(Verify if backend deployment is created in backend namespace)
kubectl get deploy example-backend -n backend
kubectl get po -n backend
- backend-service.yaml 파일 확인 및 backend-service.yaml 파일을 backend 디렉터리로 이동
(Inspect backen-service.yaml file and move the backend-service.yaml file to backend directory)
cat <<ZZZ> backend-service.yaml
apiVersion: v1
kind: Service
metadata:
 name: example-backend-internal
 namespace: backend
spec:
 selector:
   app: example-backend
 type: ClusterIP
 ports:
  -  name: https
     protocol: TCP
     port: 443
     targetPort: 8082
ZZZ
mv backend-service.yaml ./backend/backend-service.yaml- backend-service.yaml 파일을 사용해 service를 backend namespace에 생성(Create service in backend namespace using backend-service.yaml file)
kubectl apply -f ./backend/backend-service.yaml- backend namespace에 backend service가 생성됬는지 확인(Verify if backend service is created in backend namespace)
kubectl get svc example-backend -n backend
- example-ingress-backend 파일 확인 및 example-ingress-backend 파일을 backend 디렉터리로 이동
(Inspect example-ingress-backend file and move the example-ingress-backend file to backend directory)
cat <<ZZZ> example-ingress-backend.yaml
apiVersion: extensions/v1beta1
kind: Ingress
metadata:
  name: example-ingress-backend
  annotations:
    kubernetes.io/ingress.class: alb
    alb.ingress.kubernetes.io/scheme: internet-facing
    alb.ingress.kubernetes.io/target-type: ip
    alb.ingress.kubernetes.io/group.name: example-ingress
  namespace: backend
spec:
  rules:
  - host: api.example.com
    http:
      paths:
        - pathType: Prefix
          path: /
          backend:
            serviceName: example-backend-internal
            servicePort: 443

ZZZ
mv example-ingress-backend.yaml ./backend/example-ingress-backend.yaml- example-ingress-backend.yaml 파일을 사용해 ingress를 backend namespace에 생성
(Create ingress in backend namespace using example-ingress-backend.yaml file)
kubectl create -f ./backend/example-ingress-backend.yaml- backend namespace에 backend ingress가 생성됬는지 확인(Verify if backend ingress is created in backend namespace)
kubectl get ingress -n backend
이미 ingress로 생성된 load balancer에 api.example.com 주소로 target group이 잡혀있다면 10~17번 단계 스킵)If there is a target group for api.example.com in load balancer that was created by ingress, skip from step 10~17)- 콘솔로 들어가 AWS ALB에 backend ingress가 target group에 추가됬는지 확인
(Go to console and check AWS ALB's target group if the backend ingress added backend target group)
- api.example.com DNS 주소 앞으로 backend target group이 생성된 것을 확인
(Verify that backend target group is mapped with api.example.com)
- Load balancer 리스너에 https 규칙의 target group에 추가
(Add target group with https rule for the current load balancer's listener)
- https 규칙에 규칙 추가(Add https rule)

- frontend target group 규칙 추가(Add frontend target group)

- 규칙 순서 변경(Modify rule orders)

- backend target group 규칙 추가(Add backend target group)

- 규칙이 잘 적용됬는지 확인(Verify if rules are applied properly)

Verify the connection between frontend and backend service
(If there is a pop-up, connection is good to go!)

reference:
https://www.eksworkshop.com/beginner/085_scaling_karpenter/setup_the_environment
https://karpenter.sh/v0.21.1/getting-started/getting-started-with-eksctl
- Karpenter 설정파일들은 Github 첨부 파일 참조(Check my Github for Karpenter manifest files)
- Karpenter 설치 이후 아래에 보이는 sample yaml로 karpenter의 autoscaling 기능 테스트
(After installing Karpenter, test your Karpenter with the sample yaml file below)
- Karpenter가 노드 개수를 늘리는지 확인 및 replicas 개수 임의로 늘려보기, replicas 개수 늘리는 명령어는 kubectl scale --replicas=<숫자> deployment/<deployment명>
(Increase the number of replicas and check if Karpenter provisions extra node depending on the workload, command for increasing replicas 'kubectl scale --replicas='desired number of replicas' deployment/'your-deployment-name'
apiVersion: apps/v1
kind: Deployment
metadata:
  name: inflate-frontend
spec:
  replicas: 0
  selector:
    matchLabels:
      app: inflate-frontend
  template:
    metadata:
      labels:
        app: inflate-frontend
    spec:
      terminationGracePeriodSeconds: 0
      containers:
        - name: inflate
          image: public.ecr.aws/eks-distro/kubernetes/pause:3.7
          resources:
            requests:                         # Amount of cpu that pod will be assigned to
              cpu: 1
      tolerations:                            # Toleration that bypasses taints that are applied to nodes
      - key: "frontend-workload"
        operator: "Equal"
effect: "NoSchedule"- CPU 사용량(CPU Usage) - Prometheus agent
- sum by (instance) (irate(node_cpu_seconds_total{mode!~"guest.*|idle|iowait", kubernetes_node="$node"}[5m]))

- 메모리 사용량(Memory Usage) - Prometheus agent
- (node_memory_MemTotal_bytes{kubernetes_node="$node"}-node_memory_MemAvailable_bytes{kubernetes_node="$node"})/node_memory_MemTotal_bytes{kubernetes_node="$node"}

- Pod 로그(Pod log) - Loki agent
- {pod="$pod"}
