Each night, using the Allen Telescope Array (ATA) in northern California, the SETI Institute scans the sky at various radio frequencies, observing star systems with known exoplanets, searching for faint but persistent signals. The current signal detection system is programmed to search only for particular kinds of signals: narrow-band carrier waves. However, the detection system sometimes triggers on signals that are not narrow-band signals (with unknown efficiency) and are also not explicitly-known radio frequency interference (RFI). There seems to be various categories of these kinds of events that have been observed in the past.
Our goal is to classify these accurately in real-time. This may allow the signal detection system to make better observational decisions, increase the efficiency of the nightly scans, and allow for explicit detection of these other signal types.
For more information refer to SETI hackathon page.
When you’ve completed this pattern, you will understand how to:
- Convert signal data into image data
- Build and train a convolutional neural network
- Display and share results in Jupyter Notebooks
This pattern will assist application developers who need to efficiently build powerful deep learning applications and use GPUs to train the model quickly.

- The developer loads the provided notebooks to run on a PowerAI system on Nimbix Cloud.
- The SETI dataset demonstrates a use case of recognizing different classes of radio signals from outer space.
- The training notebook uses TensorFlow with convolutional neural networks to train a model and build a classifier.
- The prediction notebook demonstrates the accuracy of the classifier.
Follow these steps to setup and run this code pattern. The steps are described in detail below.
- Get 24-hours of free access to the PowerAI platform
- Access and start the Jupyter notebooks
- Run the notebooks
- Analyze the results
- Save and share
- End your trial
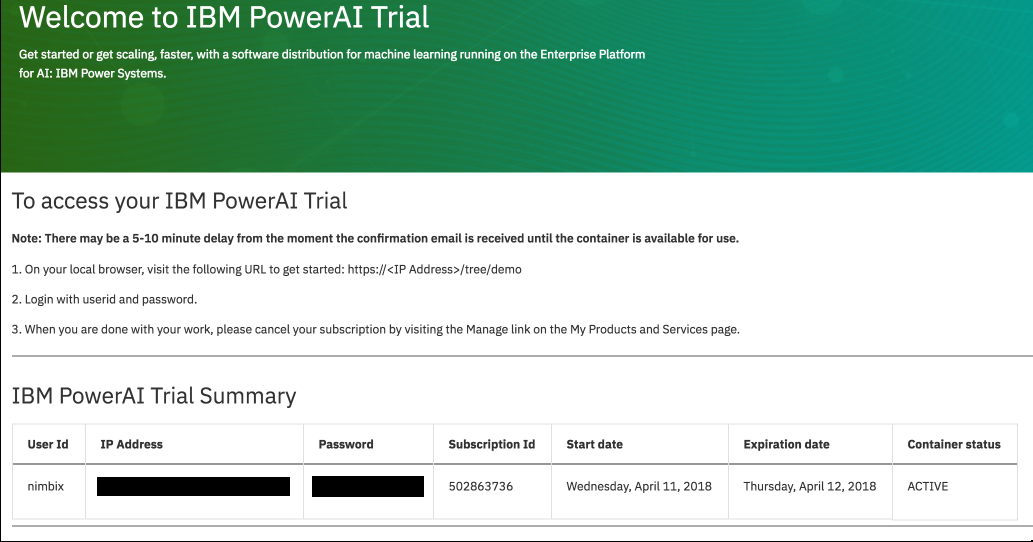
IBM has partnered with Nimbix to provide cognitive developers a trial account that provides 24-hours of free processing time on the PowerAI platform. Follow these steps to register for access to Nimbix to try the PowerAI code patterns and explore the platform.
-
Go here and follow the instructions to register for your free trial.
-
Use the welcome page (or confirmation email) to determine when your container is "ACTIVE" and collect the following information:
- IP Address (might be fully qualified domain name)
- User Id
- Password
-
Take the IP Address (FQDN) and use your local browser to go to
https://<IP Address>. -
Login with the User Id and Password.
-
Get a new terminal window by clicking on the
Newpull-down and selectingTerminal.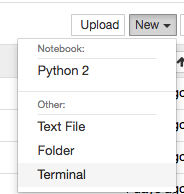
-
When using the free trial, a 4-hour timeout will cause you to lose data that is not in the
/datadirectory. Create apatternsdirectory under/dataand a symbolic link for that directory under/usr/local/samples/as follows:mkdir /data/patterns ln -s /data/patterns /usr/local/samples/ -
Use
git cloneto download the example notebook, dataset, and retraining library into/data/patterns:cd /data/patterns git clone https://github.com/IBM/powerai-seti-signal-classification
-
Once done, you can exit the terminal and return to the notebook browser. Use the
Filestab. From the root folder, click onpatterns,powerai-seti-signal-classification, and thennotebooks.
-
If your container is paused (after 4 hours) and you resume it, your data will still be under
/data. Recreate the symbolic link for it to show up in the Jupyter files tree.ln -s /data/patterns /usr/local/samples/


When a notebook is executed, what is actually happening is that each code cell in the notebook is executed, in order, from top to bottom.
Each code cell is selectable and is preceded by a tag in the left margin. The tag
format is In [x]:. Depending on the state of the notebook, the x can be:
- A blank, this indicates that the cell has never been executed.
- A number, this number represents the relative order this code step was executed.
- A
*, this indicates that the cell is currently executing.
There are several ways to execute the code cells in your notebook:
- One cell at a time.
- Select the cell, and then press the
Playbutton in the toolbar.
- Select the cell, and then press the
- Batch mode, in sequential order.
- From the
Cellmenu bar, there are several options available. For example, you canRun Allcells in your notebook, or you canRun All Below, that will start executing from the first cell under the currently selected cell, and then continue executing all cells that follow.
- From the
To complete the code pattern, run the training and prediction notebooks in this order:
- seti_cnn_tf_training.ipynb
- seti_predition.ipynb
First, we read the Basic 4 dataset, converted signals into images, and saved them in MNIST format. Now our signal classification problem has become an image classification problem. We split the MNIST data into train and test datasets and stored the results.

The training and prediction notebooks use our stored results, so you can skip the data preparation step. You can review an example notebook from the data preparation step here.
In the seti_cnn_tf_training.ipynb notebook, we use the famous SETI Dataset to build a convolutional neural network (CNN) able to perform signal classification. The CNN will determine, with some associated error, what type of signal is presented.
The notebook combines code with documentation to describe the steps and the training of the CNN model.
Run this notebook. The PowerAI free trial does not include GPUs, so training is slower. We'll use a lower number of epochs to finish faster, but this will hurt accuracy.


To create a production model for a problem of this size, you would want to run a higher number of epochs using PowerAI with one or more GPUs.
In the seti_prediction.ipynb notebook, we will use the trained model to predict the signal class. Run this notebook after the training notebook has completed.

Notice that the accuracy started at 25% (1 in 4) and improved considerably. Accuracy will continue to improve with more training time (more epochs). See below for some benchmarks that we ran with GPUs.
Convolutional neural networks involve a lot of matrix and vector multiplications that can be parallelized. GPUs can improve performance, because GPUs were designed to handle these operations in parallel!
A single core CPU takes a matrix operation in serial, one element at a time, but a single GPU could have hundreds or thousands of cores, while a CPU typically has no more than a few cores.
It is important to notice that if both CPU and GPU are available on the machine that you are running the notebook, and if a TensorFlow operation has both CPU and GPU implementations, the GPU devices will be given priority when the operation is assigned to a device.
In our case, as we are running this notebook on IBM PowerAI, you may have access to multiple GPUs, but let's use one of the GPUs in this notebook, for the sake of simplicity.
Note: If you are running the free trial, you would expect to have zero GPUs. This notebook will work, but the training will be slow.
The accuracy will start at 25% (1 in 4 classes) and gradually improves with training. With the free trial service on Nimbix Cloud, we're seeing accuracy over 50% after 75 minutes with 50 epochs.
The performance improves with GPUs -- allowing us to improve accuracy considerably. We've captured some benchmarks after more epochs running with single and multiple GPUs.
| CPU Architecture | CPU cores | Memory | GPU | Step time (sec/batch) | Accuracy |
| POWER8 | 40 | 256 GB | 1 x Tesla K80 | ~0.127 | ~72% at 75K steps (3 hours) |
| POWER8 | 32 | 128 GB | 1 x Tesla P100 w/NVLink np8g4 | ~0.035 | ~72% at 75K steps (1 hour) |
| CPU Architecture | CPU cores | Memory | GPU | Step time (sec/batch) | Accuracy |
| POWER8 | 160 | 1 TB | 4 x Tesla K80 | ~0.066 | ~72% at 75K steps (83 minutes) |
| POWER8 | 64 | 256 GB | 2 x Tesla P100 w/NVLink np8g4 | ~0.033 | ~72% at 75K steps (40 minutes) |
| POWER8 | 128 | 512 GB | 4 x Tesla P100 w/NVLink np8g4 | ~0.017 | ~72% at 75K steps (20 minutes) |
Because this notebook is running temporarily on a Nimbix Cloud server, use the following options to save your work:
Under the File menu, there are options to:
Download as...will download the notebook to your local system.Print Previewwill allow you to print the current state of the notebook.
When you are done with your work, please cancel your subscription by visiting the Manage link on the My Products and Services page.
This code pattern is licensed under the Apache License, Version 2. Separate third-party code objects invoked within this code pattern are licensed by their respective providers pursuant to their own separate licenses. Contributions are subject to the Developer Certificate of Origin, Version 1.1 and the Apache License, Version 2.