LB to forward User's req to the Backend Service that is closet to user.
User <------------ Amor ----- Proxy, LB ----- POP(point of presence, edge of Cloud) ------- FW ----------> Service (Instance Group -> Instance)
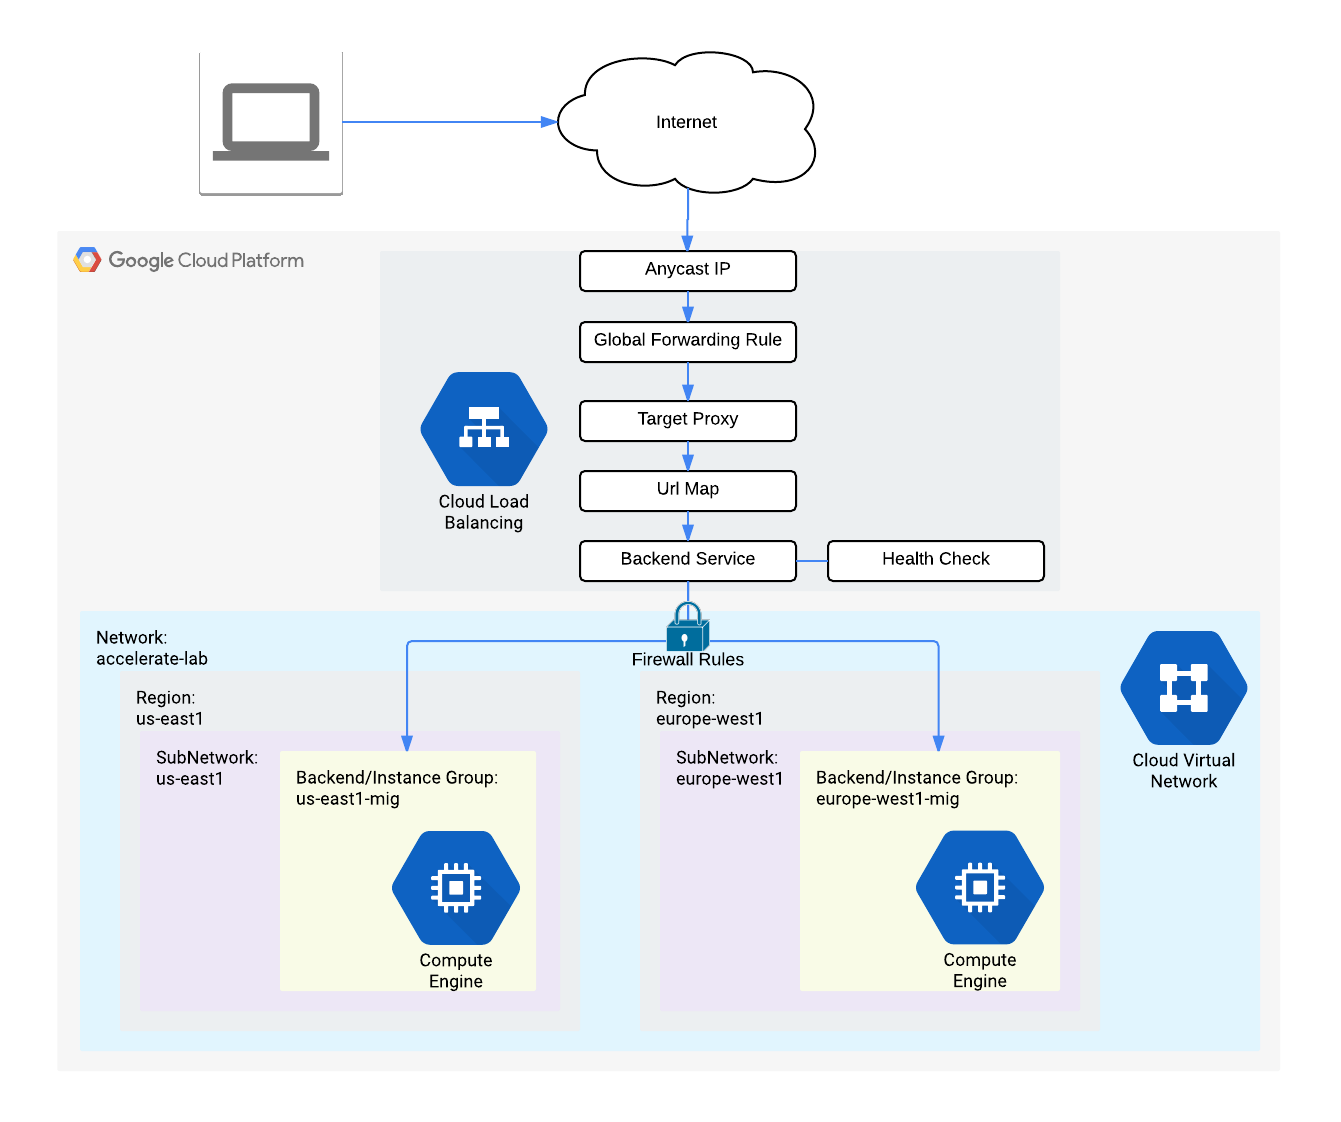
Google Cloud HTTP(S) load balancing is implemented at the edge of Google's network in Google's points of presence (POP) around the world. User traffic directed to an HTTP(S) load balancer enters the POP closest to the user and is then load balanced over Google's global network to the closest backend that has sufficient capacity available.
Cloud Armor IP allowlist/denylist enable you to restrict or allow access to your HTTP(S) load balancer at the edge of the Google Cloud, as close as possible to the user and to malicious traffic. This prevents malicious users or traffic from consuming resources or entering your virtual private cloud (VPC) networks.
In this lab, you configure an HTTP Load Balancer with global backends, as shown in the diagram below. Then, you stress test the Load Balancer and denylist the stress test IP with Cloud Armor.
(1) setup FW rules (connection to Backend)
(2) create GCE instance Templates
(3) create GCE instance Group
(4) check/explore External IP of the VM instance (part of the instance group in step 3)
(5) config Backend Service for Load Balancer
(6) config Frontend Service for Load Balancer
(7) note the IPv4/IPv6 of the LB_IP (IP will be client IP, and Host.Location as InstanceGroupName.Zone)
(8) make a VM to do test for the Load Balancer
(9) monitor network flow from user(vm created in step 8 to backend service created in step 5)
(10) stop Request Test to LB

(11) use Amor Security Policy for LB
(12) test Amor
from step 1
config FW for Backend
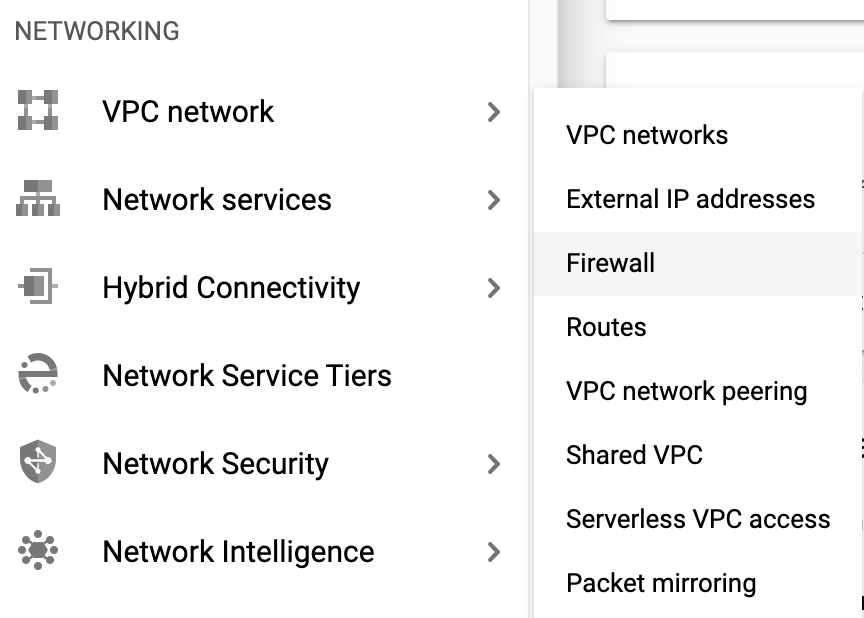
- 1.1, in cloud console, navigate to Network >> VPC >> FW
-
1.2, to create FW rule, and check rules for internal, RDP, SSH, ICMP, then config the value for the property.
      Property	       Value (type value or select option as specified)
      Name	       default-allow-health-check
      Network	       default
      Targets	       Specified target tags
      Target tags	       http-server
      Source filter	IP Ranges
      Source IP ranges	130.211.0.0/22, 35.191.0.0/16
      Protocols and ports	Specified protocols and ports, and then check tcp
from step 2
create GCE instance templates
-
2.1, in cloud console, navigate to GCE >> instance template, type template's name, then click on the "Mgmt & Disk & Network", and click on "managment" tab.
Key Value startup-script-url gs://cloud-training/gcpnet/httplb/startup.sh -
tips & attentions, script below is for startup of the instance template, which is called as Metadata in console.
#! /bin/bash apt-get update apt-get install -y apache2 php apt-get install -y wget cd /var/www/html rm index.html -f rm index.php -f wget https://storage.googleapis.com/cloud-training/gcpnet/httplb/index.php META_REGION_STRING=$(curl "http://metadata.google.internal/computeMetadata/v1/instance/zone" -H "Metadata-Flavor: Google") REGION=`echo "$META_REGION_STRING" | awk -F/ '{print $4}'` sed -i "s|region-here|$REGION|" index.php -
2.2, click on "networking" tab, to config its network properties, and wait for the instance template to be created.
Property Value (type value or select option as specified) Network default Subnet default (us-east1) Network tags http-server -
tips & attentions:
The network tag http-server ensures that the HTTP and Health Check firewall rules apply to these instances template.
-
2.3, copy its property to new instance template, and name it, then change its subnet.
 Now create another instance template for subnet-b by copying us-east1-template.

 For Network interfaces, select default (europe-west1) as the Subnet.
from step 3:
create GCE instance Group.
-
3.1, in cloud console, navigate to GCE >> instance group.
Property Value (type value or select option as specified) Name us-east1-mig[group name] Location Multiple zones Region us-east1 Instance template us-east1-template [gce instance template name] Autoscaling > Autoscaling metrics > Metric type CPU utilization Target CPU utilization 80 Minimum number of instances 1 Maximum number of instances 5 (auto scale up depends on traffic performance) Cool-down period 45 -
tips & attentions:
Managed instance groups offer Autoscaling capabilities that allow you to automatically add or remove instances from a managed instance group based on increases or decreases in load.
Autoscaling helps your app gracefully handle increases in traffic and reduces cost when the need for resources is lower. You just define the autoscaling policy and the autoscaler performs automatic scaling based on the measured load.
- 3.3, create another instance group, and name it europe-west1-mig, and use europe-west1-template.
start from step 4:
create GCE instance using GCE instance template, and explore its External IP addr.
-
4.1, in cloud console, navigate to GCE >> VM instance.
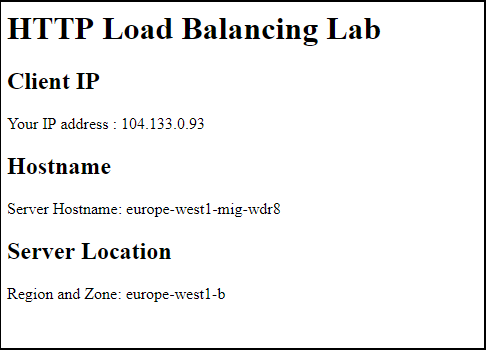
  Notice the instances that start with us-east1-mig and europe-west1-mig.

  These instances are part of the managed instance groups.

  And click on the External IP of the instance created.

  [output is Client IP and Hostname.Location as InsatanceGroupName.Zone]
start from step 5:
LB config (Backend Service)
-
5.1, in cloud console, navigate to Network >> LB
Select From Internet to my VMs, and click Continue. Set the Name to http-lb [any name you like]. -
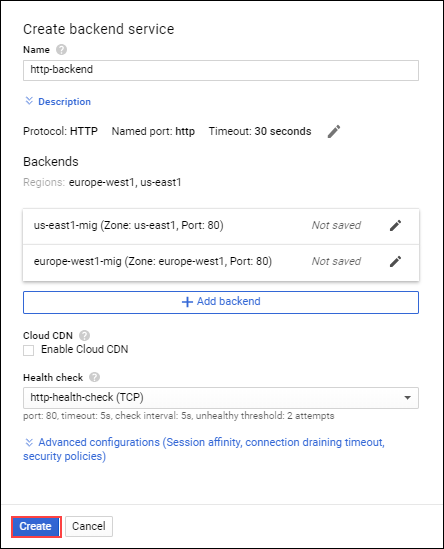
5.2, then click on "Backend Services Config". For Backend services & backend buckets, click Create or select backend services & backend buckets, then click Backend services, and then click Create a backend service, and config its properties.
Property Value (select option as specified) Name http-backend [LB's Backend Service Name] Instance group us-east1-mig Port numbers 80 Balancing mode Rate Maximum RPS 50 Capacity 100 [output] -
tips & attentions:
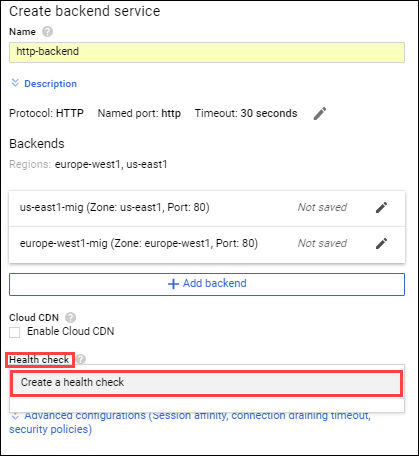
Backend services direct incoming traffic to one or more attached backends. Each backend is composed of an instance group and additional serving capacity metadata.
This configuration means that the load balancer attempts to keep each instance of us-east1-mig at or below 50 requests per second (RPS).
-
5.3, then create a health check rule for this LB's Backend Service.
      Property	Value (select option as specified)
      Name	http-health-check
      Protocol	TCP
      Port	80

      [output]
start from step 6:
LB config (Frontend Service)
The host and path rules determine how your traffic will be directed. For example, you could direct video traffic to one backend and static traffic do another backend. (we pass it in this step.)
-
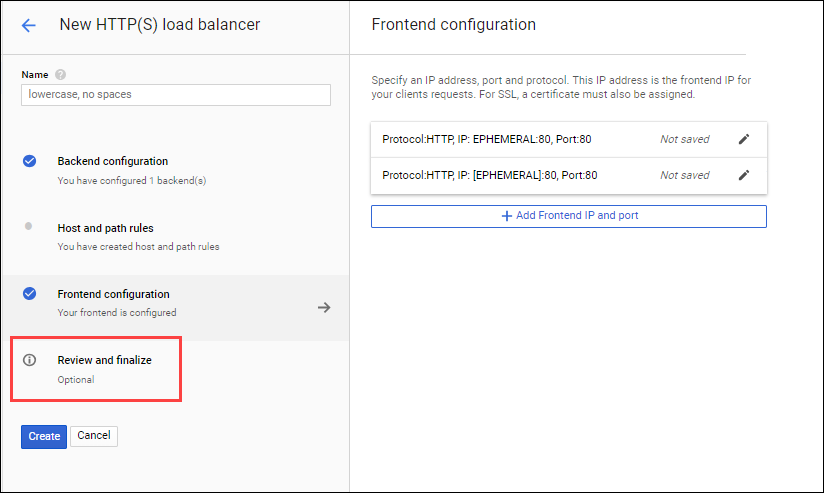
6.1, click on "frontend config", and set up its properties, and leave all value as default.
Property Value (type value or select option as specified) Protocol HTTP IP version IPv4 IP address Ephemeral Port 80 -
6.2, click on "add frontend ip and port", and leave all value as default.
Property Value (type value or select option as specified) Protocol HTTP IP version IPv6 IP address Ephemeral Port 80 -
tips & attentions:
HTTP(S) load balancing supports both IPv4 and IPv6 addresses for client traffic. Client IPv6 requests are terminated at the global load balancing layer, then proxied over IPv4 to your backends.
start from step 7:
explore LB IP
-
7.1, After Review and Finalize the Load Balancer, then click on "Create".
-
7.2, Name the Load Balancer, and find its IP addr.Click on the name of the load balancer (http-lb). Note the IPv4 and IPv6 addresses of the load balancer for the next task. They will be referred to as [LB_IP_v4] and [LB_IP_v6], respectively.
-
tips & attentions:
It might take up to 5 minutes to access the HTTP Load Balancer. In the meantime, you might get a 404 or 502 error. Keep trying until you see the page of one of the backends.
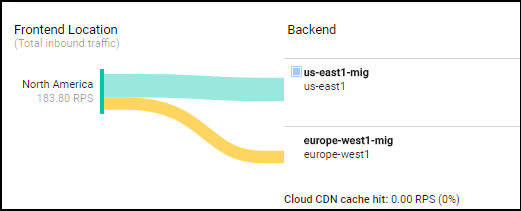
Depending on your proximity to us-east1 and europe-west1, you traffic is either forwarded to a us-east1-mig or europe-west1-mig instance.
If you have a local IPv6 address, try the IPv6 address of the HTTP Load Balancer by navigating to http://[LB_IP_v6]. Make sure to replace [LB_IP_v6] with the IPv6 address of the load balancer.
start from step 8:
To Do Test.
-
8.1, create a new VM instance (we hereby set it to us-west), later on, we will connect it to Backend in us-east1 (location=zone) & europ-west1 (location=zone).
Property Value (type value or select option as specified) Name siege-vm Region us-west1 Zone us-west1-c -
tips & attentions:
Given that us-west1 is closer to us-east1 than to europe-west1, traffic should be forwarded only to us-east1-mig (unless the load is too high).
-
8.2, For siege-vm, click SSH to launch a terminal and connect in cloud console.
-
8.3, in cloud shell, type cmd line below.
    sudo apt-get -y install siege

    export LB_IP=[LB_IP_v4]

    siege -c 250 http://$LB_IP

    [output]

    New configuration template added to /home/cloudcurriculumdeveloper/.siege
    Run siege -C to view the current settings in that file
    [alert] Zip encoding disabled; siege requires zlib support to enable it: No such file or directory
   ** SIEGE 4.0.2
   ** Preparing 250 concurrent users for battle.
   The server is now under siege...
start from step 9:
Monitor Network Flow for LB
-
9.1, in cloud console, navigate to Network >> LB >> Backend >> [Backend Service Name].
[output in UI]
start from step 10:
Stop Req to LB
-
10.1, Return to the SSH terminal of siege-vm, and press CTRL+C to stop siege.
-
10.2, to explore External IP of the siege-vm. In the Console, navigate to Navigation menu (mainmenu.png) > Compute Engine > VM instances. Note the External IP of the siege-vm. This will be referred to as [SIEGE_IP].
start from step 11:
Make usage of Armor for LB
-
11.1, in cloud console, navigate to Network >> Security >> Cloud Armor, config it and add rule.
Property Value (type value or select option as specified) Name denylist-siege Default rule action Allow -
11.2, add rule.
Property Value (type value or select option as specified) Condition Enter the SIEGE_IP // copy ip which shows in step 10.2 Action Deny Deny status 403 (Forbidden) Priority 1000 -
11.3, finish the config after select Load balancer backend service for Type, and select http-backend for Target.
start from step 12
Test Amor (within its DenyList)
-
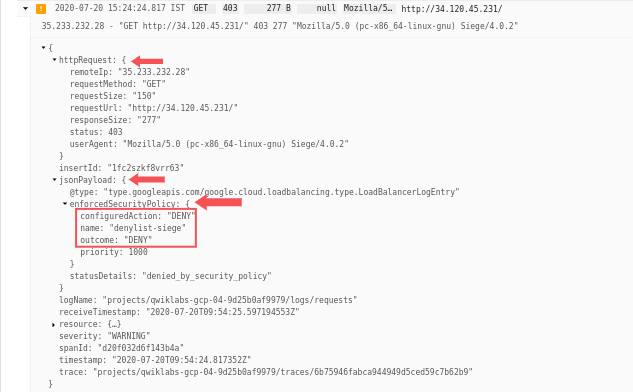
12.1, return to ssh of the siege-vm, and test connectivity with LB.
curl http://$LB_IP [output is 404] <!doctype html><meta charset="utf-8"><meta name=viewport content="width=device-width, initial-scale=1"><title>403</ title>403 Forbidden siege -c 250 http://$LB_IP [output: los shows the the traffic is blocked due to security policy] [alert] Zip encoding disabled; siege requires zlib support to enable it ** SIEGE 4.0.2 ** Preparing 250 concurrent users for battle. The server is now under siege... [to see Log Entry of siege-vm req to LB] -
12.2, test normal browser's connectivity to LB.
Open a new tab in your browser and navigate to http://[LB_IP_v4]. Make sure to replace [LB_IP_v4] with the IPv4 address of the load balancer.
  [output]
  You can access the HTTP LB from your browser because of the default rule to allow traffic;
  however, you cannot access it from the siege-vm because of the deny rule (Amor) that you implemented.
1232