3D game using minilibx library
To create 3D projection of a 2D map using raycasting and DDA algorithm.
-
The calculations used in the program are based on the permadi's raycasting tutorial. We have used the images from the same article here for better understaning.
-
For textures Lode's tutorial
To apply raycasting we divide the player's view into multiple segments and find the distance at which the corresponding ray in each segment hits a wall. Using this information we create projections.
Considerations:
- Screenwidth = 640
- Screenheight = 400
- FOV(field of view) = 60
- GRID = 64
- alpha = angle each ray forms with the x axis.
By knowing the field of view and width of the projection plane we can calculate the distance between player and the projection plane and angle between subsequent rays.
(half of screenwidth) / distance to projection plane = tan(30°)
distance to projection plane = 160 /tan(30°)
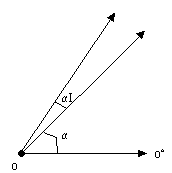
Angle between subsequent rays = fov / screenwidth = 60/640
If the person is facing NORTH(90°), then the leftmost ray will be at an angle (90°+30°) and the rightmost ray will be at an angle(90°-30°) We start from the leftmost ray.
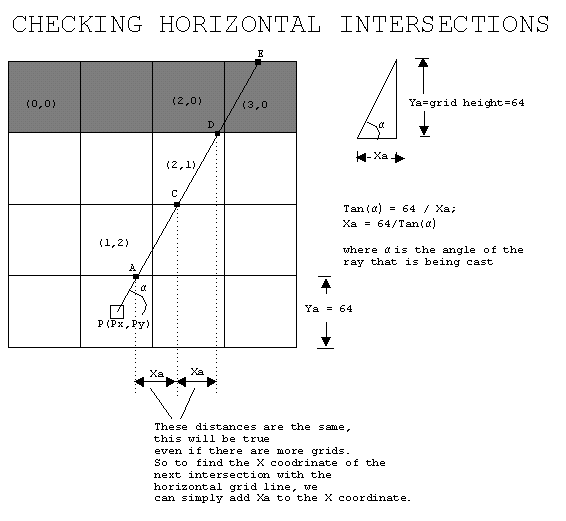
STEP 1 :Find coordinates of first hit on y axis (A.x,A.y):
A.y = floor(P.y/GRID) * GRID - 1 (If the ray is facing UP)
- P.y is distance of player in y direction
- floor(P.y/GRID) -> gives closest y coordinate
- floor(P.y/GRID) * GRID -> gives distance to closest y coordinate
- floor(P.y/GRID) * GRID - 1 -> we do not want the value to be on the grid line
A.x = P.x + dist between P.x and A.x
A.x = P.x + (P.y - A.y)/tan(alpha)
STEP 2 : check if (A.x,A.y)is a wall. If yes, got to step 4.
STEP 3 : Increament A.y in steps, find coressponding A.x. Continue this till it hits a wall.
C.y = A.y - GRID
C.x = A.x + GRID/tan(alpha)
(C.x,C.y)is not a wall so find (D.x, D.y)
D.y = C.y - GRID
D.x = C.x + GRID/tan(alpha)
STEP 4 : Once a wall is hit, we can calculate the distance to the point D using pythagorean theorem
PD = sqrt((P.x - D.x)(P.x - D.x) + (P.y - D.y)(P.y - D.y))
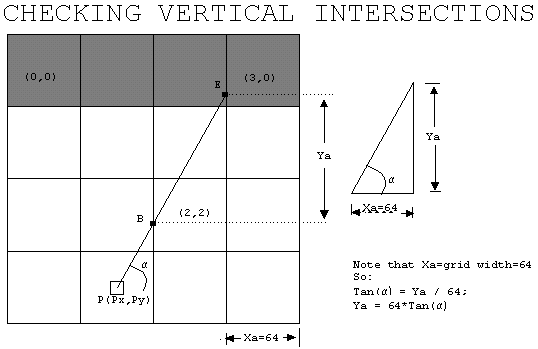
STEP 5 :Now find coordinates of first hit on x axis (B.x,B.y) and repeat the steps above to get distance PE
Now find the height of projection using the following formula
Projected height / Distance of the player to projection plane = Actual wall height / Distance to wall
Projected Height = (Distance of the player to projection plane * Actual wall height) / Distance to wall
-
Distance of the player to projection plane. - we calculated this earlier(160 /tan(30°))
-
Actual wall height - height of the grid (64). We assume each wall unit is 64x64x64
-
Distance to wall - length of the ray when it hits the wall. This PD or PE whichever is smaller.
We have used Lode's tutorial for texturing of wall.
- Check at which x-coordinate or y-coordinate the ray hits the wall
- Based on this information find the x-coordinate of the texture that needs to be rendered in that position.
- Find the rate(step size) at which projected height needs to be increased for 1 pixel increase in texture.
- Each time step is increased, get the color value for that particular pixel in the texture and store it in a buffer.
- Once all pixel values are stored in the buffer display it on the window.
To allow motion, two more attributes are needed, the player’s movement speed and the player’s turning speed. The player’s movement speed defines how many units the player should move(displacement). The player’s turning speed (measured in angle) defines how many angle to be added or subtracted when the player is turning.
MOVING FORWARD & BACKWARD
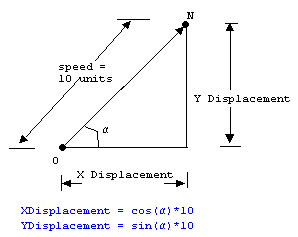
We have define the player’s movement speed to be 5 units. (This can be any number; but the larger number, the less smooth the movement will appear.) The process of finding the x and y displacement is illustrated below.
- If the player is moving forward, we add the XDisplacement to the current player’s X coordinate and add Ydisplacement to the current player’s Y coordinate.
- If the player is moving backward, we subtract the XDisplacement to the current player’s X coordinate; and subtract Ydisplacement to the current player’s Y coordinate.
- Also check for boundaries walls so that the player won’t go outside the map or walk through it.
Here, in the image, the displacement is 10 units.
TURNING
The process of turning is very simple to implement. All we need to do is to add or subtract an angle increment to the current player’s viewing angle (wrap around whenever the turn goes to a full circle). Again, larger angle increment will cause the movement appear less smooth (We have used 10° units to be used as turning speed).
Things to be handled
- The program must take as a first argument a scene description file with the .cub extension.
- The map must be composed of only 6 possible characters: 0 for an empty space, 1 for a wall, and N,S,E or W for the player’s start position and spawning orientation.
- The map must be closed/surrounded by walls, if not the program must return an error.
- Except for the map content, each type of element can be separated by one or more empty line(s).
- Except for the map content which always has to be the last, each type of element can be set in any order in the file.
- Except for the map, each type of information from an element can be separated by one or more space(s).
- The program must be able to set the floor and ceiling colors to two different ones.
- The program displays the image in a window and respects the following rules:
- The left and right arrow keys of the keyboard must allow you to look left and right in the maze.
- The W, A, S, and D keys must allow you to move the point of view through the maze.
- Pressing ESC must close the window and quit the program cleanly.
- Clicking on the red cross on the window’s frame must close the window and quit the program cleanly.
- The colors for floor and ceiling will be defined as RGB in range of [0,255]: 0, 255, 255
- The textures for the four walls (NO, SO, WE, EA) is passed as path is also provided in the map.
- If any misconfiguration of any kind is encountered in the file, the program must exit properly , without leaks and return an error message.
We have done only 1 part of the bonus: Rotate the point of view with the mouse.
Using mlx_hook, we execute mouse movement evvent. The first thing to do is fix the mouse position to the center of the screen. Based on the position of the cursor(x and y) we add and offset angle as we did for the turning the player around using arrow keys.


