Azure PaaS Implementation using Lambda Architecture of Cisco Meraki In-Store Location Analytics
https://meraki.cisco.com/solutions/location-analytics
Cisco Meraki Location Analytics displays real-time location statistics to improve customer engagement and loyalty across sites, and is built-in to Cisco Meraki APs with no additional cost or complexity. Data collected by APs is synced with the Cisco Meraki cloud with the flexibility to feed data into custom applications. Integrate with back-end CRM, drive in-store customer engagement through push notifications, or alert staff to VIP customer visits.
This solution doesn't need real-time Cisco Meraki setup as it's already got sample data required for end-to-end testing.
For proper real-time setup please see the following link to get the integration working: https://meraki.cisco.com/technologies/location-analytics-api
This solution is not production ready as it requires security hardening and relevant scaling based on specific customer environments. Also, this will give you end-to-end plumbing of required Azure components to get started with basic visualistions / Insights, which can be extended based on requirements.
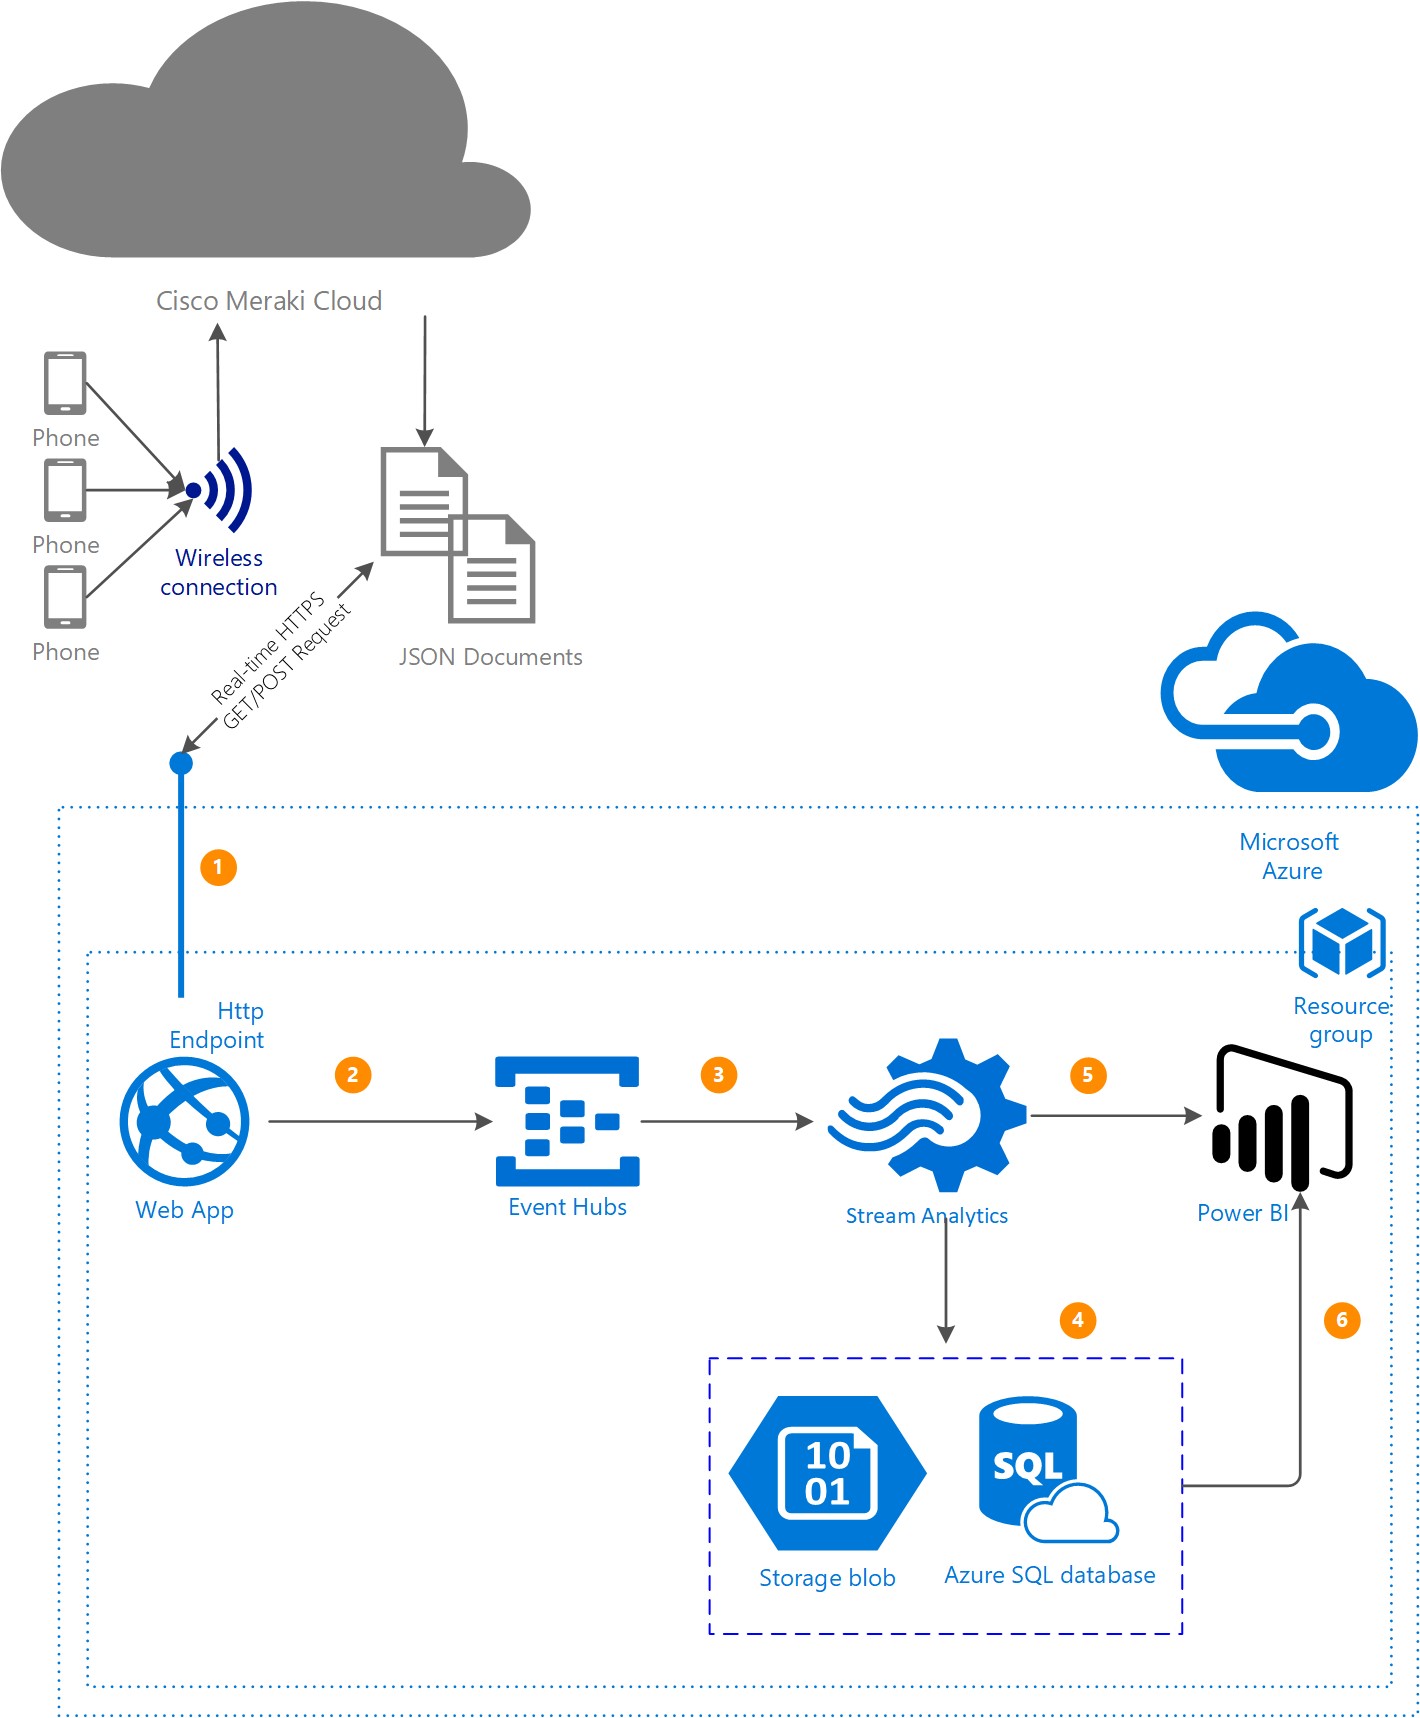
This solution is a quick demonstration of the art of possible for any smart buildings, retail stores, universities, hospitals equipped with WAPs (Wireless Access Points) using Azure PaaS offering. It enables data ingestion omitted through user mobile devices into Azure Cloud via Meraki Cloud API for analytical purposes i.e.
- Foot-Fall Analysis
- Staff Optimisation
- Store Layout Optimisation
- Product Recommendation
- Many other advance use cases
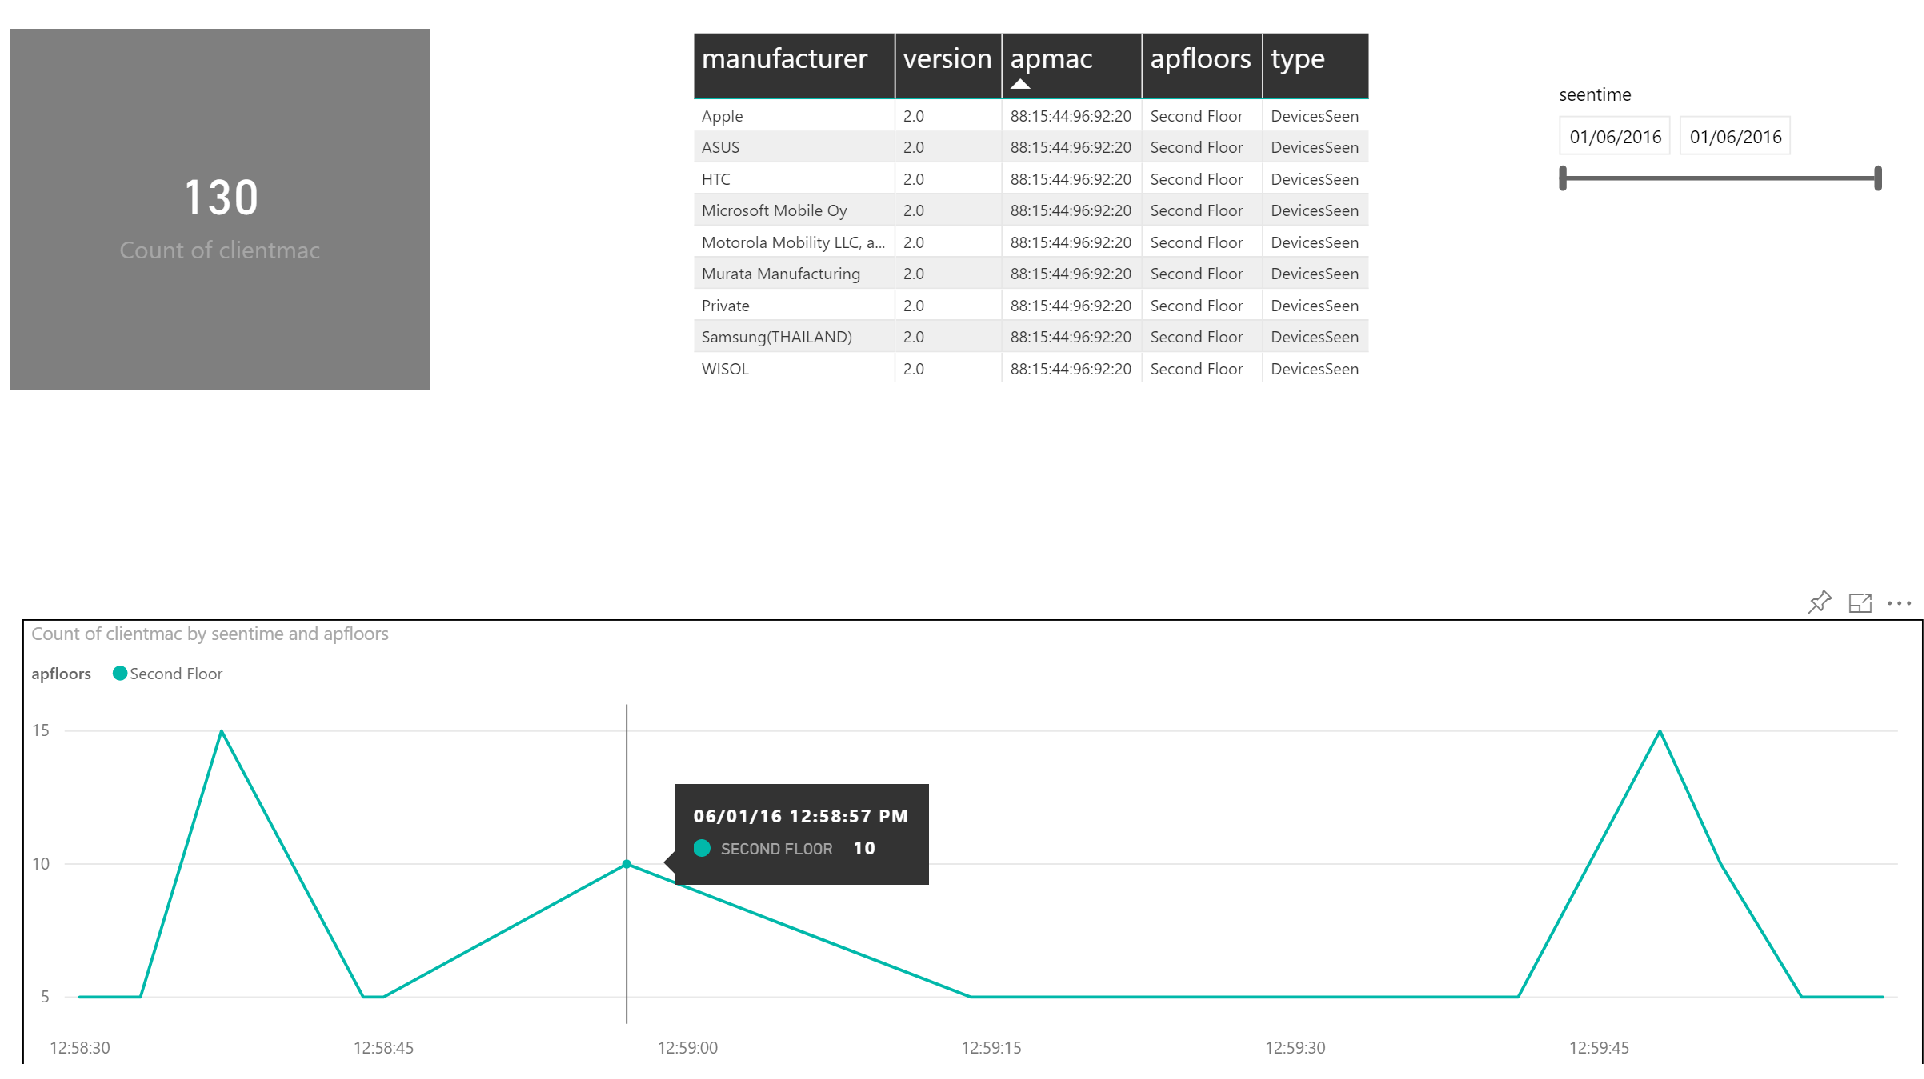
Along the way you will also be exposed to a number of other Azure components, namely Event Hub, Stream Analytics, and Power BI. When everything is successfully deployed and running, the final result will be a PowerBI dashboard showing the following Line chart for real time footfall captured via user mobile devices and further Dashboard visualisations can be added after batch aggregation / analysis.
Note: This solution is pre-configured with the Cisco Meraki settings but can be very easily tailored for other manufacturers.
- Microsoft Azure subscription with login credentials
- PowerBI subscription with login credentials
- A local installation of Visual Studio 2015 with SQL Server Data Tools (SSDT)
- Azure SDK
- Nuget Package installtion of "WindowsAzure.ServiceBus" & "WindowsAzure.Storage" from within Visual Studio 2015 -->Project-->Manage NuGet Packages menu option
Below are the steps to deploy the use case into your Azure subscription.
Clone or download the code from Github repositry and open the solution file in Visual Studio 2015. It will look like the following:

Note: Deploy the Azure Components in the following order.
https://docs.microsoft.com/en-us/azure/storage/storage-introduction#blob-storage
- Parameters
- Right-Click on MerakiStorage Project in Solution Explorer
- Change: LOCATION: [LOCATION] (The region where everything will be deployed) and Other properties as needed
- Click: Edit Paramters (If you need to change default values)
- Click: OK
https://docs.microsoft.com/en-us/azure/storage/storage-introduction#blob-storage
- Parameters
- Right-Click on MerakiSQL Project in Solution Explorer
- Change: LOCATION: [LOCATION] (The region where everything will be deployed) and Other properties as needed
- Click: Edit Paramters (If you need to change default values)
- Click: OK
Next you need to create the following table in the AZURE SQL DB. You can do this by following these steps:
- Start Visual Studio. Note that you must have installed the SQL Server Data Tools.
- Select: View: SQL Server Object Explorer
- Right click: SQL Server
- Click: Add SQL Server...
- Type: Server Name: merakiservertest.database.windows.net
- Select: Authentication: Sql Server Authentication
- Type: User name: CiscoTest
- Type: Password: Meraki121121#
- Select: Database Name: merakidb
- Click: Connect
- Right click: merakidb
- Select: New Query...
- Copy and paste:
CREATE TABLE [dbo].[tblMeraki] ( [Id] INT IDENTITY (1, 1) NOT NULL, [Version] VARCHAR (5) NULL, [Secret] VARCHAR (50) NULL, [Type] VARCHAR (20) NULL, [apFloors] VARCHAR (50) NULL, [apTags] VARCHAR (50) NULL, [apMac] VARCHAR (50) NULL, [manufacturer] VARCHAR (50) NULL, [lng] DECIMAL (18) NULL, [lat] DECIMAL (18) NULL, [x] DECIMAL (18) NULL, [y] DECIMAL (18) NULL, [unc] DECIMAL (18) NULL, [seentime] DATETIME NULL, [ssid] VARCHAR (50) NULL, [os] CHAR (10) NULL, [clientMac] VARCHAR (50) NULL, [seenEpoch] VARCHAR (50) NULL, [rssi] VARCHAR (50) NULL, PRIMARY KEY CLUSTERED ([Id] ASC) );
- Click: Execute
https://docs.microsoft.com/en-us/azure/event-hubs/event-hubs-what-is-event-hubs
This is currently created with 1 Throughput Unit.
- Parameters
- Right-Click on MerakiEventHub Project in Solution Explorer
- Change: LOCATION: [LOCATION] (The region where everything will be deployed) and Other properties as needed
- Click: Edit Paramters (If you need to change default values)
- Click: OK
Before deploying the web app go to Event Hubs in the portal grab the Connection String Primary from under Consumer groups section by clicking on Shared access policies--> ManagePolicy

After grabbing that paste that in the project within Handler.ashx file where the Event Hub connection string currently applied, finally, Rebuild the project for the settings to apply.
Now, follow the steps below to deploy the MerakiWebApp project:
- Parameters
- Right-Click on MerakiWebAPP Project in Solution Explorer
- Change: LOCATION: [LOCATION] (The region where everything will be deployed) and Other properties as needed
- Click: Edit Paramters (If you need to change default values)
- Click: OK
https://docs.microsoft.com/en-us/azure/stream-analytics/stream-analytics-introduction
- Parameters
- Right-Click on MerakiStreamAnalytics Project in Solution Explorer
- Change: LOCATION: [LOCATION] (The region where everything will be deployed) and Other properties as needed
- Click: Edit Paramters (If you need to change default values)
- Click: OK
For further details on how to create Inputs/Outputs for Stream Analytics refer to following links https://docs.microsoft.com/en-gb/azure/stream-analytics/stream-analytics-define-inputs#create-data-stream-input-from-event-hubs https://docs.microsoft.com/en-gb/azure/stream-analytics/stream-analytics-define-outputs
Browse: https://portal.azure.com
- Click: STREAM ANALYTICS > streamanalyticsjob[unique] > Click on Query > Goto solution explorer look for StreamAnalyticsJobQuery.sql file under scripts folder > Copy and paste that in the Query window
- Select: Add Inputs / Outputs based on following diagram with same names specified to match the query outputs
- Click: Finish > Start > Finish (You do not need to specify a custom time)

In Order to confirm that all the above plumbing of Azure components is working as expected before visualising the Real-time output in Power BI would required a quick test as following:
Download or Install either Fiddler / Postman or any web debugger tool for creating Http GET/POST requests: https://www.telerik.com/download/fiddler
-
Goto Solution explorer and copy the test data from "merakitestdata.json" file under scripts and paste in the Request Body of the fiddler tool as shown in the following image:
-
Get the ** deployed MerakiCisco website URL** from Azure Portal for the deployed web app and paste it in the URL section under "Composer Tab" next to POST method (as highlighted in the image)

-
If the test shows "Status" 200 as shown in the image then all the integration worked as expected and outputs can be visualised using the following Power BI Setup.

- Browse: https://powerbi.microsoft.com
- Click: Sign in (Login with your credentials)
- Show: The navigation pane
- Click: meraki (Under the Datasets folder > Line chart # Under Visualizations)
- Drag: seentimeime: To: Axis
- Drag: apfloors: To: Legend
- Drag: clientmac: To: Values
- Click: Save
- Type: Name: MerakiReport
- Click: Save > Pin visual (pin icon on upper-right)
- Select: New dashboard
- Type: Name: MerakiDashboard
- Click: Pin
- Use Https for communication between Meraki API and Web APP Endpoint (Currently going through a process to get it implemneted with the help of Cisco)
- Streamline script outputs
- Add Batch Processing Power BI Visualisations for interesting insights i.e. floor plans mapping etc.
- Add error handling
- Automate Stream Analytics Input/Output and Query sections