Microservice architecture can be termed as a variant of the service-oriented architecture (SOA) structural style that arranges an application as a collection of loosely coupled services. In a microservice architecture implemetation, services are usually quite fine-grained and the protocols are lightweight to ensure fast communication. There is no single definition for a microservice, However there are some key defining characteristics of microservices.
- are organized around business functionality
- are language agnostic
- are self contained
- are small in size, message-enabled
More information on microservices can be found on Martin Fowler's Blog on Microservices.
With microservice architectures, dependency on a network becomes quite key and raises reliability questions. As the number of services increase, you'll find that you have to deal with the interactions between them, monitor the system wide health (across all services), the network should be fault tolerant, have system wide logging and telemetry in place, handle multiple points of failure, and a lot more. All the services needs to have these common functionalities in place to allow smooth and reliable service to service communication. This is where Service Mesh implementation comes in handy.
What is a Service Mesh ?
A service mesh, is an extra layer that allows different services to share data amongst themselves, and in turn should reduce microservice complexity. Unlike other solutions that manage interservice communication, a service mesh is a dedicated infrastructure layer that is built right into an app (sidecar pattern).
Why do we need a Service Mesh ?
Interservice communication is one of the most challenging aspects of microservice architectures. Netflix being a notable success story within the implementation of microservice architectures, have contributed a wealth of resources to tackling the affir mention problem, examples being eureka(service discovery), cloud sleuth(distriuted tracing), ribbon(load balancing) and many more. However most of these tools are language specific.
With containerization taking a fore front in modern day deployment and becoming more popular, a more language agnostic solution becomes more inherent.
What is Envoy?
Before we move into actual solutions and implementations of service meshes we need to understand what Envoy role is in cloud native architectures and just generally the fuss around it.
Envoy is an OSI Layer 7 proxy & communication bus that has been designed for large modern service oriented architectures.
Envoy project started out at Lyft sometime in 2015, as mentioned in their blog, the company was struggling to stabilize it's rapidly growing microservice distributed architecture at the time. After its adoption Envoy quickly became an integral part to the scaling of Lyft’s architecture. Soon after envoy was released as OSS and saw a large growth in the community.
How is Envoy used ?
Envoy is heavily used to implement extensible sidecar proxies within the service mesh architecture.
A sidecar proxy is an application design pattern which abstracts functionality that is not key to the business logic away from the main services to ease the tracking and maintenance of the application as a unit, these include;
- service-service communications,
- monitoring(health checks) and security
- logging ...etc
A sidecar proxy is by default attached to a parent application to extend or add functionality hence the name sidecar.
As mentioned envoy is widely used to implemented sidecar proxies in most production implementation this can be attributed to a host of reasons, among the top being its Extensibility, evident from the exsistence of multiple extension points as well as it's Rich configuration API, just to mention a few.
At this point lets see How to pull all this together using and deploy using consul.
What is Consul ?
Consul is a distributed highly available and data center aware solution to connect and Configure applications across dynamic, distributed infrasctructure. Put simply consul is a service mesh solution offering add on integrations to HashiCorp's vast ecosystem of DevOps tools, other service meshes include Istio, Linkerd, and Citrix ADC.
Consul comes with a simple built-in proxy to allow rapid out of the box configuration, it however also supports 3rd party proxy integrations such as Envoy.
Why Consul ?
- Multi Datacenter Aware
- Service Mesh / Segmentations
- Service Discovery - auto detection of new service and location
- Service health Checking - Consul provides a dashboard to visualize the health of all sidecar proxies, nodes, services
- Key/Value Storage for system wide dynamic configurations
Consul Architecture
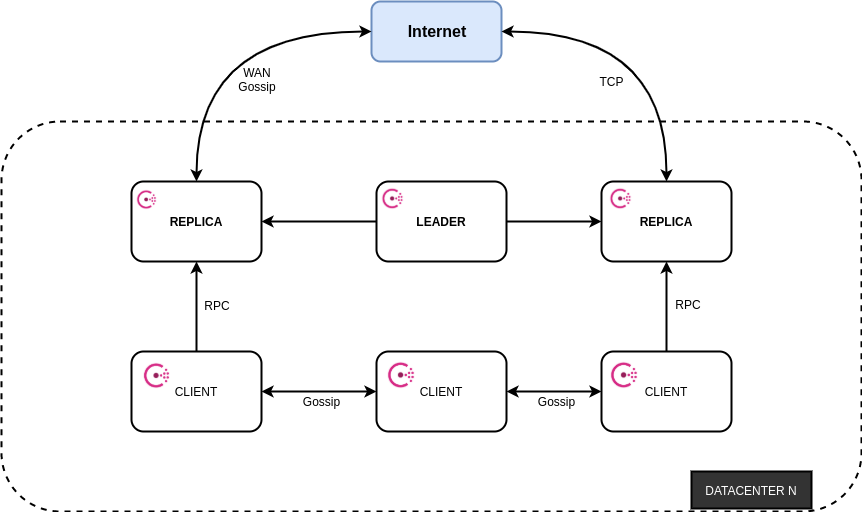
As seen from the above image we have a mixture of clients and servers within the data center. It is expected that there should be between 3-5 servers. This balances out availability in the case of failure and performance, since the consensus algorithm gets progressively slower as more nodes are added. There is no limit however to the number of clients you can have. The default architecture works by using the raft algorithm, which helps us in electing a leader out of the three different consul servers.
Prerequisites
- Some Level of understanding of Bash Scripting
- Some Level of working with Containerization tools
- Networking Experience
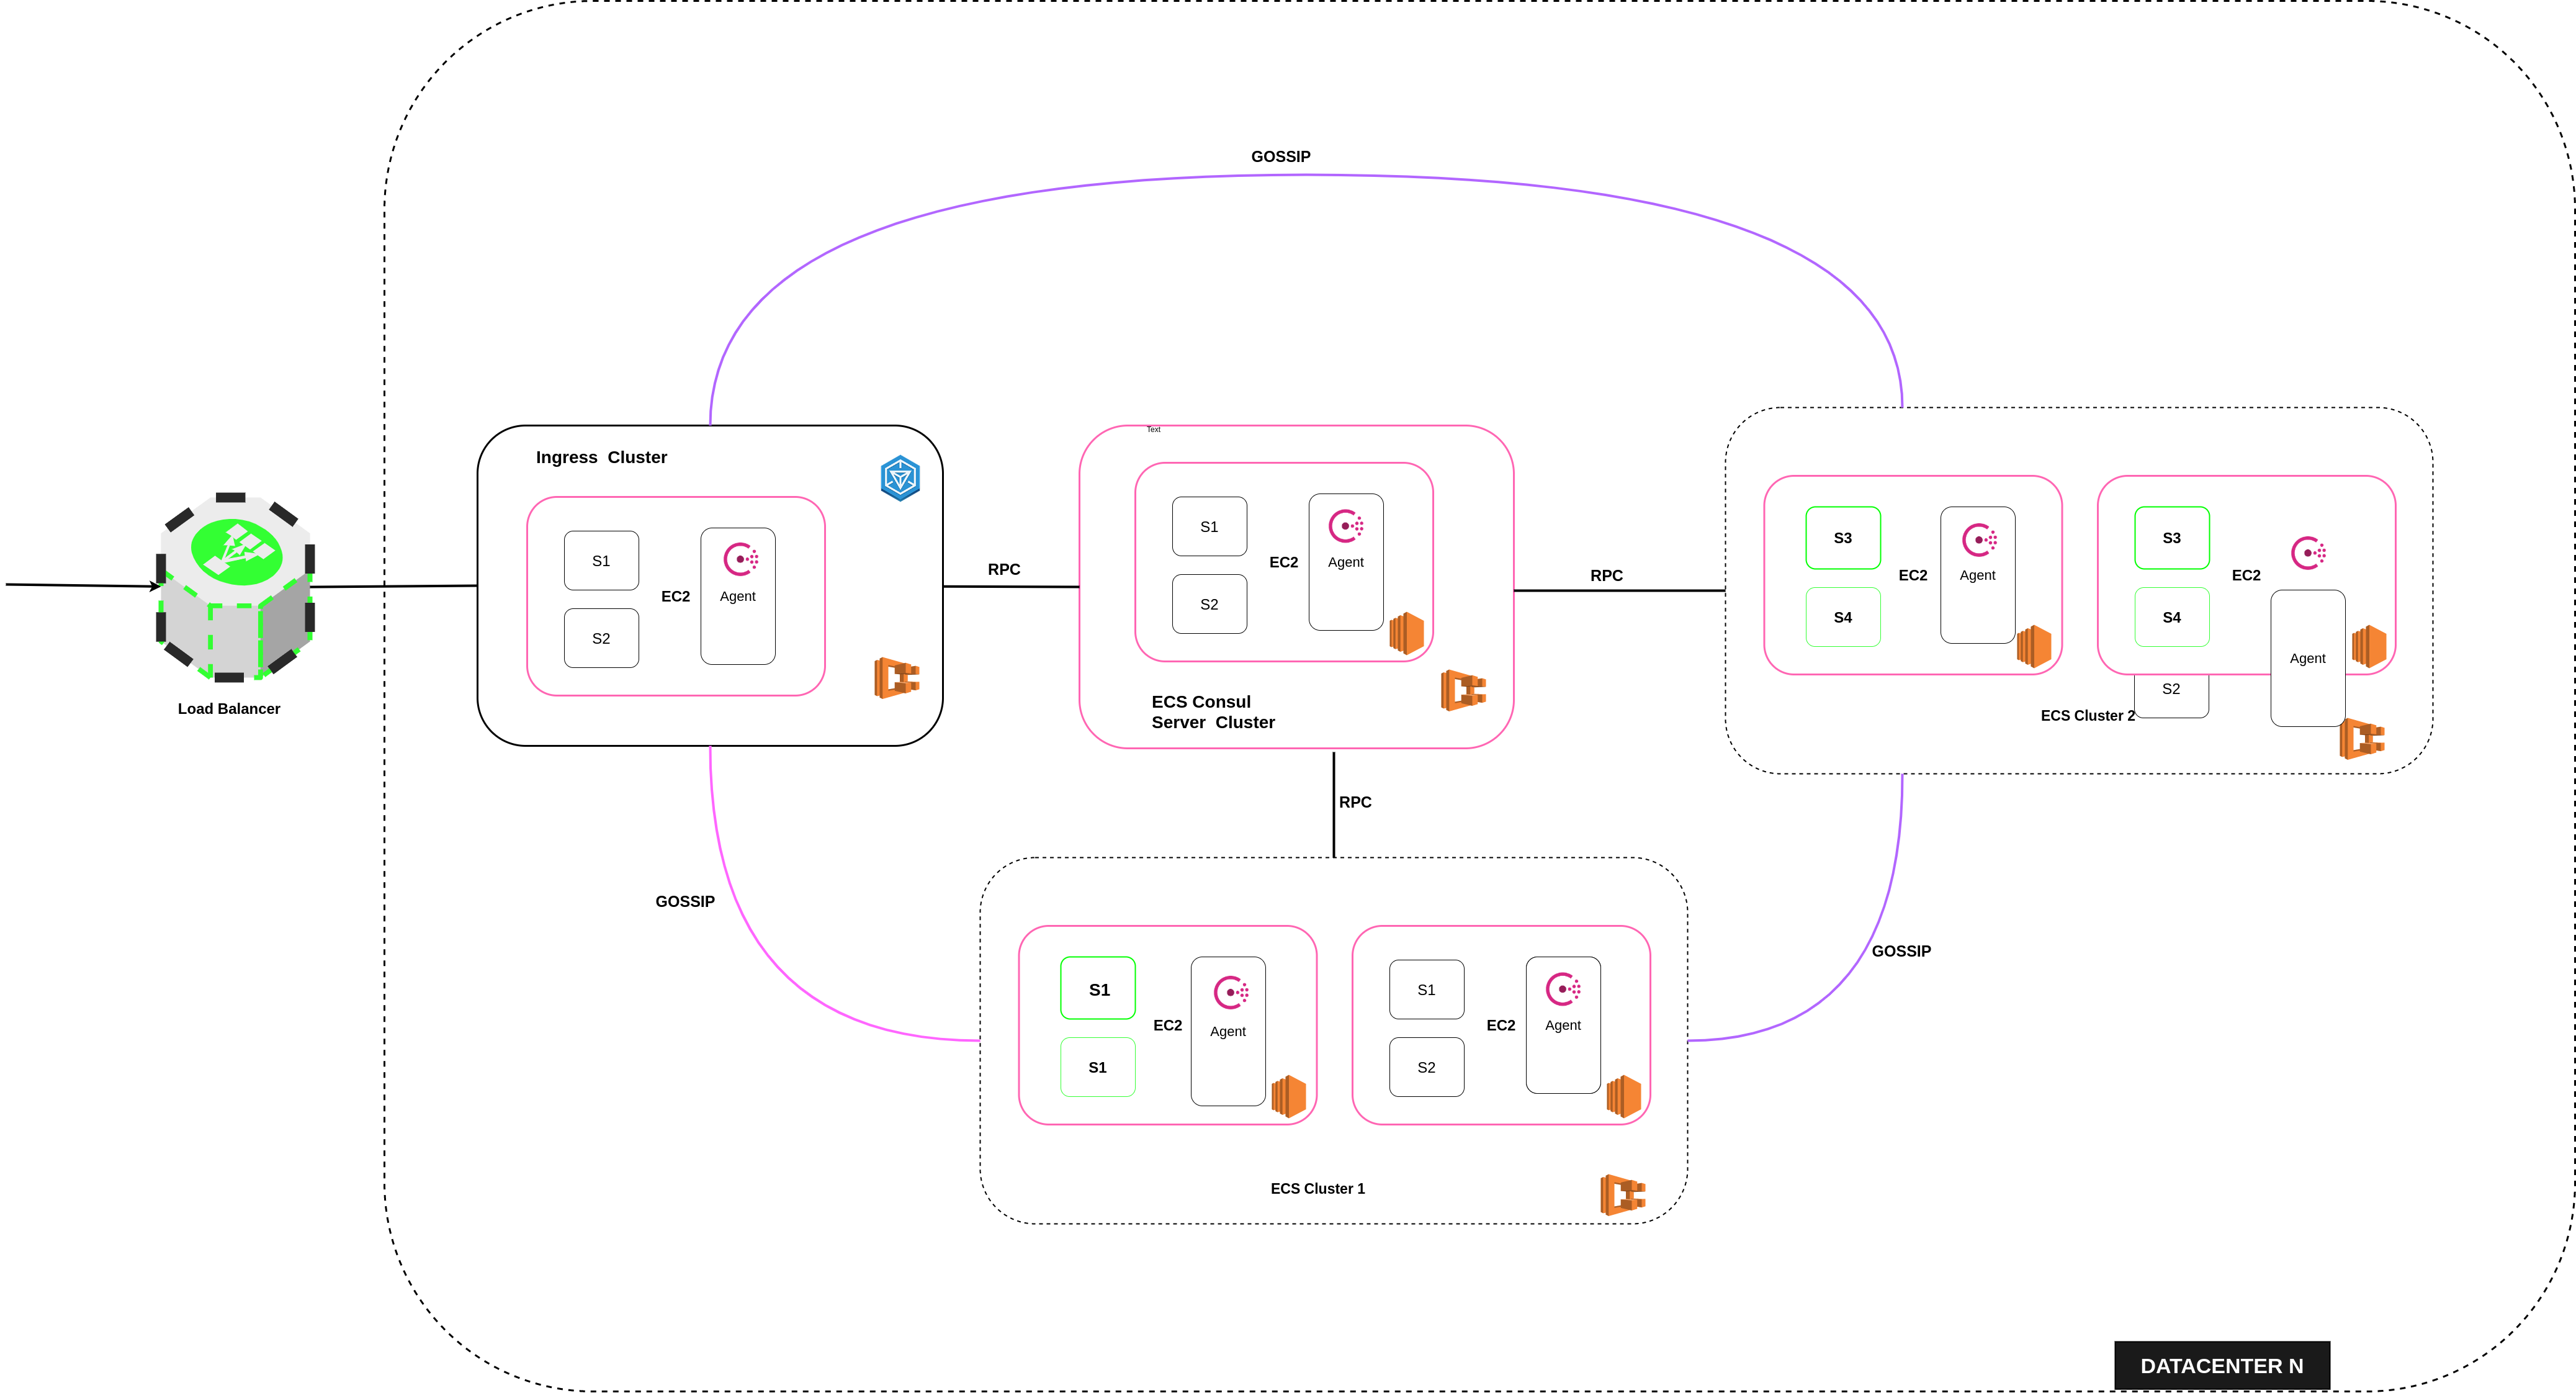 The pattern follows a multi-cluster deployment scheme implemented on top of Amazon ECS.
ECS is the AWS container service that handles the orchestration and provisioning of Docker containers.
This step by step guide will require knowledge in setting up ECS clusters For more information on cluster creation and configuration refer to this tutorial on Medium by Tung Nguyen.
The project has 4 services implemented in spring-boot, these are dockerized to allow deployment on the proposed architecture. The services are language agnostic and can be implemented in any framework/language of choice. According to the architecture diagram Cluster 1 & Cluster 2 run 2 services each. The clusters each run an extra service i.e. the consul agent. The deployment has a cluster dedicated to the ingress gateway and another for the server instances.
Summary of Consul & Service Mesh Terms
-
Consul agent - The Consul agent is the core process of Consul. The agent maintains membership information, registers services, runs checks, responds to queries, and more. The agent must run on every node that is part of a Consul cluster.
-
Service Mesh - A service mesh, is a way to control how different parts of an application share data with one another. Unlike other systems for managing this communication, a service mesh is a dedicated infrastructure layer built right into an app. This visible infrastructure layer can document how well (or not) different parts of an app interact, so it becomes easier to optimize communication and avoid downtime as an app grows.
-
Sidecar Service - Deploy components of an application into a separate process or container to provide isolation and encapsulation. The sidecar service handles peripheral tasks such as proxy to remote services, logging, dynamic configuration
-
Ingress Gateway - An ingress Gateway describes a load balancer operating at the edge of the mesh that receives incoming HTTP/TCP connections.
We should create and configure 4 ECS clusters
- Cluster 1 - contains S1 and S2
- Cluster 2 - contains S3 and S4
- Consul Server Cluster
- Ingress Cluster
note that this takes a multicluster approach, you don't have necessarily to run it as explained there are plenty of other approaches to consider. Using resources as defined in this guide can be quite costly to mantain, hence ensure that you subscribe to the AWS free tier if you are using this tutorial for learning purposes.
Once the Consul Server Cluster is created we should now define the consul-server-service. First things first we need to have the consul server image on ECR. We'll define a custom consul image that embeds envoy proxy that consul uses to implement the sidecar on . below is a sample customized Dockerfile of this.
ARG ENVOY_VERSION=1.14-latest

FROM envoyproxy/envoy-alpine:v${ENVOY_VERSION}

ARG CONSUL_VERSION=1.8.0

RUN mkdir -p /opt/consul  \
    && mkdir -p /etc/consul.d \
    && mkdir /var/logs \
    # This should be avoided in production, instead change ownership
    && chmod -R 777 /opt/consul \
    && chmod -R 777 /etc/consul.d \
    && chmod -R 777 /var/logs

# copy config file into the the image
COPY consul.hcl /etc/consul.d/consul.hcl

# download defined version of consul and install it
RUN apk add -u bash curl && \
    wget https://releases.hashicorp.com/consul/"${CONSUL_VERSION}"/consul_"${CONSUL_VERSION}"_linux_amd64.zip \
    -O /tmp/consul.zip && \
    unzip /tmp/consul.zip -d /tmp && \
    mv /tmp/consul /usr/local/bin/consul && \
    rm -f /tmp/consul.zip
# Initialize consul agent as server based on config file
CMD [ "consul", "agent", "-config-file", "/etc/consul.d/consul.hcl" ]
Consul can run as server or agent depending on initialization config i.e. server=true
below is the config file loaded as the service starts up.
datacenter = "our_dc"
data_dir = "/opt/consul"
verify_incoming = false
verify_outgoing = false

bootstrap_expect = 1
ui = true
client_addr = "0.0.0.0"
server = true

ports {
  grpc = 8502
}

connect {
  enabled = true
}

bind_addr = "{{GetInterfaceIP \"eth0\"}}"

auto_encrypt = {
   allow_tls = true
}
Push this to ECR and create a task definition for this here is a sample of task definition with exposable ports as well a volume mount-points.
Consul will communicate to agents on the eth0 interface which provides host IP on the registered vpc this is evident from;
bind_addr = "{{GetInterfaceIP \"eth0\"}}"It is crucial to ensure that you run the task in host network mode or use vxLan to allow the consul container access other hosts within the network.
Create an ECS service to run the tasks automatically. Once the tasks are active you should be able to view the consul dashboard by accessing the node IP on port 8500 http://ip:8500/

Once the cluster are created, Next step will be to create the task and service(consul-cluster-1 & consul-cluster-2) to run the consul agent.
Consul accepts configuration files in either json or hcl. This configuration is loaded in json since some of the attributes are dynamic and loaded directly from the host as the container starts up. Since we are running the Tasks in host mode we need to bind the consul agent IP address as the node Local IP.
{
    "bind_addr": "{{GetInterfaceIP \"eth0\"}}",
    "addresses": {
        "http": "\($snadress)",
        "grpc": "\($snadress)"
    },
    "data_dir": "/opt/consul",
    "datacenter": "our_dc",
    "retry_join": [
        "{REPLACE-TO-CONSUL-SERVER-IP}"
    ],
    "ports": {
        "grpc": 8502,
        "http": 8500,
        "sidecar_max_port": 21005,
        "sidecar_min_port": 21000
    },
    "enable_central_service_config": true,
    "services": [
        {
            "check": [
                {
                    "http": "http://\($snadress):8080",
                    "id": "users-check",
                    "interval": "5s",
                    "method": "GET",
                    "timeout": "3s"
                }
            ],
            "connect": [
                {
                    "sidecar_service": [
                        {
                            "proxy": [
                                {
                                    "local_service_address": $snadress,
                                    "upstreams": [
                                        {
                                            "destination_type": "service",
                                            "destination_name": "todos",
                                            "datacenter": "our_dc",
                                            "local_bind_address": $snadress,
                                            "local_bind_port": 1234
                                        }
                                    ]
                                }
                            ]
                        }
                    ]
                }
            ],
            "id": "users-1",
            "name": "users",
            "port": 8080
        },
        {
            "check": [
                {
                    "http": "http://\($snadress):8081",
                    "id": "activities-check",
                    "interval": "5s",
                    "method": "GET",
                    "timeout": "3s"
                }
            ],
            "connect": [
                {
                    "sidecar_service": [
                        {
                            "proxy": [
                                {
                                    "local_service_address": $snadress
                                }
                            ]
                        }
                    ]
                }
            ],
            "id": "activities-1",
            "name": "activities",
            "port": 8081
        }
    ]
}
The above configuration file registers two services i.e. users and activities as well as their sidecar services.
The connect.sidecar_service field is a complete nested service definition on which almost any regular service definition field can be set. The configuration is loaded with an upstream to allo communication to a different service, in this case todos, this requires an intention to fully allow comunication between the two services.
"upstreams": [
    {
        "destination_type": "service",
        "destination_name": "todos",
        "datacenter": "our_dc",
        "local_bind_address": $snadress,
        "local_bind_port": 1234
    }
]
The side car service is initialized to run on envoy which is advised for a production use case this is done using the service registration bash script.
#!/bin/sh

# SERVICE="users"

# Collect Host Ip address
OUR_SERVER_ADDRESS=$(ip addr show eth0 | grep -o "inet [0-9]*\.[0-9]*\.[0-9]*\.[0-9]*" | grep -o "[0-9]*\.[0-9]*\.[0-9]*\.[0-9]*")

# Write agent configuration
consul config write -http-addr="$OUR_SERVER_ADDRESS:8500" /opt/consul/configs/config.users.hcl

# connect sidecar to load envoy
consul connect envoy -http-addr="$OUR_SERVER_ADDRESS:8500" -grpc-addr="$OUR_SERVER_ADDRESS:8502" -sidecar-for users-1
The Dockerfile to the agent is as below.
# rebuild cluster 1 again
ARG ENVOY_VERSION=1.14-latest

FROM envoyproxy/envoy-alpine:v${ENVOY_VERSION}

# Remove env localhost
ARG CONSUL_VERSION=1.8.0

RUN apk update && apk add jq --no-cache supervisor

RUN mkdir -p /opt/consul  \
    && mkdir -p /etc/consul.d \
    && mkdir /var/logs \
    # This should be avoided in production, instead change ownership
    && chmod -R 777 /opt/consul \
    && chmod -R 777 /etc/consul.d \
    && chmod -R 777 /var/logs

ADD configs /opt/consul/configs

ADD scripts /opt/consul/scripts

COPY supervisord.conf /etc/supervisor/conf.d/supervisord.conf

RUN chmod +x /opt/consul/scripts/init.sh

RUN chmod +x /opt/consul/scripts/registerusers.sh

RUN chmod +x /opt/consul/scripts/registeractivities.sh

RUN apk add -u bash curl && \
    wget https://releases.hashicorp.com/consul/"${CONSUL_VERSION}"/consul_"${CONSUL_VERSION}"_linux_amd64.zip \
    -O /tmp/consul.zip && \
    unzip /tmp/consul.zip -d /tmp && \
    mv /tmp/consul /usr/local/bin/consul && \
    rm -f /tmp/consul.zip

CMD [ "/usr/bin/supervisord", "-c", "/etc/supervisor/conf.d/supervisord.conf"]
Supervisord is installed within the agent load configurations for the services within the cluster. This is mainly because the services have to registed after initial configuration of the agent, also the initialization command does not dettach hence supervisor helps in separating the execution terminal for each configuration file.
Below is a sample configuration file to supervisor, The service registration scripts are delayed by 30 secs to allow the agent initialization script time to execute.
[supervisord]
nodaemon=true

[program:consul-agent-c1]
command=./opt/consul/scripts/init.sh
stdout_logfile=/dev/fd/1
stdout_logfile_maxbytes=0
redirect_stderr=true
autostart=true

[program:side-car-service-registration-activites]
command=./opt/consul/scripts/registeractivities.sh
stdout_logfile=/dev/fd/1
stdout_logfile_maxbytes=0
redirect_stderr=true
startsecs=30
autostart=true

[program:side-car-service-registration-users]
command=./opt/consul/scripts/registerusers.sh
stdout_logfile=/dev/fd/1
stdout_logfile_maxbytes=0
redirect_stderr=true
autostart=true
startsecs=30
This is the final step at least to allow traffic into the deployment. The Ingress Gateway will run as a service on its own cluster having its own agent. To do this we'll define a configuration files as below.
Kind = "ingress-gateway"
Name = "ingress-service"

TLS {
 Enabled = true
}

Listeners = [
  {
    Port     = 80
    Protocol = "http"
    Services = [
      {
        Name = "*"
      }
    ]
  }
]
The ingress is configured to allow all traffic on port 80 to any service within the datacenter. A request to a service can be made as shown below an extra header named Host is key to direct to the required service.
curl  -i\
 -H "Accept: application/json"\
 -H "Content-Type: application/json"\
 -H "Host: {service-name}.consul.*"\
 -X GET
{ingress-cluster-ip}To make our work easier and avoid having to restart services every time an agent configuration is updated.
During the course of the explanation a lot of configurations that would otherwise be run manually on the consul terminal have been defined within the various bash scripts attached to each agent.
To fully automate this Github actions can be used to directly trigger these updates. The steps are as follows;
- Build and tag the image
- Push To Amazon ECR - The repository should be created manually on ECR
- Fill in the new image ID in the Amazon ECS task definition - The task definition needs to be created manually
- Deploy Amazon ECS task definition - The cluster and service need to be created manually
Below is a sample action file that implements the above mentioned steps.
name: Consul Agent client for cluster 1 docker image to Amazon ECR

on:
  push:
    paths:
      - consul/consul-cluster-1/**
    branches:
      - build

env:
  AWS_DEFAULT_REGION: eu-west-1
  AWS_DEFAULT_OUTPUT: json
  AWS_ACCOUNT_ID: ${{ secrets.AWS_ACCOUNT_ID }}
  AWS_ACCESS_KEY_ID: ${{ secrets.AWS_ACCESS_KEY_ID }}
  AWS_SECRET_ACCESS_KEY: ${{ secrets.AWS_SECRET_ACCESS_KEY }}
  CONTAINER_IMAGE: consul-cluster-1:latest

jobs:
  build-and-push:
    name: Building and pushing image to AWS ECR
    runs-on: ubuntu-latest
    steps:
      - name: Checkout
        uses: actions/checkout@master

      - name: Setup ECR
        run: |
          $( aws ecr get-login --no-include-email )

      - name: Build and tag the image
        id: build-image
        run: |
          docker build \
            -t $CONTAINER_IMAGE \
            -t $AWS_ACCOUNT_ID.dkr.ecr.$AWS_DEFAULT_REGION.amazonaws.com/$CONTAINER_IMAGE ./consul/consul-cluster-1
          echo "::set-output name=image::$AWS_ACCOUNT_ID.dkr.ecr.$AWS_DEFAULT_REGION.amazonaws.com/$CONTAINER_IMAGE"

      - name: Push To Amazon ECR
        run: |
          docker push $AWS_ACCOUNT_ID.dkr.ecr.$AWS_DEFAULT_REGION.amazonaws.com/$CONTAINER_IMAGE

      - name: Configure AWS Credentials
        uses: aws-actions/configure-aws-credentials@v1
        with:
          aws-access-key-id: ${{ secrets.AWS_ACCESS_KEY_ID }}
          aws-secret-access-key: ${{ secrets.AWS_SECRET_ACCESS_KEY }}
          aws-region: eu-west-1

      - name: Fill in the new image ID in the Amazon ECS task definition
        id: task-def
        uses: aws-actions/amazon-ecs-render-task-definition@v1
        with:
          task-definition: consul/consul-cluster-1/task-definition.json
          container-name: consul-c1-proxy-agent
          image: ${{ steps.build-image.outputs.image }}

      - name: Deploy Amazon ECS task definition
        uses: aws-actions/amazon-ecs-deploy-task-definition@v1
        with:
          task-definition: ${{ steps.task-def.outputs.task-definition }}
          service: consul-cluster-one-agent-service
          cluster: cluster-service-activities
          # wait-for-service-stability: true
You should now have a basic idea of how consul works. The information and demonstration provided in this guide is not exactly the only way to handle consul in production, Hashicorp have a multitude of other implementations.
This @repo has the full implemetation of tha content discussed within this tutorial, While the repo cannot be run using a one liner(requires multiple configurations to work), it can act as good reference to get you sarted with deploying consul.
That's all. Feel free to raise any issues on Github.
Good Luck & Happy Coding