| subcategory |
|---|
Deployment |
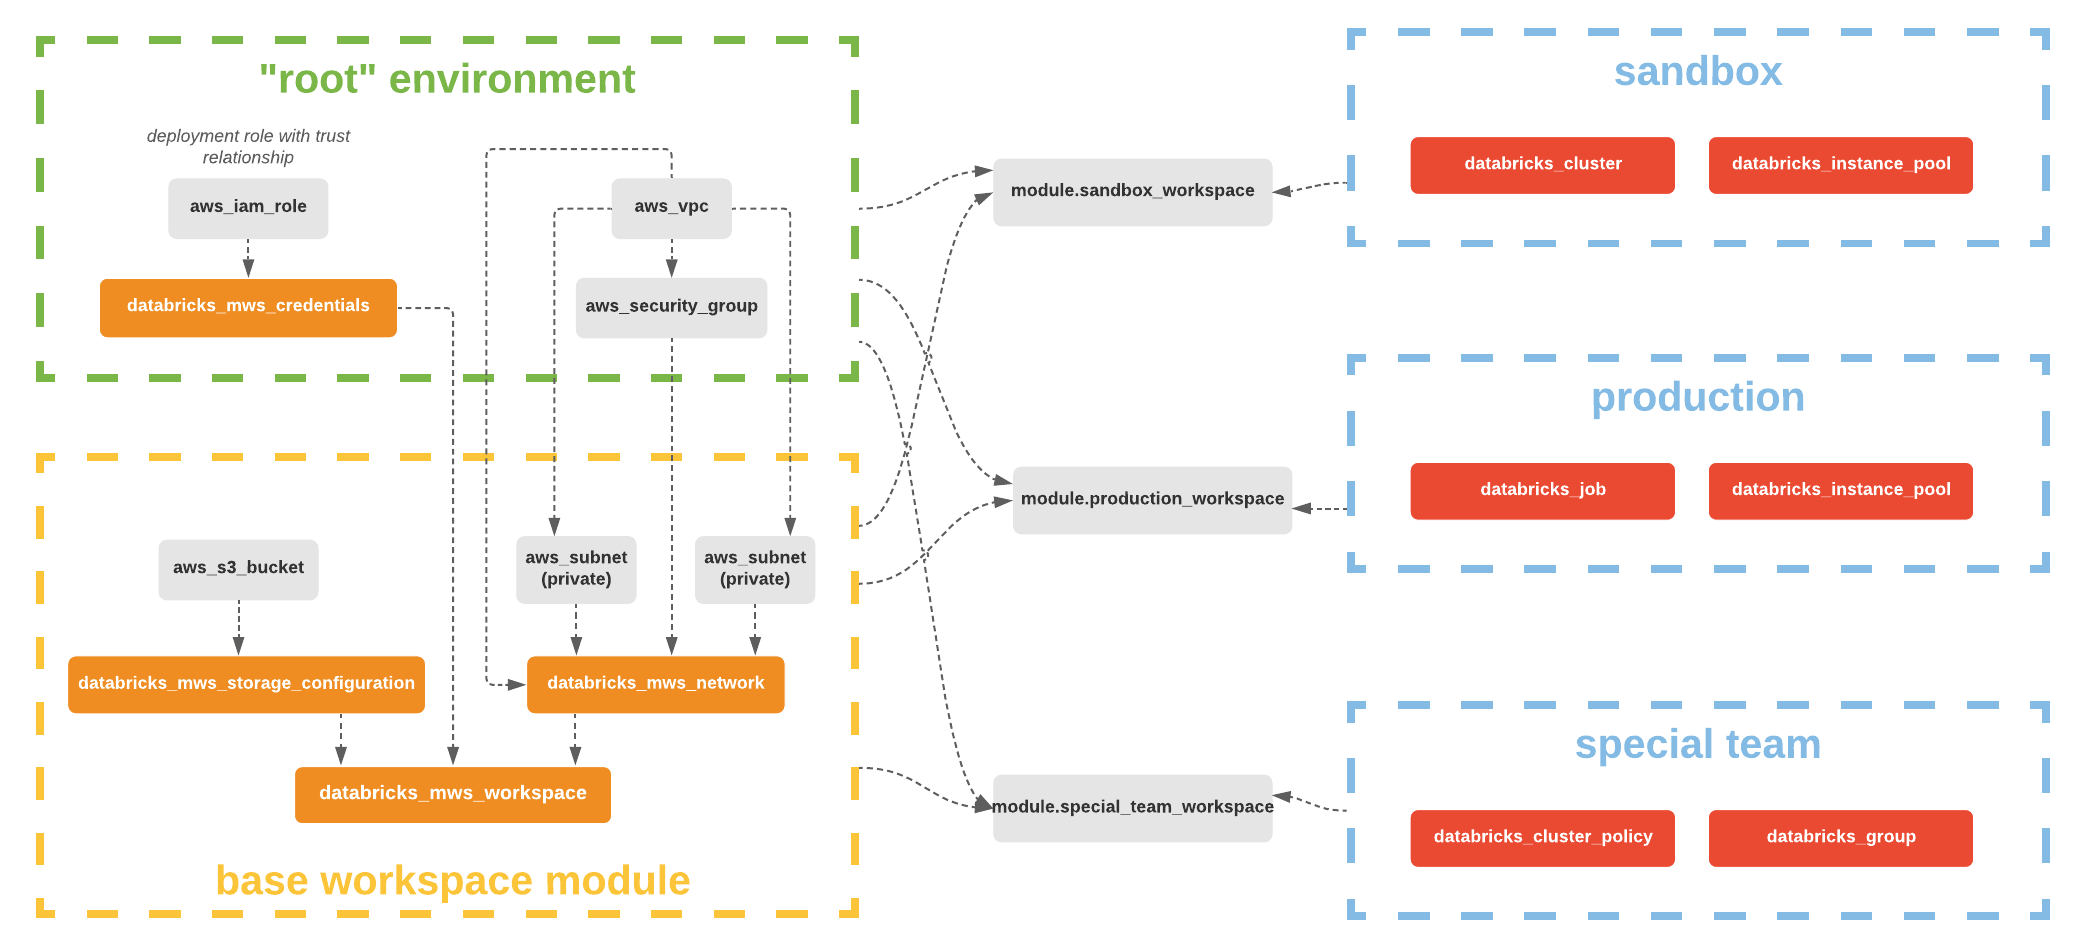
-> Note Initialize provider with alias = "mws", host = "https://accounts.cloud.databricks.com" and use provider = databricks.mws. We require all databricks_mws_* resources to be created within its own dedicated terraform module of your environment. Usually this module creates VPC and IAM roles as well. Code that creates workspaces and code that manages workspaces must be in separate terraform modules to avoid common confusion between provider = databricks.mws and provider = databricks.created_workspace. This is why we specify databricks_host and databricks_token outputs, that have to be used in the latter modules:
provider "databricks" {
  host  = module.ai.databricks_host
  token = module.ai.databricks_token
}
This resource allows you to set up workspaces in E2 architecture on AWS or workspaces on GCP. Please follow this complete runnable example on AWS or GCP with new VPC and new workspace setup.
-> Note On Azure you need to use azurerm_databricks_workspace resource to create Azure Databricks workspaces.
To get workspace running, you have to configure a couple of things:
- databricks_mws_credentials - You can share a credentials (cross-account IAM role) configuration ID with multiple workspaces. It is not required to create a new one for each workspace.
- databricks_mws_storage_configurations - You can share a root S3 bucket with multiple workspaces in a single account. You do not have to create new ones for each workspace. If you share a root S3 bucket for multiple workspaces in an account, data on the root S3 bucket is partitioned into separate directories by workspace.
- databricks_mws_networks - (optional, but recommended) You can share one customer-managed VPC with multiple workspaces in a single account. You do not have to create a new VPC for each workspace. However, you cannot reuse subnets or security groups with other resources, including other workspaces or non-Databricks resources. If you plan to share one VPC with multiple workspaces, be sure to size your VPC and subnets accordingly. Because a Databricks databricks_mws_networks encapsulates this information, you cannot reuse it across workspaces.
- databricks_mws_customer_managed_keys - You can share a customer-managed key across workspaces.
variable "databricks_account_id" {
  description = "Account ID that can be found in the dropdown under the email address in the upper-right corner of https://accounts.cloud.databricks.com/"
}

provider "databricks" {
  alias = "mws"
  host  = "https://accounts.cloud.databricks.com"
}

// register cross-account ARN
resource "databricks_mws_credentials" "this" {
  provider         = databricks.mws
  account_id       = var.databricks_account_id
  credentials_name = "${var.prefix}-creds"
  role_arn         = var.crossaccount_arn
}

// register root bucket
resource "databricks_mws_storage_configurations" "this" {
  provider                   = databricks.mws
  account_id                 = var.databricks_account_id
  storage_configuration_name = "${var.prefix}-storage"
  bucket_name                = var.root_bucket
}

// register VPC
resource "databricks_mws_networks" "this" {
  provider           = databricks.mws
  account_id         = var.databricks_account_id
  network_name       = "${var.prefix}-network"
  vpc_id             = var.vpc_id
  subnet_ids         = var.subnets_private
  security_group_ids = [var.security_group]
}

// create workspace in given VPC with DBFS on root bucket
resource "databricks_mws_workspaces" "this" {
  provider       = databricks.mws
  account_id     = var.databricks_account_id
  workspace_name = var.prefix
  aws_region     = var.region

  credentials_id           = databricks_mws_credentials.this.credentials_id
  storage_configuration_id = databricks_mws_storage_configurations.this.storage_configuration_id
  network_id               = databricks_mws_networks.this.network_id

  token {}
}

output "databricks_token" {
  value     = databricks_mws_workspaces.this.token[0].token_value
  sensitive = true
}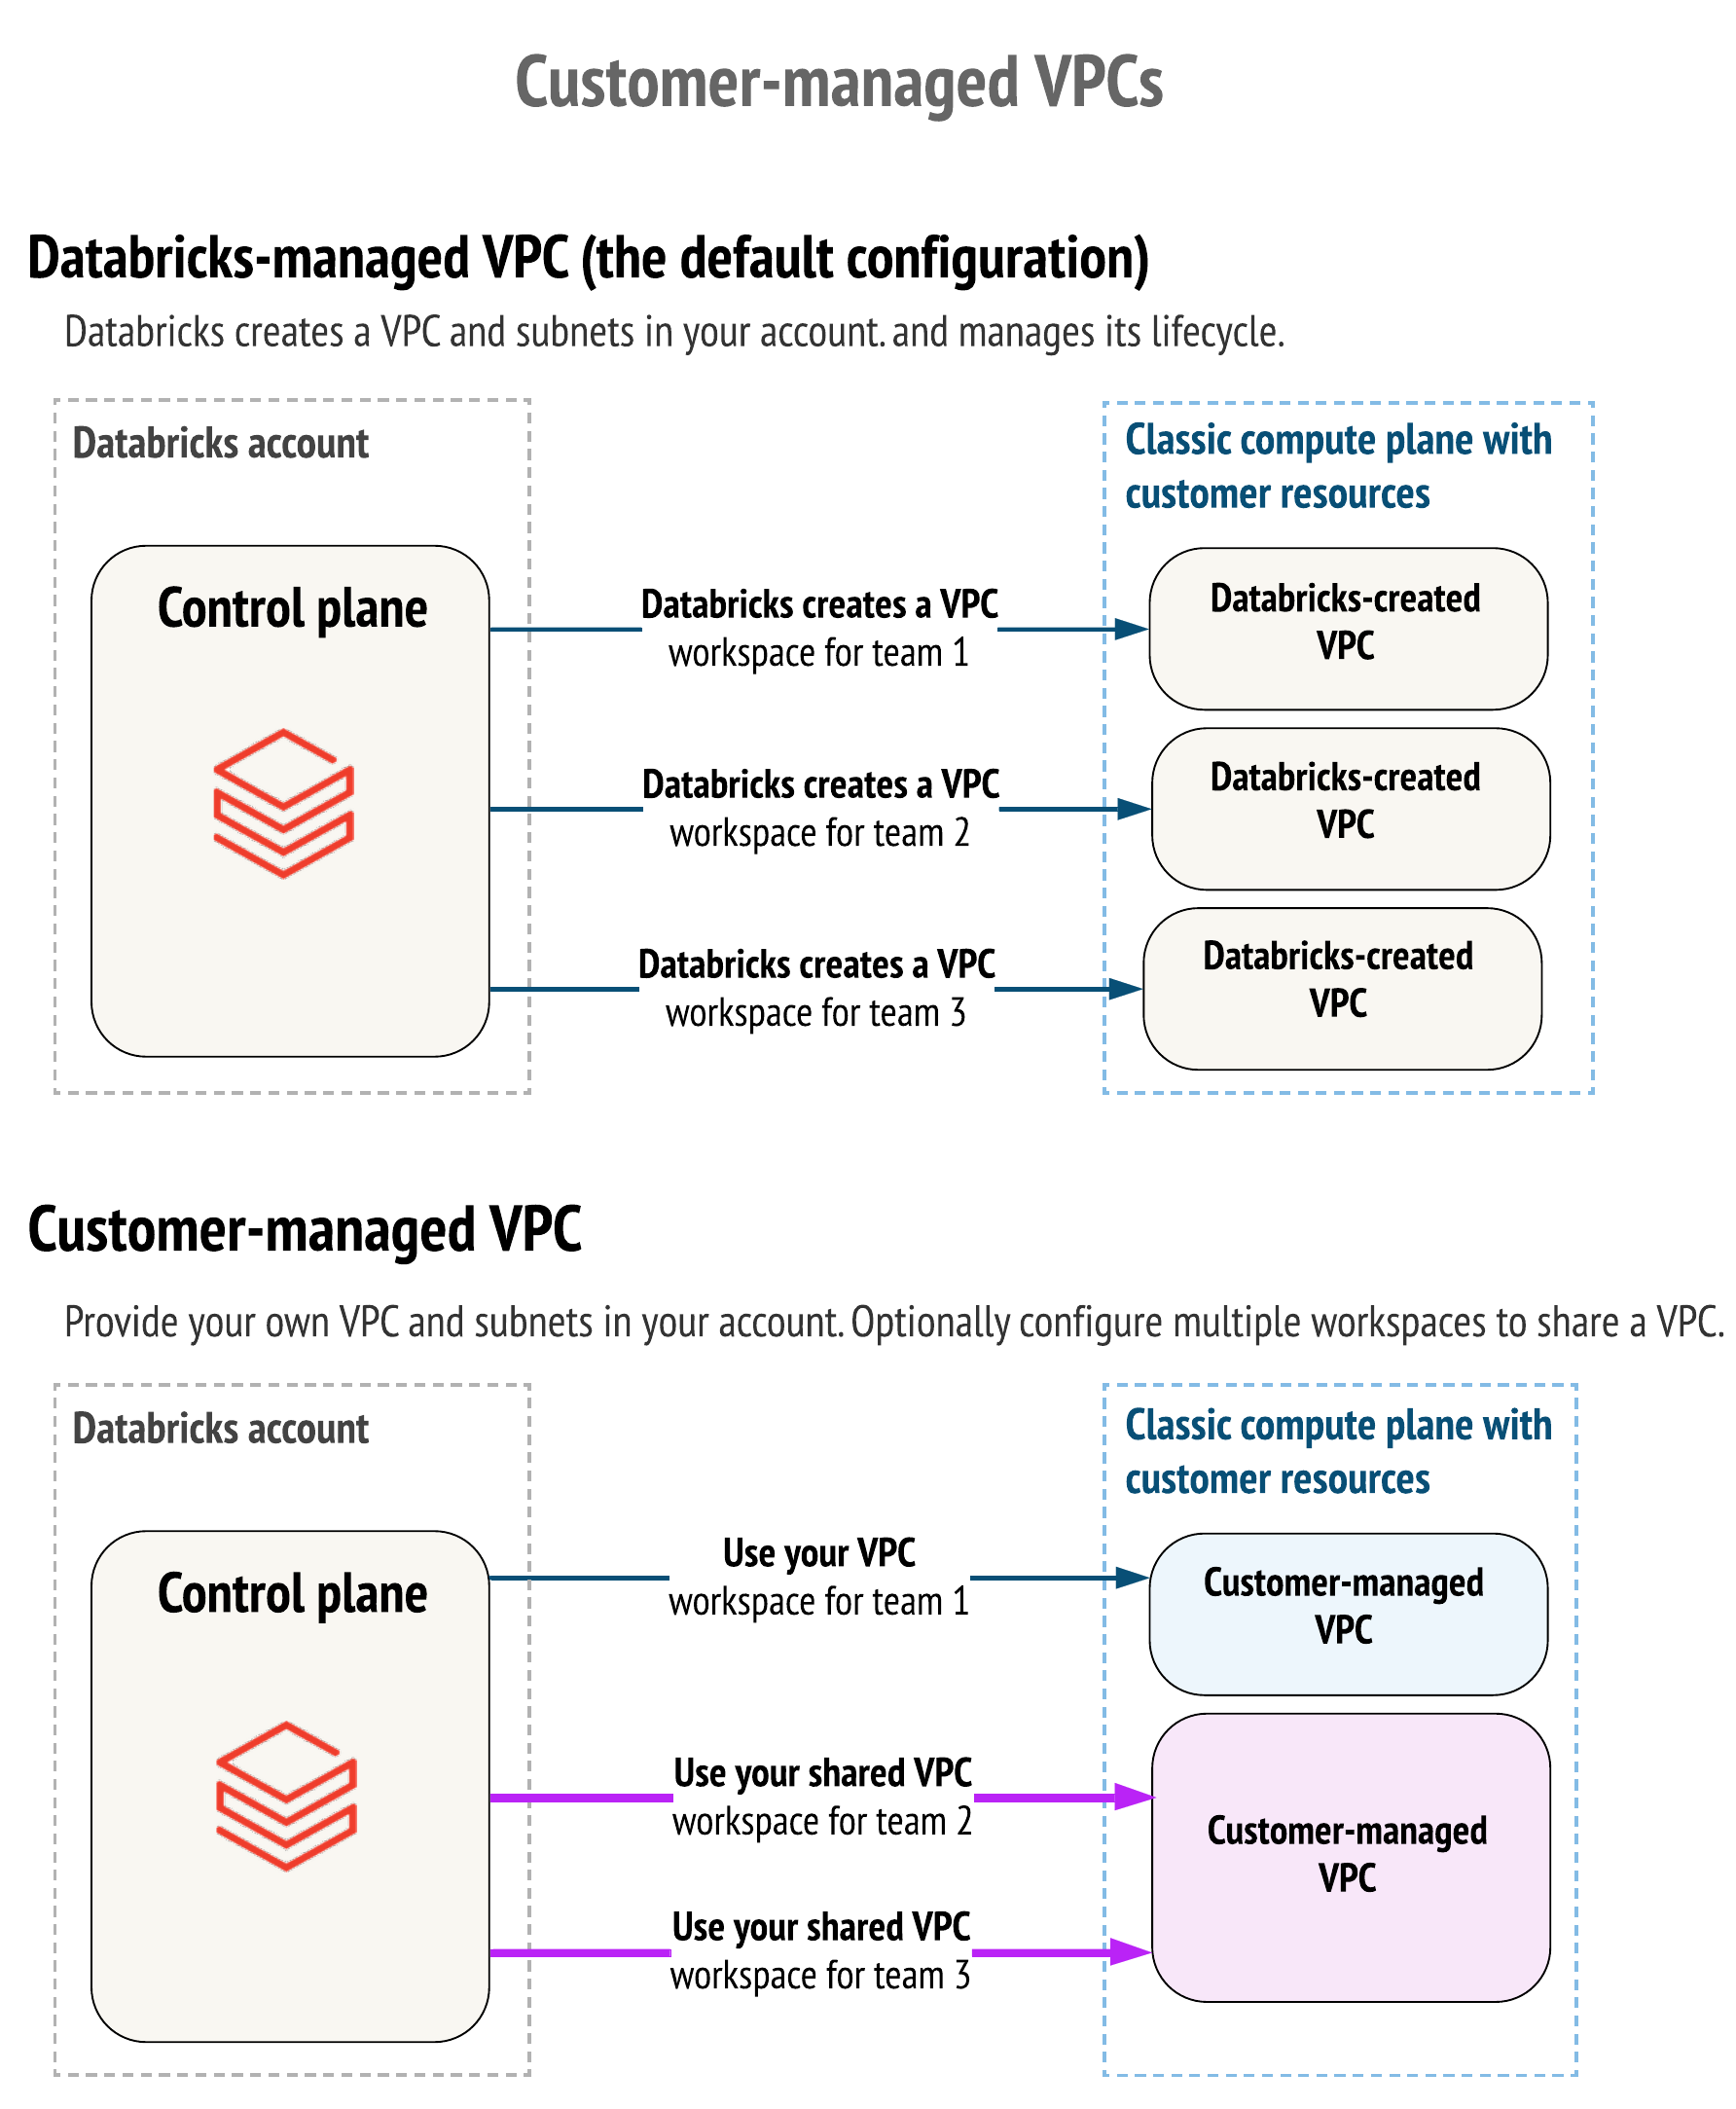
By default, Databricks creates a VPC in your AWS account for each workspace. Databricks uses it for running clusters in the workspace. Optionally, you can use your VPC for the workspace, using the feature customer-managed VPC. Databricks recommends that you provide your VPC with databricks_mws_networks so that you can configure it according to your organization’s enterprise cloud standards while still conforming to Databricks requirements. You cannot migrate an existing workspace to your VPC. Please see the difference described through IAM policy actions on this page.
variable "databricks_account_id" {
  description = "Account Id that could be found in the top right corner of https://accounts.cloud.databricks.com/"
}

resource "random_string" "naming" {
  special = false
  upper   = false
  length  = 6
}

locals {
  prefix = "dltp${random_string.naming.result}"
}

data "databricks_aws_assume_role_policy" "this" {
  external_id = var.databricks_account_id
}

resource "aws_iam_role" "cross_account_role" {
  name               = "${local.prefix}-crossaccount"
  assume_role_policy = data.databricks_aws_assume_role_policy.this.json
  tags               = var.tags
}

data "databricks_aws_crossaccount_policy" "this" {
}

resource "aws_iam_role_policy" "this" {
  name   = "${local.prefix}-policy"
  role   = aws_iam_role.cross_account_role.id
  policy = data.databricks_aws_crossaccount_policy.this.json
}

resource "databricks_mws_credentials" "this" {
  provider         = databricks.mws
  account_id       = var.databricks_account_id
  credentials_name = "${local.prefix}-creds"
  role_arn         = aws_iam_role.cross_account_role.arn
}

resource "aws_s3_bucket" "root_storage_bucket" {
  bucket        = "${local.prefix}-rootbucket"
  acl           = "private"
  force_destroy = true
  tags          = var.tags
}

resource "aws_s3_bucket_versioning" "root_versioning" {
  bucket = aws_s3_bucket.root_storage_bucket.id
  versioning_configuration {
    status = "Disabled"
  }
}

resource "aws_s3_bucket_server_side_encryption_configuration" "root_storage_bucket" {
  bucket = aws_s3_bucket.root_storage_bucket.bucket

  rule {
    apply_server_side_encryption_by_default {
      sse_algorithm = "AES256"
    }
  }
}

resource "aws_s3_bucket_public_access_block" "root_storage_bucket" {
  bucket                  = aws_s3_bucket.root_storage_bucket.id
  block_public_acls       = true
  block_public_policy     = true
  ignore_public_acls      = true
  restrict_public_buckets = true
  depends_on              = [aws_s3_bucket.root_storage_bucket]
}

data "databricks_aws_bucket_policy" "this" {
  bucket = aws_s3_bucket.root_storage_bucket.bucket
}

resource "aws_s3_bucket_policy" "root_bucket_policy" {
  bucket     = aws_s3_bucket.root_storage_bucket.id
  policy     = data.databricks_aws_bucket_policy.this.json
  depends_on = [aws_s3_bucket_public_access_block.root_storage_bucket]
}

resource "databricks_mws_storage_configurations" "this" {
  provider                   = databricks.mws
  account_id                 = var.databricks_account_id
  storage_configuration_name = "${local.prefix}-storage"
  bucket_name                = aws_s3_bucket.root_storage_bucket.bucket
}

resource "databricks_mws_workspaces" "this" {
  provider       = databricks.mws
  account_id     = var.databricks_account_id
  workspace_name = local.prefix
  aws_region     = "us-east-1"

  credentials_id           = databricks_mws_credentials.this.credentials_id
  storage_configuration_id = databricks_mws_storage_configurations.this.storage_configuration_id

  token {}

  # Optional Custom Tags
  custom_tags = {

    "SoldToCode" = "1234"

  }
}

output "databricks_token" {
  value     = databricks_mws_workspaces.this.token[0].token_value
  sensitive = true
}
In order to create a Databricks Workspace that leverages AWS PrivateLink please ensure that you have read and understood the Enable Private Link documentation and then customise the example above with the relevant examples from mws_vpc_endpoint, mws_private_access_settings and mws_networks.
To get workspace running, you have to configure a network object:
- databricks_mws_networks - (optional, but recommended) You can share one customer-managed VPC with multiple workspaces in a single account. You do not have to create a new VPC for each workspace. However, you cannot reuse subnets with other resources, including other workspaces or non-Databricks resources. If you plan to share one VPC with multiple workspaces, be sure to size your VPC and subnets accordingly. Because a Databricks databricks_mws_networks encapsulates this information, you cannot reuse it across workspaces.
variable "databricks_account_id" {
  description = "Account Id that could be found in the top right corner of https://accounts.cloud.databricks.com/"
}
variable "databricks_google_service_account" {}
variable "google_project" {}

provider "databricks" {
  alias = "mws"
  host  = "https://accounts.gcp.databricks.com"
}


// register VPC
resource "databricks_mws_networks" "this" {
  account_id   = var.databricks_account_id
  network_name = "${var.prefix}-network"
  gcp_network_info {
    network_project_id    = var.google_project
    vpc_id                = var.vpc_id
    subnet_id             = var.subnet_id
    subnet_region         = var.subnet_region
    pod_ip_range_name     = "pods"
    service_ip_range_name = "svc"
  }
}

// create workspace in given VPC
resource "databricks_mws_workspaces" "this" {
  account_id     = var.databricks_account_id
  workspace_name = var.prefix
  location       = var.subnet_region
  cloud_resource_container {
    gcp {
      project_id = var.google_project
    }
  }

  network_id = databricks_mws_networks.this.network_id
  gke_config {
    connectivity_type = "PRIVATE_NODE_PUBLIC_MASTER"
    master_ip_range   = "10.3.0.0/28"
  }

  token {}
}

output "databricks_token" {
  value     = databricks_mws_workspaces.this.token[0].token_value
  sensitive = true
}
In order to create a Databricks Workspace that leverages GCP Private Service Connect please ensure that you have read and understood the Enable Private Service Connect documentation and then customise the example above with the relevant examples from mws_vpc_endpoint, mws_private_access_settings and mws_networks.
By default, Databricks creates a VPC in your GCP project for each workspace. Databricks uses it for running clusters in the workspace. Optionally, you can use your VPC for the workspace, using the feature customer-managed VPC. Databricks recommends that you provide your VPC with databricks_mws_networks so that you can configure it according to your organization’s enterprise cloud standards while still conforming to Databricks requirements. You cannot migrate an existing workspace to your VPC.
variable "databricks_account_id" {
  description = "Account Id that could be found in the top right corner of https://accounts.cloud.databricks.com/"
}

data "google_client_openid_userinfo" "me" {
}

data "google_client_config" "current" {
}

resource "databricks_mws_workspaces" "this" {
  provider       = databricks.accounts
  account_id     = var.databricks_account_id
  workspace_name = var.prefix
  location       = data.google_client_config.current.region

  cloud_resource_container {
    gcp {
      project_id = data.google_client_config.current.project
    }
  }

  gke_config {
    connectivity_type = "PRIVATE_NODE_PUBLIC_MASTER"
    master_ip_range   = "10.3.0.0/28"
  }

  token {}
}

output "databricks_token" {
  value     = databricks_mws_workspaces.this.token[0].token_value
  sensitive = true
}-> Note All workspaces would be verified to get into runnable state or deleted upon failure. You can only update credentials_id, network_id, and storage_customer_managed_key_id, private_access_settings_id on a running workspace.
The following arguments are available:
account_id- Account Id that could be found in the top right corner of Accounts Console.deployment_name- (Optional) part of URL as inhttps://<prefix>-<deployment-name>.cloud.databricks.com. Deployment name cannot be used until a deployment name prefix is defined. Please contact your Databricks representative. Once a new deployment prefix is added/updated, it only will affect the new workspaces created.workspace_name- name of the workspace, will appear on UI.network_id- (Optional)network_idfrom networks.aws_region- (AWS only) region of VPC.storage_configuration_id- (AWS only)storage_configuration_idfrom storage configuration.managed_services_customer_managed_key_id- (Optional)customer_managed_key_idfrom customer managed keys withuse_casesset toMANAGED_SERVICES. This is used to encrypt the workspace's notebook and secret data in the control plane.storage_customer_managed_key_id- (Optional)customer_managed_key_idfrom customer managed keys withuse_casesset toSTORAGE. This is used to encrypt the DBFS Storage & Cluster Volumes.location- (GCP only) region of the subnet.cloud_resource_container- (GCP only) A block that specifies GCP workspace configurations, consisting of following blocks:gcp- A block that consists of the following field:project_id- The Google Cloud project ID, which the workspace uses to instantiate cloud resources for your workspace.
gke_config- (GCP only) A block that specifies GKE configuration for the Databricks workspace:connectivity_type: Specifies the network connectivity types for the GKE nodes and the GKE master network. Possible values are:PRIVATE_NODE_PUBLIC_MASTER,PUBLIC_NODE_PUBLIC_MASTER.master_ip_range: The IP range from which to allocate GKE cluster master resources. This field will be ignored if GKE private cluster is not enabled. It must be exactly as big as/28.
private_access_settings_id- (Optional) Canonical unique identifier of databricks_mws_private_access_settings in Databricks Account.custom_tags- (Optional / AWS only) - The custom tags key-value pairing that is attached to this workspace. These tags will be applied to clusters automatically in addition to anydefault_tagsorcustom_tagson a cluster level. Please note it can take up to an hour for custom_tags to be set due to scheduling on Control Plane. After custom tags are applied, they can be modified however they can never be completely removed.pricing_tier- (Optional) - The pricing tier of the workspace.
You can specify a token block in the body of the workspace resource, so that Terraform manages the refresh of the PAT token for the deployment user. The other option is to create databricks_obo_token, though it requires Premium or Enterprise plan enabled as well as more complex setup. Token block exposes token_value, that holds sensitive PAT token and optionally it can accept two arguments:
-> Note Tokens managed by token {} block are recreated when expired.
comment- (Optional) Comment, that will appear in "User Settings / Access Tokens" page on Workspace UI. By default it's "Terraform PAT".lifetime_seconds- (Optional) Token expiry lifetime. By default its 2592000 (30 days).
On AWS, the following arguments could be modified after the workspace is running:
network_id- Modifying networks on running workspaces would require three separateterraform applysteps.credentials_idstorage_customer_managed_key_idprivate_access_settings_idcustom_tags
In addition to all arguments above, the following attributes are exported:
id- (String) Canonical unique identifier for the workspace, of the format<account-id>/<workspace-id>workspace_id- (String) workspace idworkspace_status_message- (String) updates on workspace statusworkspace_status- (String) workspace statuscreation_time- (Integer) time when workspace was createdworkspace_url- (String) URL of the workspacecustom_tags- (Map) Custom Tags (if present) added to workspace
The timeouts block allows you to specify create, read and update timeouts. It usually takes 5-7 minutes to provision Databricks E2 Workspace and another couple of minutes for your local DNS caches to resolve. Please launch TF_LOG=DEBUG terraform apply whenever you observe timeout issues.
timeouts {
  create = "30m"
  read   = "10m"
  update = "20m"
}
You can reset local DNS caches before provisioning new workspaces with one of the following commands:
- Linux -
sudo /etc/init.d/nscd restart - Mac OS Sierra, X El Capitan, X Mavericks, X Mountain Lion, or X Lion -
sudo killall -HUP mDNSResponder - Mac OS X Yosemite -
sudo discoveryutil udnsflushcaches - Mac OS X Snow Leopard -
sudo dscacheutil -flushcache - Mac OS X Leopard and below -
sudo lookupd -flushcache
-> Note Importing this resource is not currently supported.
The following resources are used in the same context:
- Provisioning Databricks on AWS guide.
- Provisioning Databricks on AWS with PrivateLink guide.
- Provisioning AWS Databricks E2 with a Hub & Spoke firewall for data exfiltration protection guide.
- Provisioning Databricks on GCP guide.
- Provisioning Databricks workspaces on GCP with Private Service Connect guide.
- databricks_mws_credentials to configure the cross-account role for creation of new workspaces within AWS.
- databricks_mws_customer_managed_keys to configure KMS keys for new workspaces within AWS.
- databricks_mws_log_delivery to configure delivery of billable usage logs and audit logs.
- databricks_mws_networks to configure VPC & subnets for new workspaces within AWS.
- databricks_mws_storage_configurations to configure root bucket new workspaces within AWS.
- databricks_mws_private_access_settings to create a Private Access Setting that can be used as part of a databricks_mws_workspaces resource to create a Databricks Workspace that leverages AWS PrivateLink.