


Welcome to tti-eval, a repository for benchmarking text-to-image models on your own data!
Evaluate your (or HF) text-to-image embedding models like CLIP from OpenAI against your (or HF) datasets to estimate how well the model will perform on your classification dataset.
With this library, you can take an embedding model intended for jointly embedding images and text (like CLIP) and compute metrics for how well such model performs on classifying your custom dataset. What you will do is
- Install
tti-eval - Compute embeddings of a dataset with a model
- Do an evaluation of the model against the dataset
You can easily benchmark different models and datasets against each other. Here is an example:

tti-evalrequires Python 3.11 and Poetry.
- Clone the repository:
git clone https://github.com/encord-team/text-to-image-eval.git - Navigate to the project directory:
cd text-to-image-eval - Install the required dependencies:
poetry shell poetry install - Add environment variables:
export TTI_EVAL_CACHE_PATH=$PWD/.cache
export TTI_EVAL_OUTPUT_PATH=$PWD/output
export ENCORD_SSH_KEY_PATH=<path_to_the_encord_ssh_key_file>
To build embeddings, run the CLI command tti-eval build.
This command allows to interactively select the model and dataset combinations on which to build the embeddings.
Alternatively, you can choose known (model, dataset) pairs using the --model-dataset option. For example:
tti-eval build --model-dataset clip/Alzheimer-MRI --model-dataset bioclip/Alzheimer-MRI
To evaluate models, use the CLI command tti-eval evaluate.
This command enables interactive selection of model and dataset combinations for evaluation.
Alternatively, you can specify known (model, dataset) pairs using the --model-dataset option. For example:
tti-eval evaluate --model-dataset clip/Alzheimer-MRI --model-dataset bioclip/Alzheimer-MRI
To create 2D animations of the embeddings, use the CLI command tti-eval animate.
This command allows to visualise the reduction of embeddings from two models on the same dataset.
You have the option to interactively select two models and a dataset for visualization. Alternatively, you can specify the models and dataset as arguments. For example:
tti-eval animate clip bioclip Alzheimer-MRI
The animations will be saved at the location specified by the environment variable TTI_EVAL_OUTPUT_PATH.
By default, this path corresponds to the output folder in the repository directory.
To interactively explore the animation in a temporary session, use the --interactive flag.
ℹ️ You can also carry out these operations using Python. Explore our Python Quickstart guide for more details.

One example of where this tti-eval is useful is to test different open-source models against different open-source datasets within a specific domain.
Below, we focused on the medical domain. We evaluate nine different models of which three of them are domain specific.
The models are evaluated against four different medical datasets. Note, Further down this page, you will find links to all models and datasets.
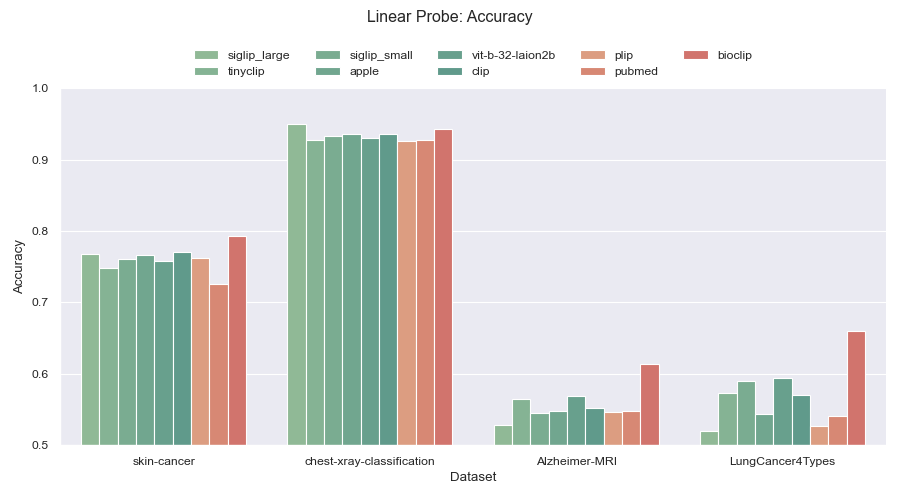
Figure 1: Linear probe accuracy across four different medical datasets. General purpose models are colored green while models trained for the medical domain are colored red.
The raw numbers from the experiment
| Model/Dataset | Alzheimer-MRI | LungCancer4Types | chest-xray-classification | skin-cancer |
|---|---|---|---|---|
| apple | 0.6777 | 0.6633 | 0.9687 | 0.7985 |
| bioclip | 0.8952 | 0.7800 | 0.9771 | 0.7961 |
| clip | 0.6986 | 0.6867 | 0.9727 | 0.7891 |
| plip | 0.8021 | 0.6767 | 0.9599 | 0.7860 |
| pubmed | 0.8503 | 0.5767 | 0.9725 | 0.7637 |
| siglip_large | 0.6908 | 0.6533 | 0.9695 | 0.7947 |
| siglip_small | 0.6992 | 0.6267 | 0.9646 | 0.7780 |
| tinyclip | 0.7389 | 0.5900 | 0.9673 | 0.7589 |
| vit-b-32-laion2b | 0.7559 | 0.5967 | 0.9654 | 0.7738 |
| Model/Dataset | Alzheimer-MRI | LungCancer4Types | chest-xray-classification | skin-cancer |
|---|---|---|---|---|
| apple | 0.4460 | 0.2367 | 0.7381 | 0.3594 |
| bioclip | 0.3092 | 0.2200 | 0.7356 | 0.0431 |
| clip | 0.4857 | 0.2267 | 0.7381 | 0.1955 |
| plip | 0.0104 | 0.2267 | 0.3873 | 0.0797 |
| pubmed | 0.3099 | 0.2867 | 0.7501 | 0.1127 |
| siglip_large | 0.4876 | 0.3000 | 0.5950 | 0.0421 |
| siglip_small | 0.4102 | 0.0767 | 0.7381 | 0.1541 |
| tinyclip | 0.2526 | 0.2533 | 0.7313 | 0.1113 |
| vit-b-32-laion2b | 0.3594 | 0.1533 | 0.7378 | 0.1228 |
| Model/Dataset | Alzheimer-MRI | LungCancer4Types | chest-xray-classification | skin-cancer |
|---|---|---|---|---|
| apple | 0.4281 | 0.2786 | 0.8835 | 0.6437 |
| bioclip | 0.4535 | 0.3496 | 0.8786 | 0.6278 |
| clip | 0.4247 | 0.2812 | 0.8602 | 0.6347 |
| plip | 0.4406 | 0.3174 | 0.8372 | 0.6289 |
| pubmed | 0.4445 | 0.3022 | 0.8621 | 0.6228 |
| siglip_large | 0.4232 | 0.2743 | 0.8797 | 0.6466 |
| siglip_small | 0.4303 | 0.2613 | 0.8660 | 0.6348 |
| tinyclip | 0.4361 | 0.2833 | 0.8379 | 0.6098 |
| vit-b-32-laion2b | 0.4378 | 0.2934 | 0.8551 | 0.6189 |
| Model/Dataset | Alzheimer-MRI | LungCancer4Types | chest-xray-classification | skin-cancer |
|---|---|---|---|---|
| apple | 0.5482 | 0.5433 | 0.9362 | 0.7662 |
| bioclip | 0.6139 | 0.6600 | 0.9433 | 0.7933 |
| clip | 0.5547 | 0.5700 | 0.9362 | 0.7704 |
| plip | 0.5469 | 0.5267 | 0.9261 | 0.7630 |
| pubmed | 0.5482 | 0.5400 | 0.9278 | 0.7269 |
| siglip_large | 0.5286 | 0.5200 | 0.9496 | 0.7697 |
| siglip_small | 0.5449 | 0.4967 | 0.9327 | 0.7606 |
| tinyclip | 0.5651 | 0.5733 | 0.9280 | 0.7484 |
| vit-b-32-laion2b | 0.5684 | 0.5933 | 0.9302 | 0.7578 |
This repository contains classification datasets sourced from Hugging Face and Encord.
⚠️ Currently, only image and image groups datasets are supported, with potential for future expansion to include video datasets.
| Dataset Title | Implementation | HF Dataset |
|---|---|---|
| Alzheimer-MRI | Hugging Face | Falah/Alzheimer_MRI |
| chest-xray-classification | Hugging Face | trpakov/chest-xray-classification |
| LungCancer4Types | Hugging Face | Kabil007/LungCancer4Types |
| plants | Hugging Face | sampath017/plants |
| skin-cancer | Hugging Face | marmal88/skin_cancer |
| sports-classification | Hugging Face | HES-XPLAIN/SportsImageClassification |
| rsicd | Encord | * Requires ssh key and access to the Encord project |
To register a dataset from a known source, you can include the dataset definition as a JSON file in the sources/datasets folder.
The definition will be validated against the schema defined by the tti_eval.dataset.base.DatasetDefinitionSpec Pydantic class to ensure that it adheres to the required structure.
You can find the explicit schema in sources/dataset-definition-schema.json.
Check out the declarations of known sources at tti_eval.dataset.types and refer to the existing dataset definitions in the sources/datasets folder for guidance.
Below is an example of a dataset definition for the plants dataset sourced from Hugging Face:
{
  "dataset_type": "HFDataset",
  "title": "plants",
  "title_in_source": "sampath017/plants"
}
In each dataset definition, the dataset_type and title fields are required.
The dataset_type indicates the name of the class that represents the source, while title serves as a reference for the dataset on this platform.
For Hugging Face datasets, the title_in_source field should store the title of the dataset as it appears on the Hugging Face website.
For datasets sourced from Encord, other set of fields are required. These include project_hash, which contains the hash of the project, and classification_hash, which contains the hash of the radio-button (multiclass) classification used in the labels.
Expanding the dataset sources involves two key steps:
- Create a dataset class that inherits from
tti_eval.dataset.Datasetand specifies the input requirements for extracting data from the new source. This class should encapsulate the necessary logic for fetching and processing dataset elements. - Generate a dataset definition in JSON format and save it in the
sources/datasetsfolder, following the guidelines outlined in the previous section. Ensure that the definition includes essential fields such asdataset_type,title, andmodule_path, which points to the file containing the dataset class implementation.
It's recommended to store the file containing the dataset class implementation in the
tti_eval/dataset/typesfolder and add a reference to the class in the__init__.pyfile in the same folder. This ensures that the new dataset type is accessible by default for all dataset definitions, eliminating the need to explicitly state themodule_pathfield for datasets from such source.
Alternatively, you can programmatically add a dataset, which will be available only for the current session, using the register_dataset() method of the tti_eval.dataset.DatasetProvider class.
Here is an example of how to register a dataset from Hugging Face using Python code:
from tti_eval.dataset import DatasetProvider, Split
from tti_eval.dataset.types import HFDataset

DatasetProvider.register_dataset(HFDataset, "plants", title_in_source="sampath017/plants")
ds = DatasetProvider.get_dataset("plants", split=Split.ALL)
print(len(ds)) # Returns: 219To permanently remove a dataset, simply delete the corresponding JSON file stores in the sources/datasets folder.
This action removes the dataset from the list of available datasets in the CLI, disabling the option to create any further embedding using its data.
However, all embeddings previously built on that dataset will remain intact and available for other tasks such as evaluation and animation.
This repository contains models sourced from Hugging Face, OpenCLIP and local implementations based on OpenCLIP models.
TODO: Some more prose about what's the difference between implementations.
| Model Title | Implementation | HF Model |
|---|---|---|
| apple | OpenCLIP | apple/DFN5B-CLIP-ViT-H-14 |
| bioclip | OpenCLIP | imageomics/bioclip |
| eva-clip | OpenCLIP | BAAI/EVA-CLIP-8B-448 |
| vit-b-32-laion2b | OpenCLIP | laion/CLIP-ViT-B-32-laion2B-s34B-b79K |
| clip | Hugging Face | openai/clip-vit-large-patch14-336 |
| fashion | Hugging Face | patrickjohncyh/fashion-clip |
| plip | Hugging Face | vinid/plip |
| pubmed | Hugging Face | flaviagiammarino/pubmed-clip-vit-base-patch32 |
| rsicd | Hugging Face | flax-community/clip-rsicd |
| siglip_large | Hugging Face | google/siglip-large-patch16-256 |
| siglip_small | Hugging Face | google/siglip-base-patch16-224 |
| street | Hugging Face | geolocal/StreetCLIP |
| tinyclip | Hugging Face | wkcn/TinyCLIP-ViT-40M-32-Text-19M-LAION400M |
| Model Title | Implementation | Weights |
|---|---|---|
| rsicd-encord | LocalOpenCLIP | - |
To register a model from a known source, you can include the model definition as a JSON file in the sources/models folder.
The definition will be validated against the schema defined by the tti_eval.model.base.ModelDefinitionSpec Pydantic class to ensure that it adheres to the required structure.
You can find the explicit schema in sources/model-definition-schema.json.
Check out the declarations of known sources at tti_eval.model.types and refer to the existing model definitions in the sources/models folder for guidance.
Below is an example of a model definition for the clip model sourced from Hugging Face:
{
  "model_type": "HFModel",
  "title": "clip",
  "title_in_source": "openai/clip-vit-large-patch14-336"
}
In each model definition, the model_type and title fields are required.
The model_type indicates the name of the class that represents the source, while title serves as a reference for the model on this platform.
For non-local models, the title_in_source field should store the title of the model as it appears in the source.
For model checkpoints in local storage, the title_in_source field should store the title of the model used to train it.
Additionally, on models sourced from OpenCLIP the optional pretrained field may be needed. See the list of OpenCLIP models here.
Expanding the model sources involves two key steps:
- Create a model class that inherits from
tti_eval.model.Modeland specifies the input requirements for loading models from the new source. This class should encapsulate the necessary logic for processing model elements and generating embeddings. - Generate a model definition in JSON format and save it in the
sources/modelsfolder, following the guidelines outlined in the previous section. Ensure that the definition includes essential fields such asmodel_type,title, andmodule_path, which points to the file containing the model class implementation.
It's recommended to store the file containing the model class implementation in the
tti_eval/model/typesfolder and add a reference to the class in the__init__.pyfile in the same folder. This ensures that the new model type is accessible by default for all model definitions, eliminating the need to explicitly state themodule_pathfield for models from such source.
Alternatively, you can programmatically add a model, which will be available only for the current session, using the register_model() method of the tti_eval.model.ModelProvider class.
Here is an example of how to register a model from Hugging Face using Python code:
from tti_eval.model import ModelProvider
from tti_eval.model.types import HFModel

ModelProvider.register_model(HFModel, "clip", title_in_source="openai/clip-vit-large-patch14-336")
model = ModelProvider.get_model("clip")
print(model.title, model.title_in_source) # Returns: clip openai/clip-vit-large-patch14-336To permanently remove a model, simply delete the corresponding JSON file stores in the sources/models folder.
This action removes the model from the list of available models in the CLI, disabling the option to create any further embedding with it.
However, all embeddings previously built with that model will remain intact and available for other tasks such as evaluation and animation.
- Create the virtual environment, add dev dependencies and set up pre-commit hooks.
./dev-setup.sh - Add environment variables:
export TTI_EVAL_CACHE_PATH=$PWD/.cache
export TTI_EVAL_OUTPUT_PATH=$PWD/output
export ENCORD_SSH_KEY_PATH=<path_to_the_encord_ssh_key_file>
Contributions are welcome! Please feel free to open an issue or submit a pull request with your suggestions, bug fixes, or new features.
To contribute by adding dataset sources, follow these steps:
- Store the file containing the new dataset class implementation in the
tti_eval/dataset/typesfolder. Don't forget to add a reference to the class in the__init__.pyfile in the same folder. This ensures that the new dataset type is accessible by default for all dataset definitions, eliminating the need to explicitly state themodule_pathfield for datasets from such source. - Open a pull request with the necessary changes. Make sure to include tests validating that data retrieval, processing and usage are working as expected.
- Document the addition of the dataset source, providing details on its structure, usage, and any specific considerations or instructions for integration. This ensures that users have clear guidance on how to leverage the new dataset source effectively.
To contribute by adding model sources, follow these steps:
- Store the file containing the new model class implementation in the
tti_eval/model/typesfolder. Don't forget to add a reference to the class in the__init__.pyfile in the same folder. This ensures that the new model type is accessible by default for all model definitions, eliminating the need to explicitly state themodule_pathfield for models from such source. - Open a pull request with the necessary changes. Make sure to include tests validating that model loading, processing and embedding generation are working as expected.
- Document the addition of the model source, providing details on its structure, usage, and any specific considerations or instructions for integration. This ensures that users have clear guidance on how to leverage the new model source effectively.
autofaiss: The project depends on the autofaiss library which can give some trouble on Windows. Please reach out or raise an issue with as many system and version details as possible if you encounter it.