
Alex is a chat bot that helps you at work, saving your time and boosting your productivity 💪.
He can help you to ask for expenses refunds, add tasks, create tickets, find documents and answer questions.
One more thing: Alex is a friend of Alexa 😬.
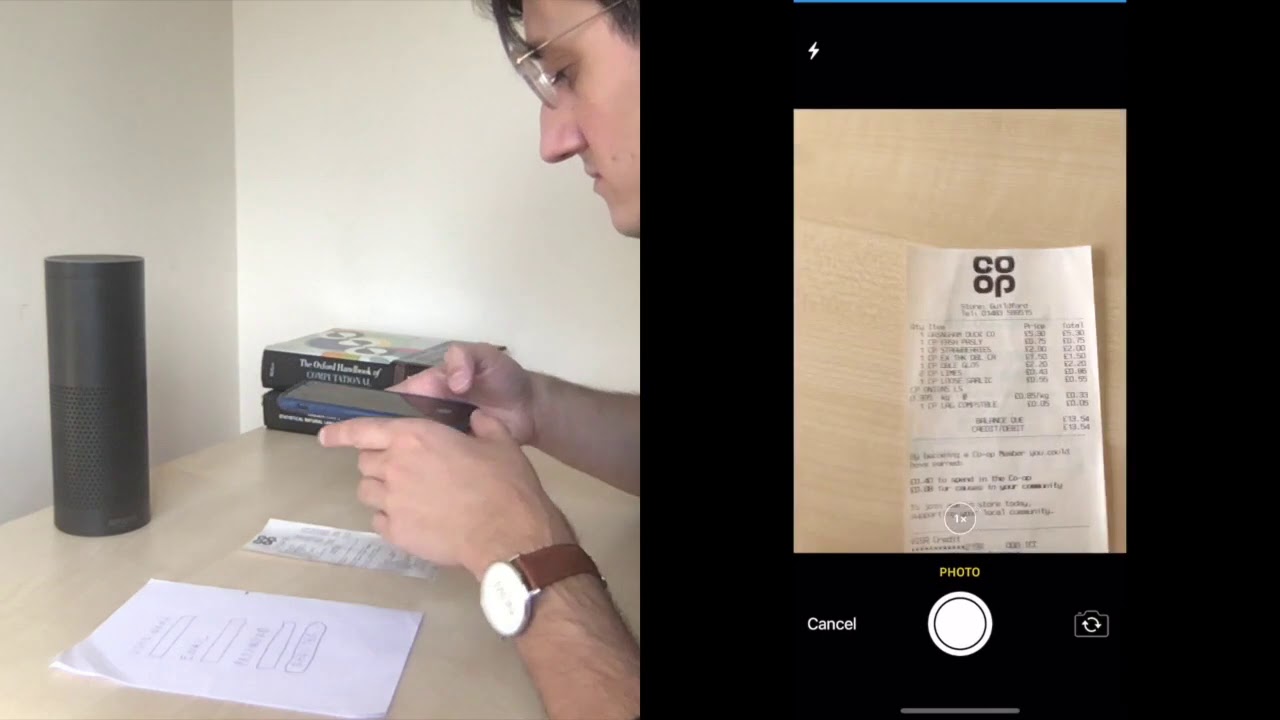
Click below 👇 to see the demo 😎
| Feature | Message | Code | AWS Curated Models used | AWS Services used |
|---|---|---|---|---|
| Send passport | Alex, here is my passport | lambda_send_passport.py | Passport Data Page Detection |
Lex S3 SageMaker |
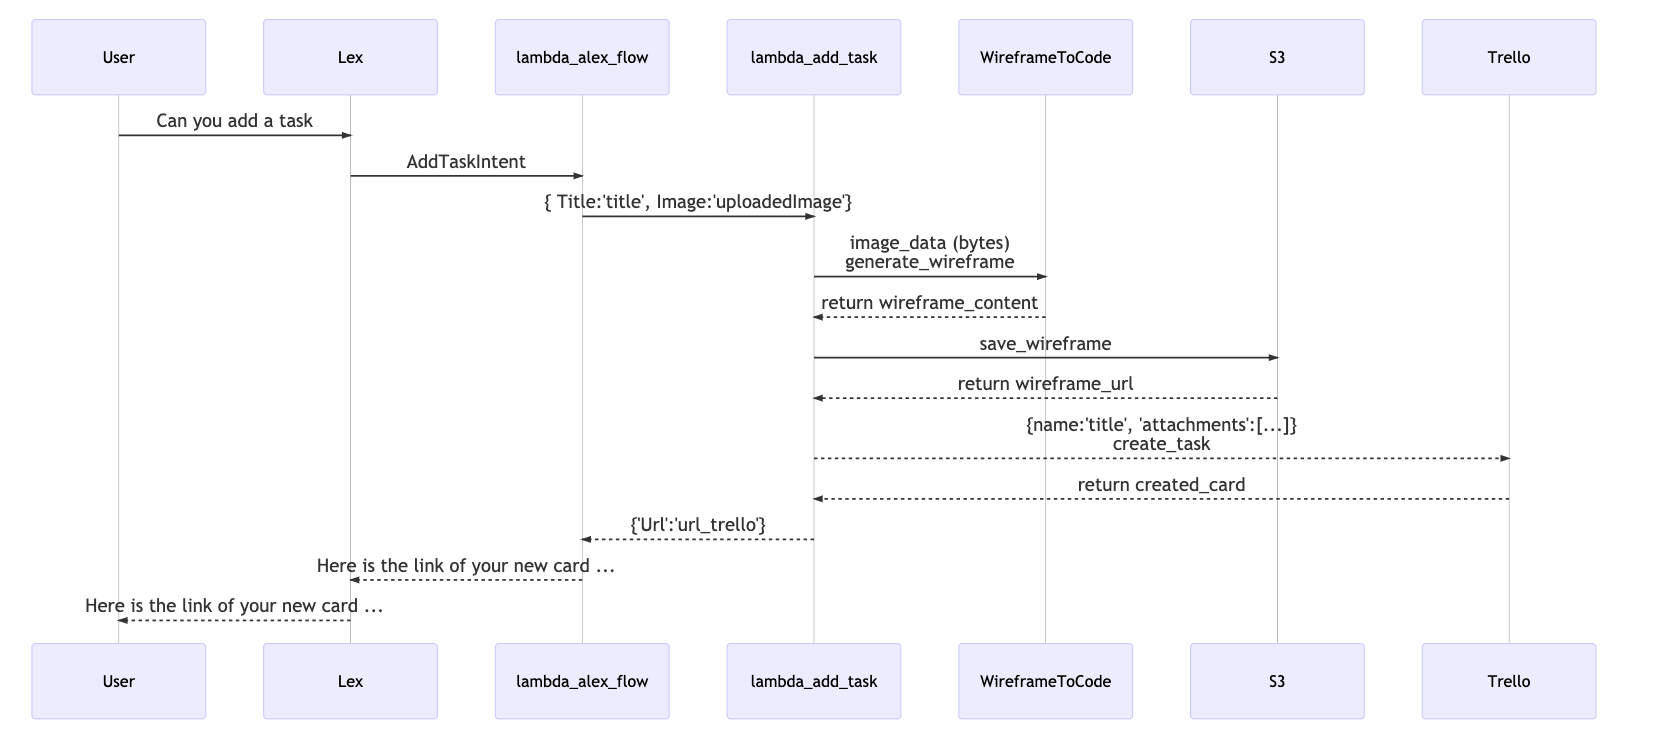
| Add task | Alex, can you add a task | lambda_add_task.py | Mphasis Autocode WireframeToCode |
Lex S3 SageMaker Alexa Skills |
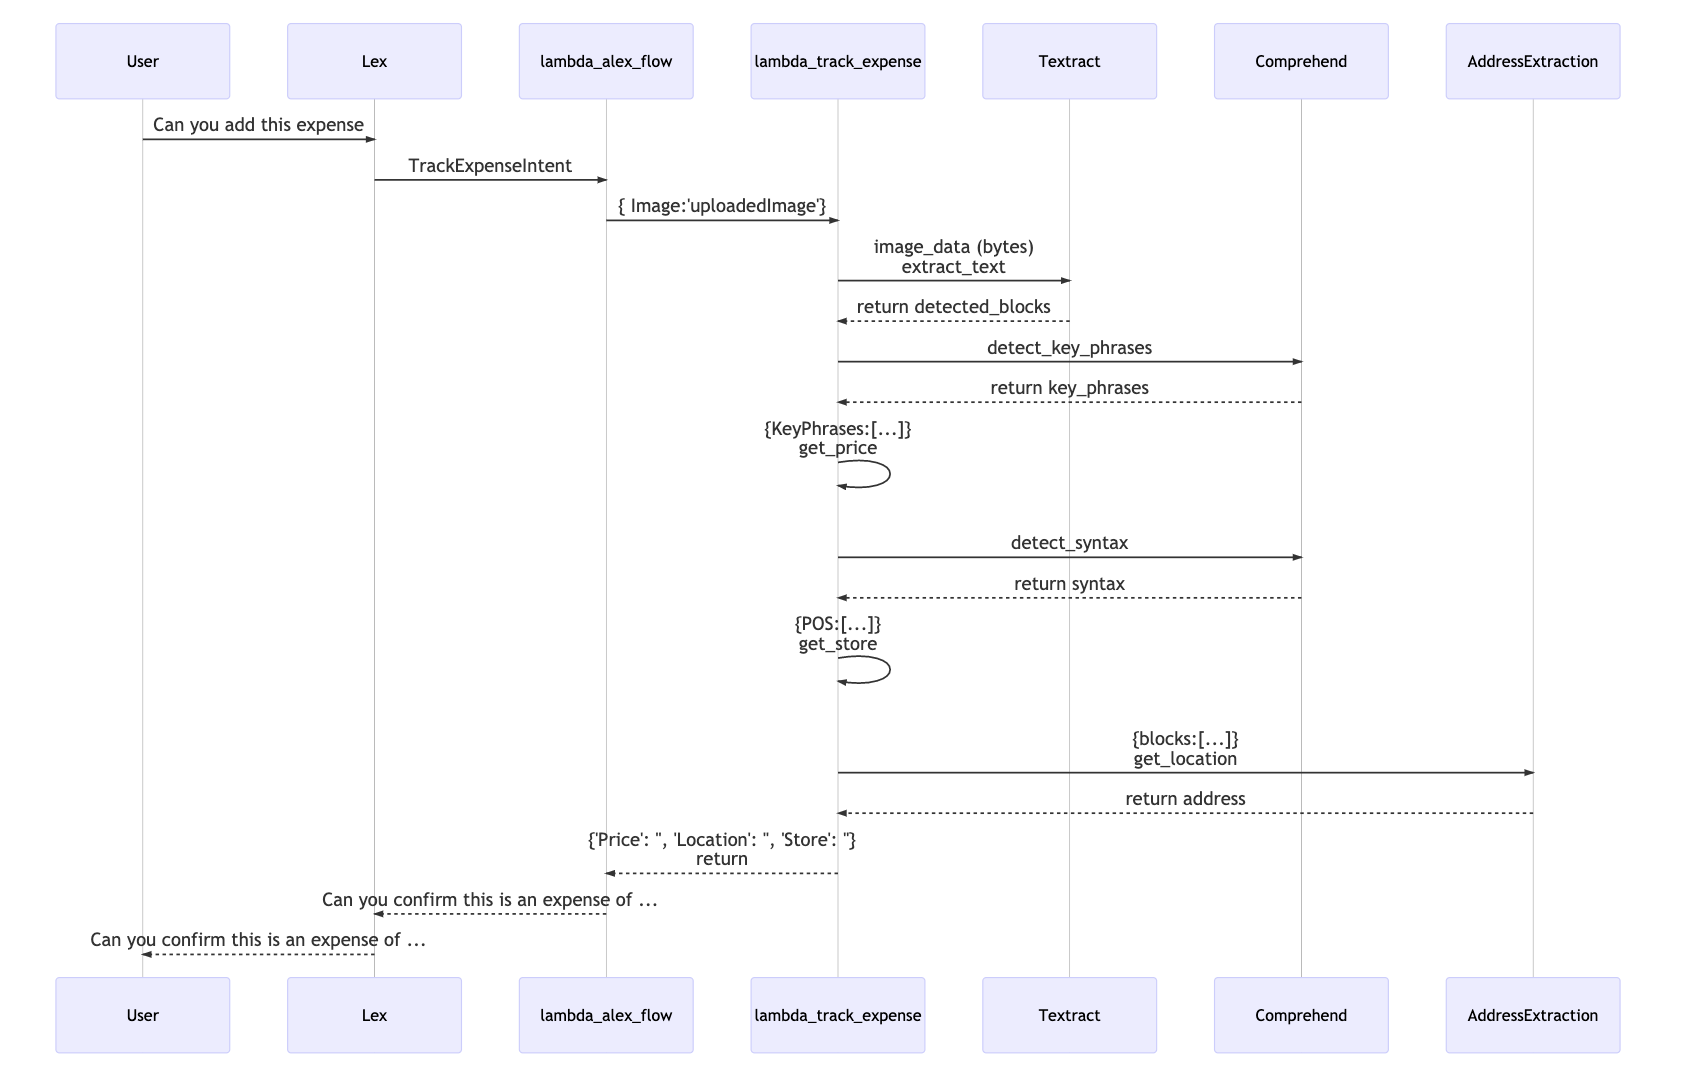
| Add expense | Alex, can you add this expense | lambda_track_expense.py | Mphasis DeepInsights Address Extraction |
Lex S3 SageMaker Textract Comprehend |
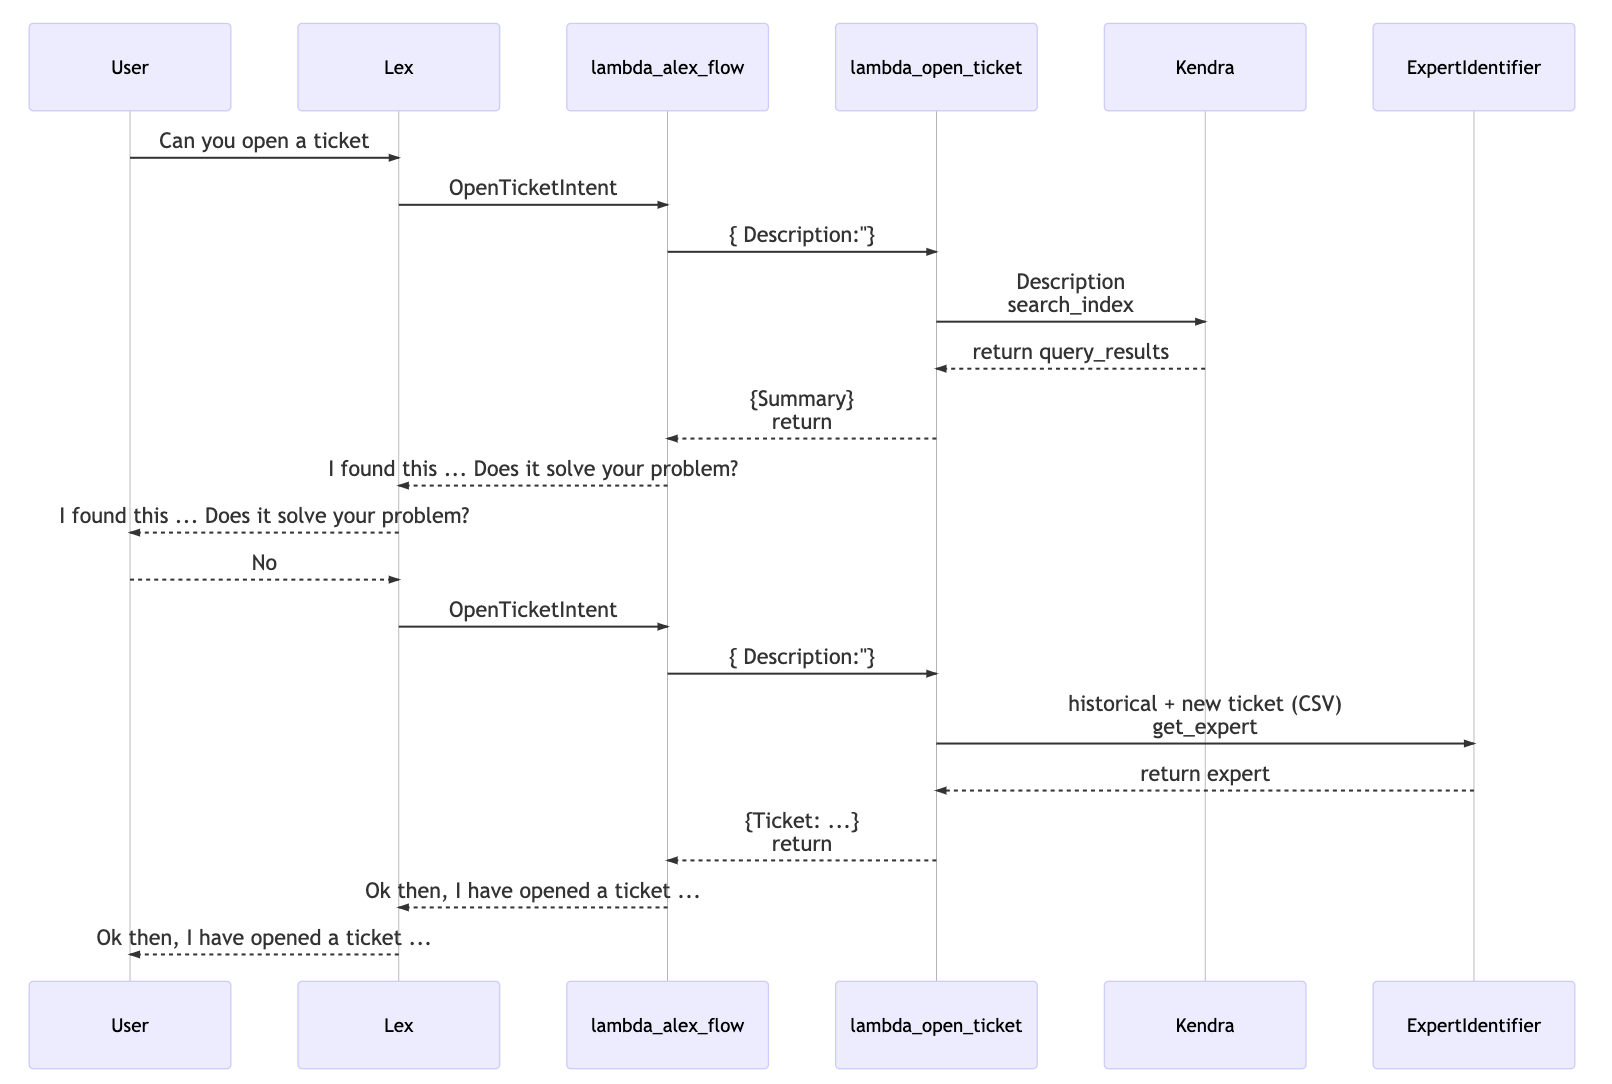
| Open ticket | Alex, can you open a ticket | lambda_open_ticket.py | Mphasis Optimize.AI Expert Identifier |
Lex S3 SageMaker Kendra |
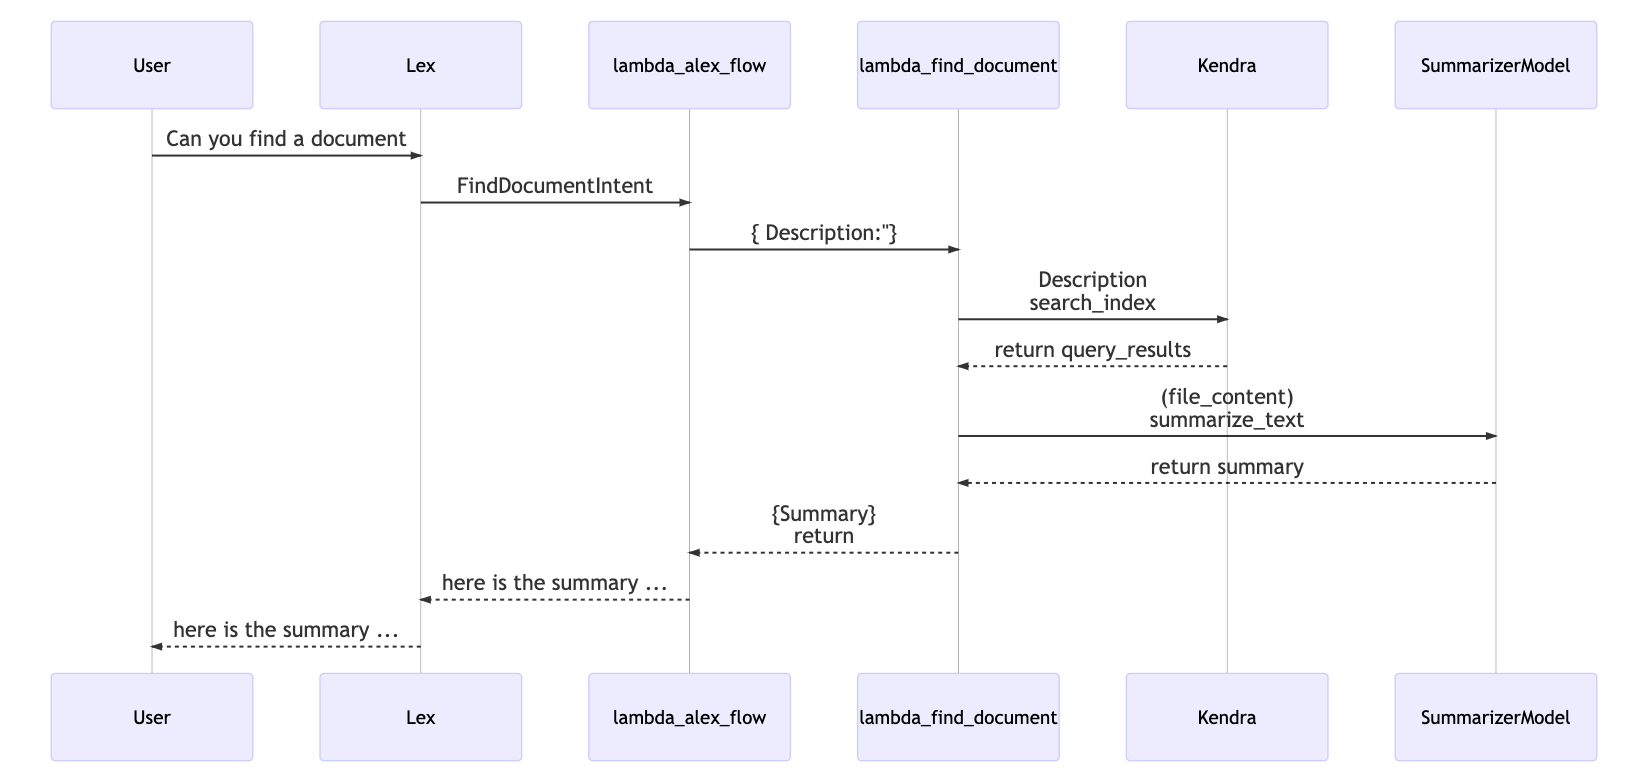
| Find document | Alex, can you find a document | lambda_find_document.py | Mphasis DeepInsights Text Summarizer |
Lex S3 SageMaker Kendra |
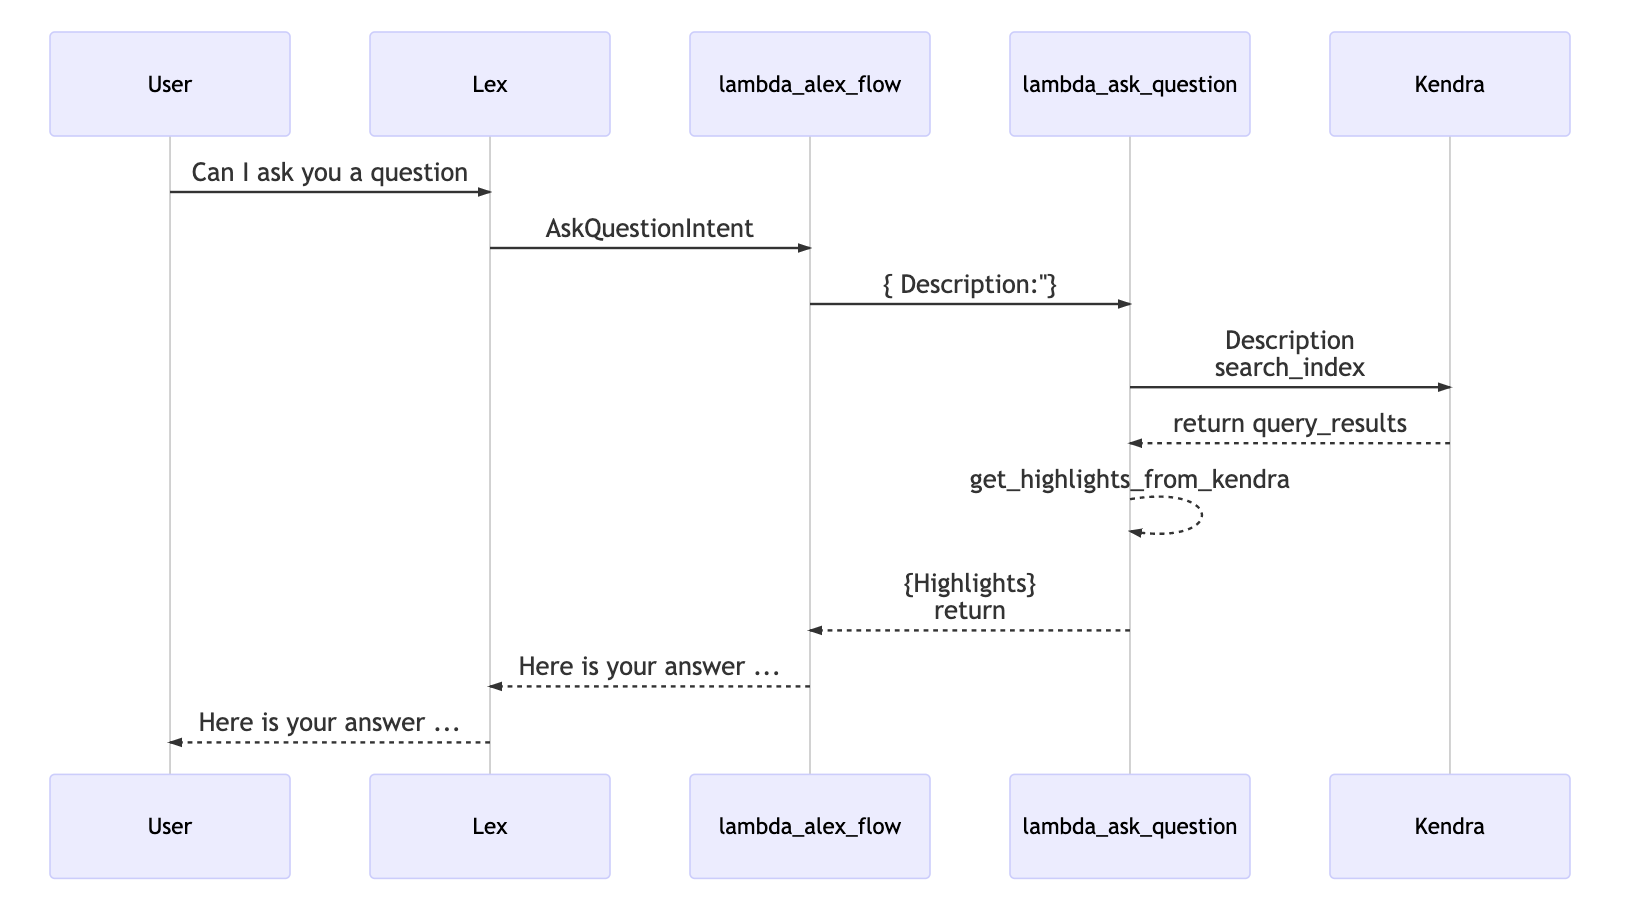
| Ask question | Alex, {how, what, why} ... | lambda_ask_question.py | S3 Kendra Alexa Skills Lex |

- Amazon Lex
- Amazon S3
- Amazon Textract
- Amazon Comprehend
- Amazon SageMaker
- Amazon Kendra
- Alexa Skills
- Passport Data Page Detection
- Mphasis Autocode WireframeToCode
- Mphasis DeepInsights Address Extraction
- Mphasis Optimize.AI Expert Identifier
- Mphasis DeepInsights Text Summarizer

| Feature | Input | Output |
|---|---|---|
| Send passport | data-input/Passport.jpg | {'ExpirationDate': '17/01/1985','BirthDate': '31/01/2016','PassportNumber': '107185703'} |
| Add task | data-input/wireframe.jpg | data-output/wireframe.html |
| Add expense | data-input/expense.jpg | {'Price': '13.54', 'Location': 'Guildford', 'Store': 'Co-op'} |
| Open ticket | {'query':'My internet is not working'} and this file |
{'Summary': 'Wait 2-5 minutes before plugging it back in.\n\n\n3. Wait 5 more minutes and retry the connection.\n\n\nIn most cases, this should x your issue and allow you to get back online. If you go through\nthese steps and something still isnt working, you may need to contact your internet\nservice provider for assistance.\n\n\nUnderstanding Your Routers Icons\n\n\nMost routers have a series of icons that illuminate to convey dierent status messages at a\nglance. Though these can vary from brand to brand, most manufacturers include at least\nthree primary status indicators:\n\n\nWiFi not working\n\n\nWiFi slowed down\n\n\nWiFi network disappearing\n\n\nDevices that wont connect to Wi\n\n\nGlobe icon: solid when modem is connected to the Internet.'} |
| Find document | {'Description': 'Privacy policy'} and this file |
{'Summary': 'We collect your personal information in order to provide and continually improve our products and services. What personal information about customers does amazon europe collect ?provide , troubleshoot , and improve amazon services.'} |
| Ask question | {'Description': 'How many vacation weeks I have on my first year?'} and this file |
{'Summary': "Amazon.\ncom's salaried employees earn two weeks of vacation time in their first year of employment and three weeks of vacation in their\nsecond year"} |
There are three levels of testing you can follow, with increasing levels of difficulty.
You can test only the Models, test the Use-cases and test the Full deployment.
If you just want just wand to test the deployment of the curated models and perform inference, follow the instructions at this Jupyter notebook.
Now, if you want to test the use-cases, i.e. test the models integrated with the business logic and AWS services, use this this Jupyter notebook.
Please note that for this you will need to have deployed the models, and depending on the feature you want to test, you may need to configure S3 Buckets, Kendra index, and get a Trello API key/token.
As I said, doing a full deploy is not exactly easy 😅.
But bear with me and let's follow these steps:
- Open the file
config.py - Edit with the configurations from your AWS account
Run this command in the command line and wait (it will take some time to deploy all models):
python models_deploy.py
Skip if you have already deployed the models with the Jupyter Notebook.
- S3 Buckets
- Amazon Kendra
- Lambda functions
- Amazon Lex Bot
- Alexa Skill
- Configuring Permissions and IAM
- Create a bucket for images and HTML files (Remember to replace the bucket in your
config.pyfile) - Create a bucket to store the documents for Kendra
I'm not going to explain in detail how to deploy a Kendra index because AWS docs do a good job on this.
You need to follow two steps:
You just need to make sure you use the bucket you have created above as the datasource for the Kendra index.
Now it is time to create our Lambda functions.
It is very simple to create a Lambda function via the console, you can follow this tutorial.
You will need to create seven functions, namely:
Click on the links above to copy the source code for the Lambda function and paste it at the Lambda configuration. All of them use Python 3.6 engine.
Important You will need to configure the timeout for at least 60 seconds, or otherwise the functions will fail. This is because some of the models are slow to perform inference.
- Go to the Amazon Lex service page in AWS Console
- Open the file intent_config_lex.json and replace all instances of {AWS_ACCOUNT_ID} with your AWS account id
- Click import and select the file intent_config_lex.json (you will actually need to zip it first)
- Click Build and then Publish
- Done! Your bot is created
We need to create a Lambda to handle the requests from Alexa. For this, we are going to use the starting application from AWS Serverless repository because it already creates the necessary Alexa Skill trigger for us, and we just need to update the Lambda code.
- Go to the same page that you used to create a Lambda function
- Choose Browse serverless app repository
- Type alexa-skills-kit-python36-facts-skill and select the app
- Change the application name to alex-alexa-skill
- Change the Lambda name to alex-alexa-skill
- Click Deploy
- Now select the Lambda function and paste this code
- Click save
Important You will need to configure the timeout for at least 60 seconds
- Go to the Alexa developer dashboard
- Select Create Skill
- Choose Custom and provision your own
- Select Start from scratch
- Click JSON Editor and drag and drop this file into the editor
- Go to Endpoint and copy and paste the ARN of your application from the previous step
- Click Save model and Build model
First, let's create a custom Policy named InvokeLambda. This is needed because we need to allow Lambda functions to call other Lambda functions (such as lambda_alex_flow.py).
Go to this link to create the policy and add InvokeAsync and InvokeFunction actions.
Now we need to attach a number of policies to each Lambda role. You can find attach policies to roles at this link.
- alex_flow
- InvokeLambda
- ask_question
- AmazonSageMakerFullAccess
- AmazonKendraFullAccess
- find_document
- AmazonSageMakerFullAccess
- AmazonKendraFullAccess
- AmazonS3FullAccess
- InvokeLambda
- add_task
- AmazonSageMakerFullAccess
- AmazonS3FullAccess
- open_ticket
- AmazonKendraFullAccess
- AmazonSageMakerFullAccess
- send_passport
- AmazonSageMakerFullAccess
- upload_file
- AmazonS3FullAccess
You should also add InvokeLambda to the role for your Alexa Skill app, which should be named something like serverlessrepo-alexa-skil-(....)
There are two projects for the mobile app, the cordova wrapper and the Lex Bot UI (which was based on this project from Amazon)
First, you need to create a Cognito pool ID and add the Lex policy.
Next, open those three files:
- lex-ui/src/config.dev.json
- lex-ui/src/config.prod.json
- lex-ui/src/store/action.js
And replace {YOUR_API_GATEWAY_TO_UPLOAD_FILE_LAMBDA} for https://{YOU_ENDPOINT}.execute-api.us-east-1.amazonaws.com/Production/upload_file
Also, replace YOUR_COGNITO_POOL_ID with the Cognito pool ID you have created above.
npm installnpm run buildpython move_files.py(this is necessary to copy the built UI to the cordova Wrapper)
- Install Ionic
npm install -g ionic - Install Cordova
npm install -g cordova - Run
ionic cap add ios - Run
ionic build - Run
ionic cap copy ios - Run
ionic cap sync ios - Run
ionic cap open iosand now you can deploy the app to your device using Xcode
Congratulations for reaching this far 🙏
