


This repository contains the infrastructure and deployment code for my Home Lab software and infrastructure. The goal here is to experiment with, understand, and adopt GitOps and IaC best practices for Kubernetes. Furthermore, this allows me to dabble all the way up the hardware stack to see where the rubber actually hits the road, so to speak.
The path I've chosen is through Harvester, Rancher, and Kubernetes and attempts to adhere to the principle of Hyperconverged Infrastructure (HCI). To do this I'm leveraging older rackmounted hardware. It's not the most power efficent, but it's also not the worst.
📁
├─📁 .taskfiles     # Commonly performed actions executable via taskfile.dev cli.
├─📁 .vscode        # Portable configuration for this repo.
├─📁 clusters       # Kubernetes clusters defined via gitops.
├─📁 docs           # Documentation, duh.
├─📁 manifests      # Realm of the .yaml files.
│ ├─📁 apps         # Kustomizations defining a single application to be deployed to a cluster.
│ ├─📁 components   # Re-usable kustomize components for use across applications.
│ └─📁 harvester    # Manifests used for harvester configuration.
└─📁 terraform      # Infrastructure provisioned via terraform.
└─📁 .modules # Re-usable terraform modules.My homelab architecture has gone through a number of revamps over the years but there has emerged a few key considerations:
- Enterprise gear is cooler than consumer stuff. This rules out NUCs.
- Downtime is not fun when the wife is asking why the internet doesn't work.
- I enjoy overengineering things.
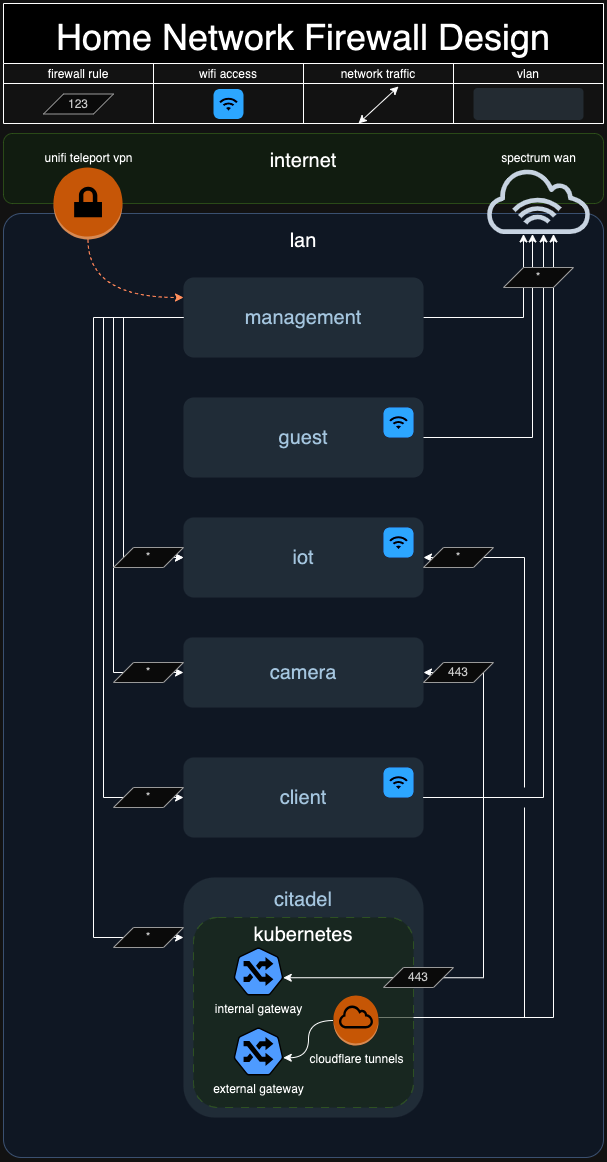
Through the confluence of the above factors I've arrived on the current iteration of my setup, which is split into two physically distinct parts: the home and the lab. The home portion is a standard Unifi setup, managed out of my UDM Pro. The lab portion is managed and described here, and is arranged such that any outage or maintenance of the lab will not impact the home portion.
The linkage between the two is done physically by a single 10Gb link, and by assigning the client vlan in the diagram below a primary dns server from the lab portion. If, heaven forbid, the lab should suffer an outage, the client vlan is also given a second dns server to use.
Click to see vlan diagram
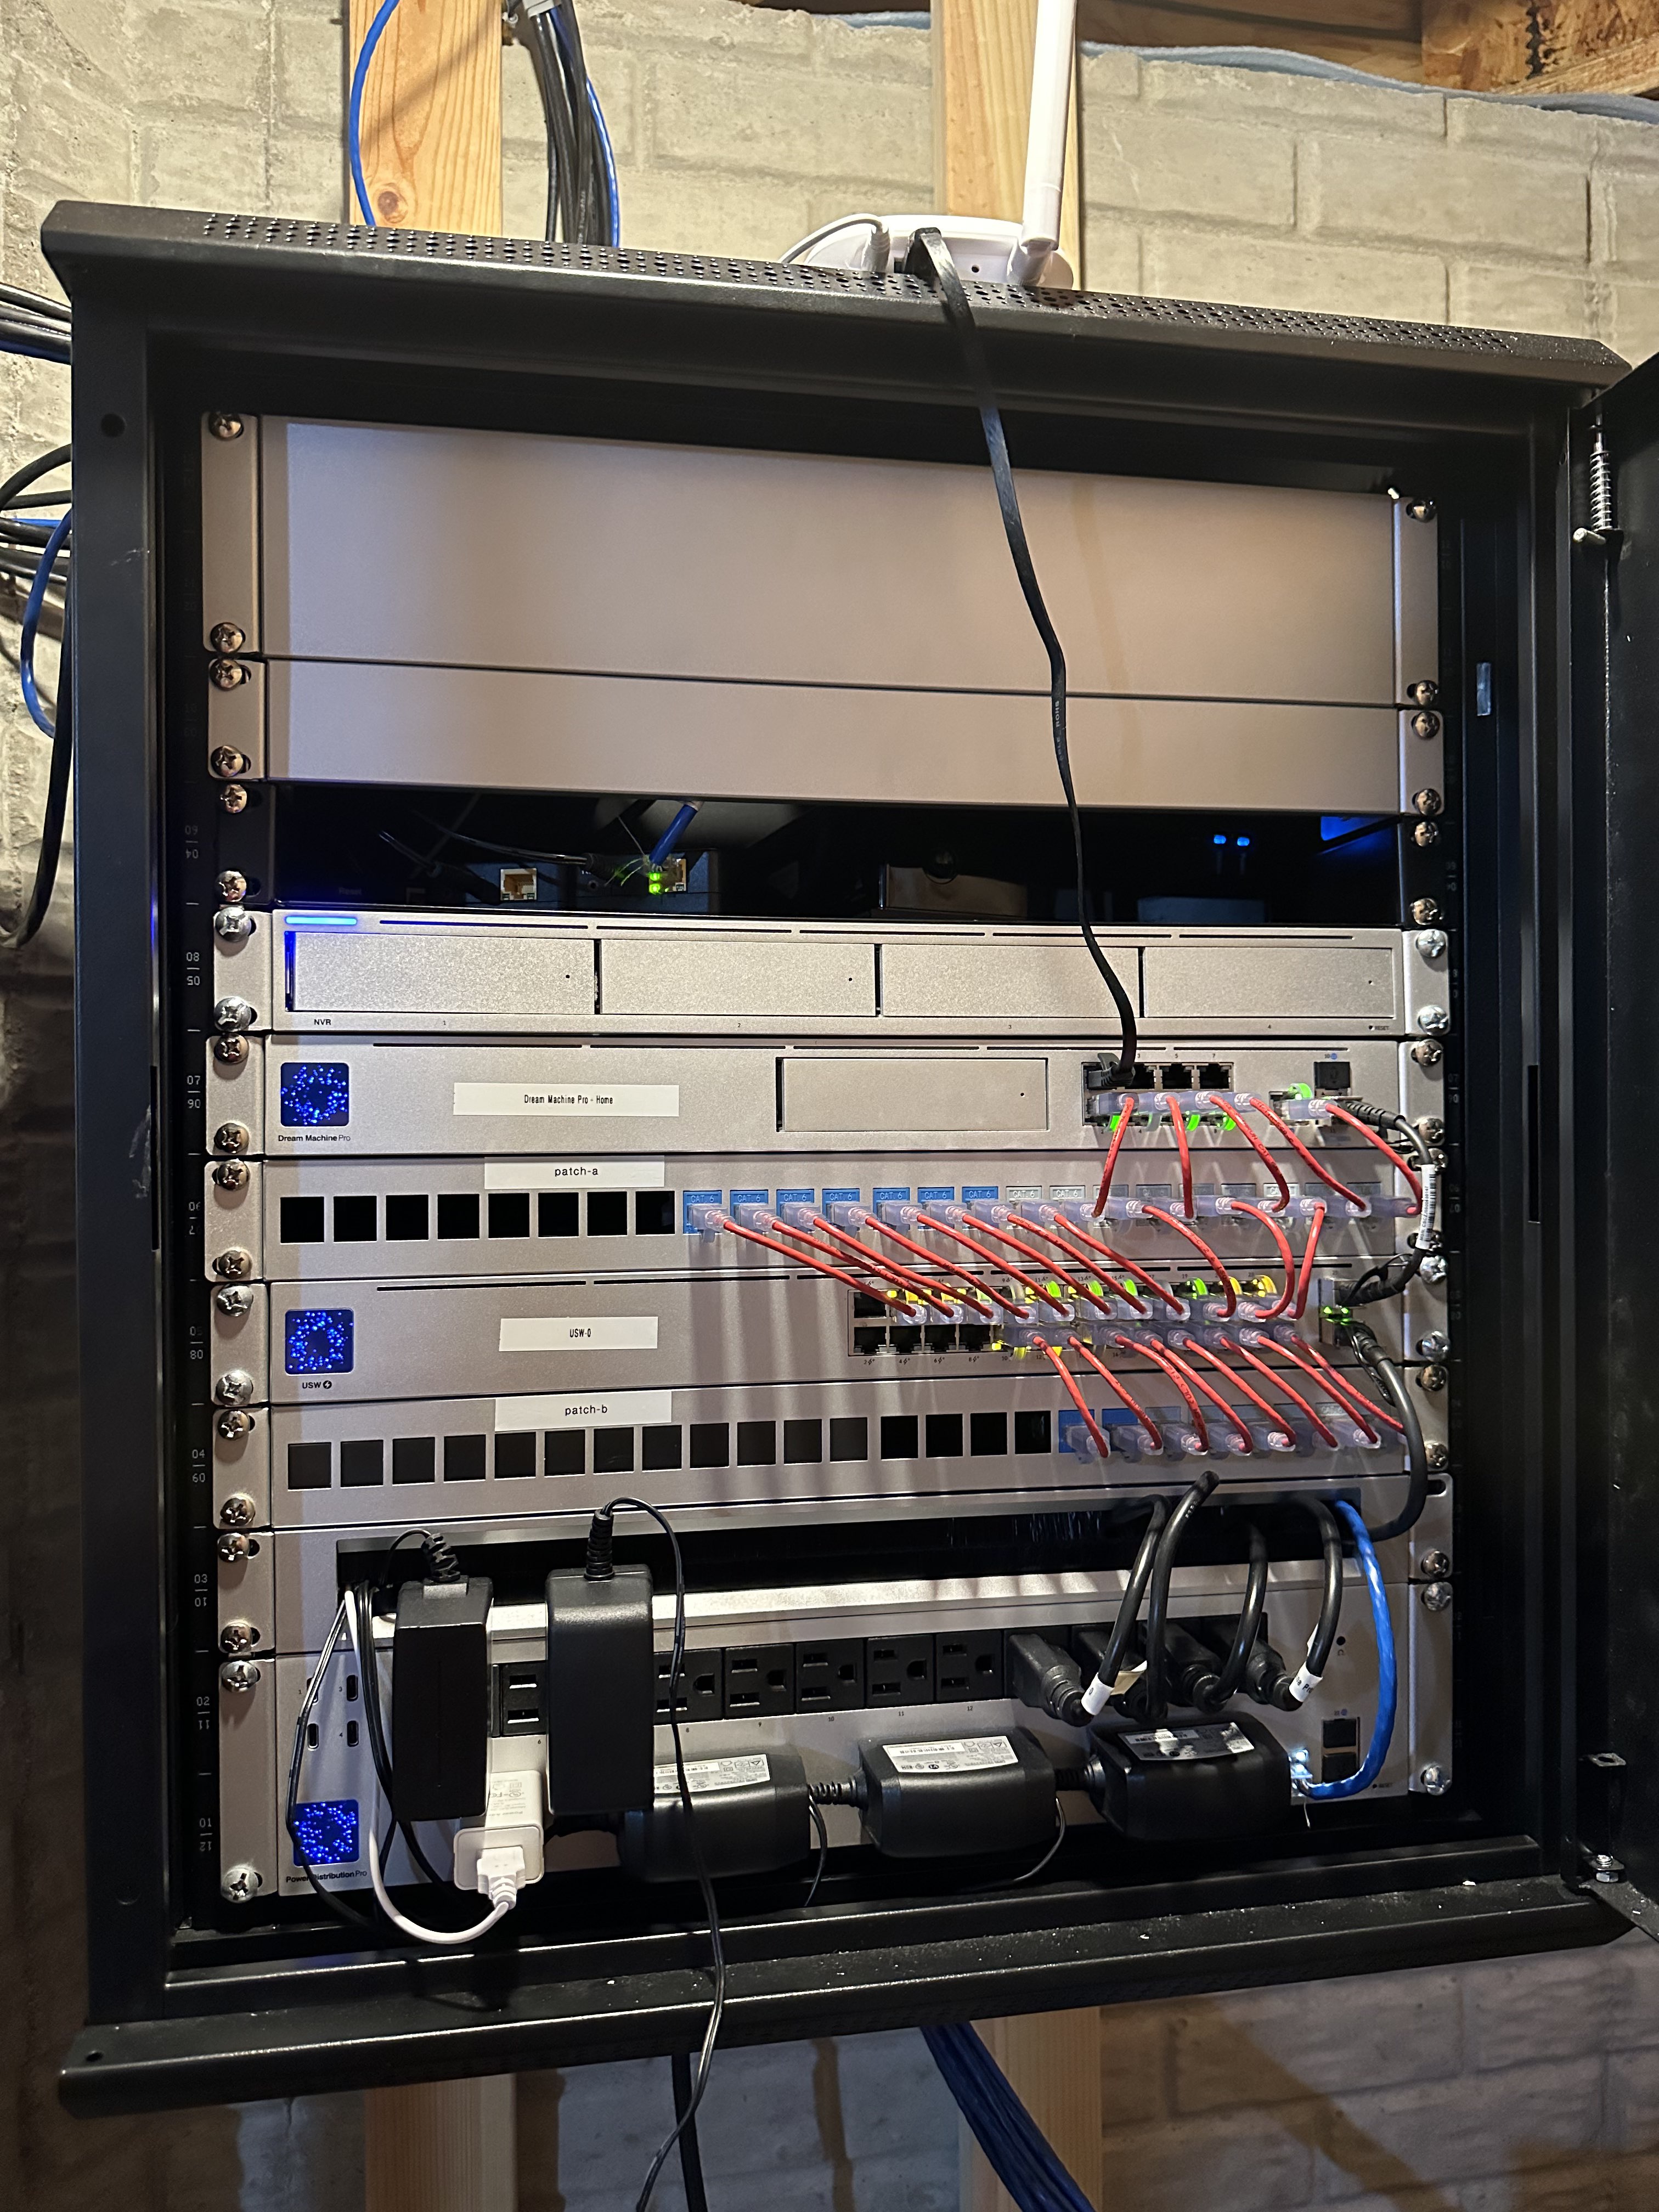
The network side of things is a straightforward Unifi setup. The shelf up top houses some MoCA adapters for locations for convenience, and my modem tucked somewhere in the back. My patch panels use a blue key for POE and gray for a non-POE jack.
Click to see my network rack!
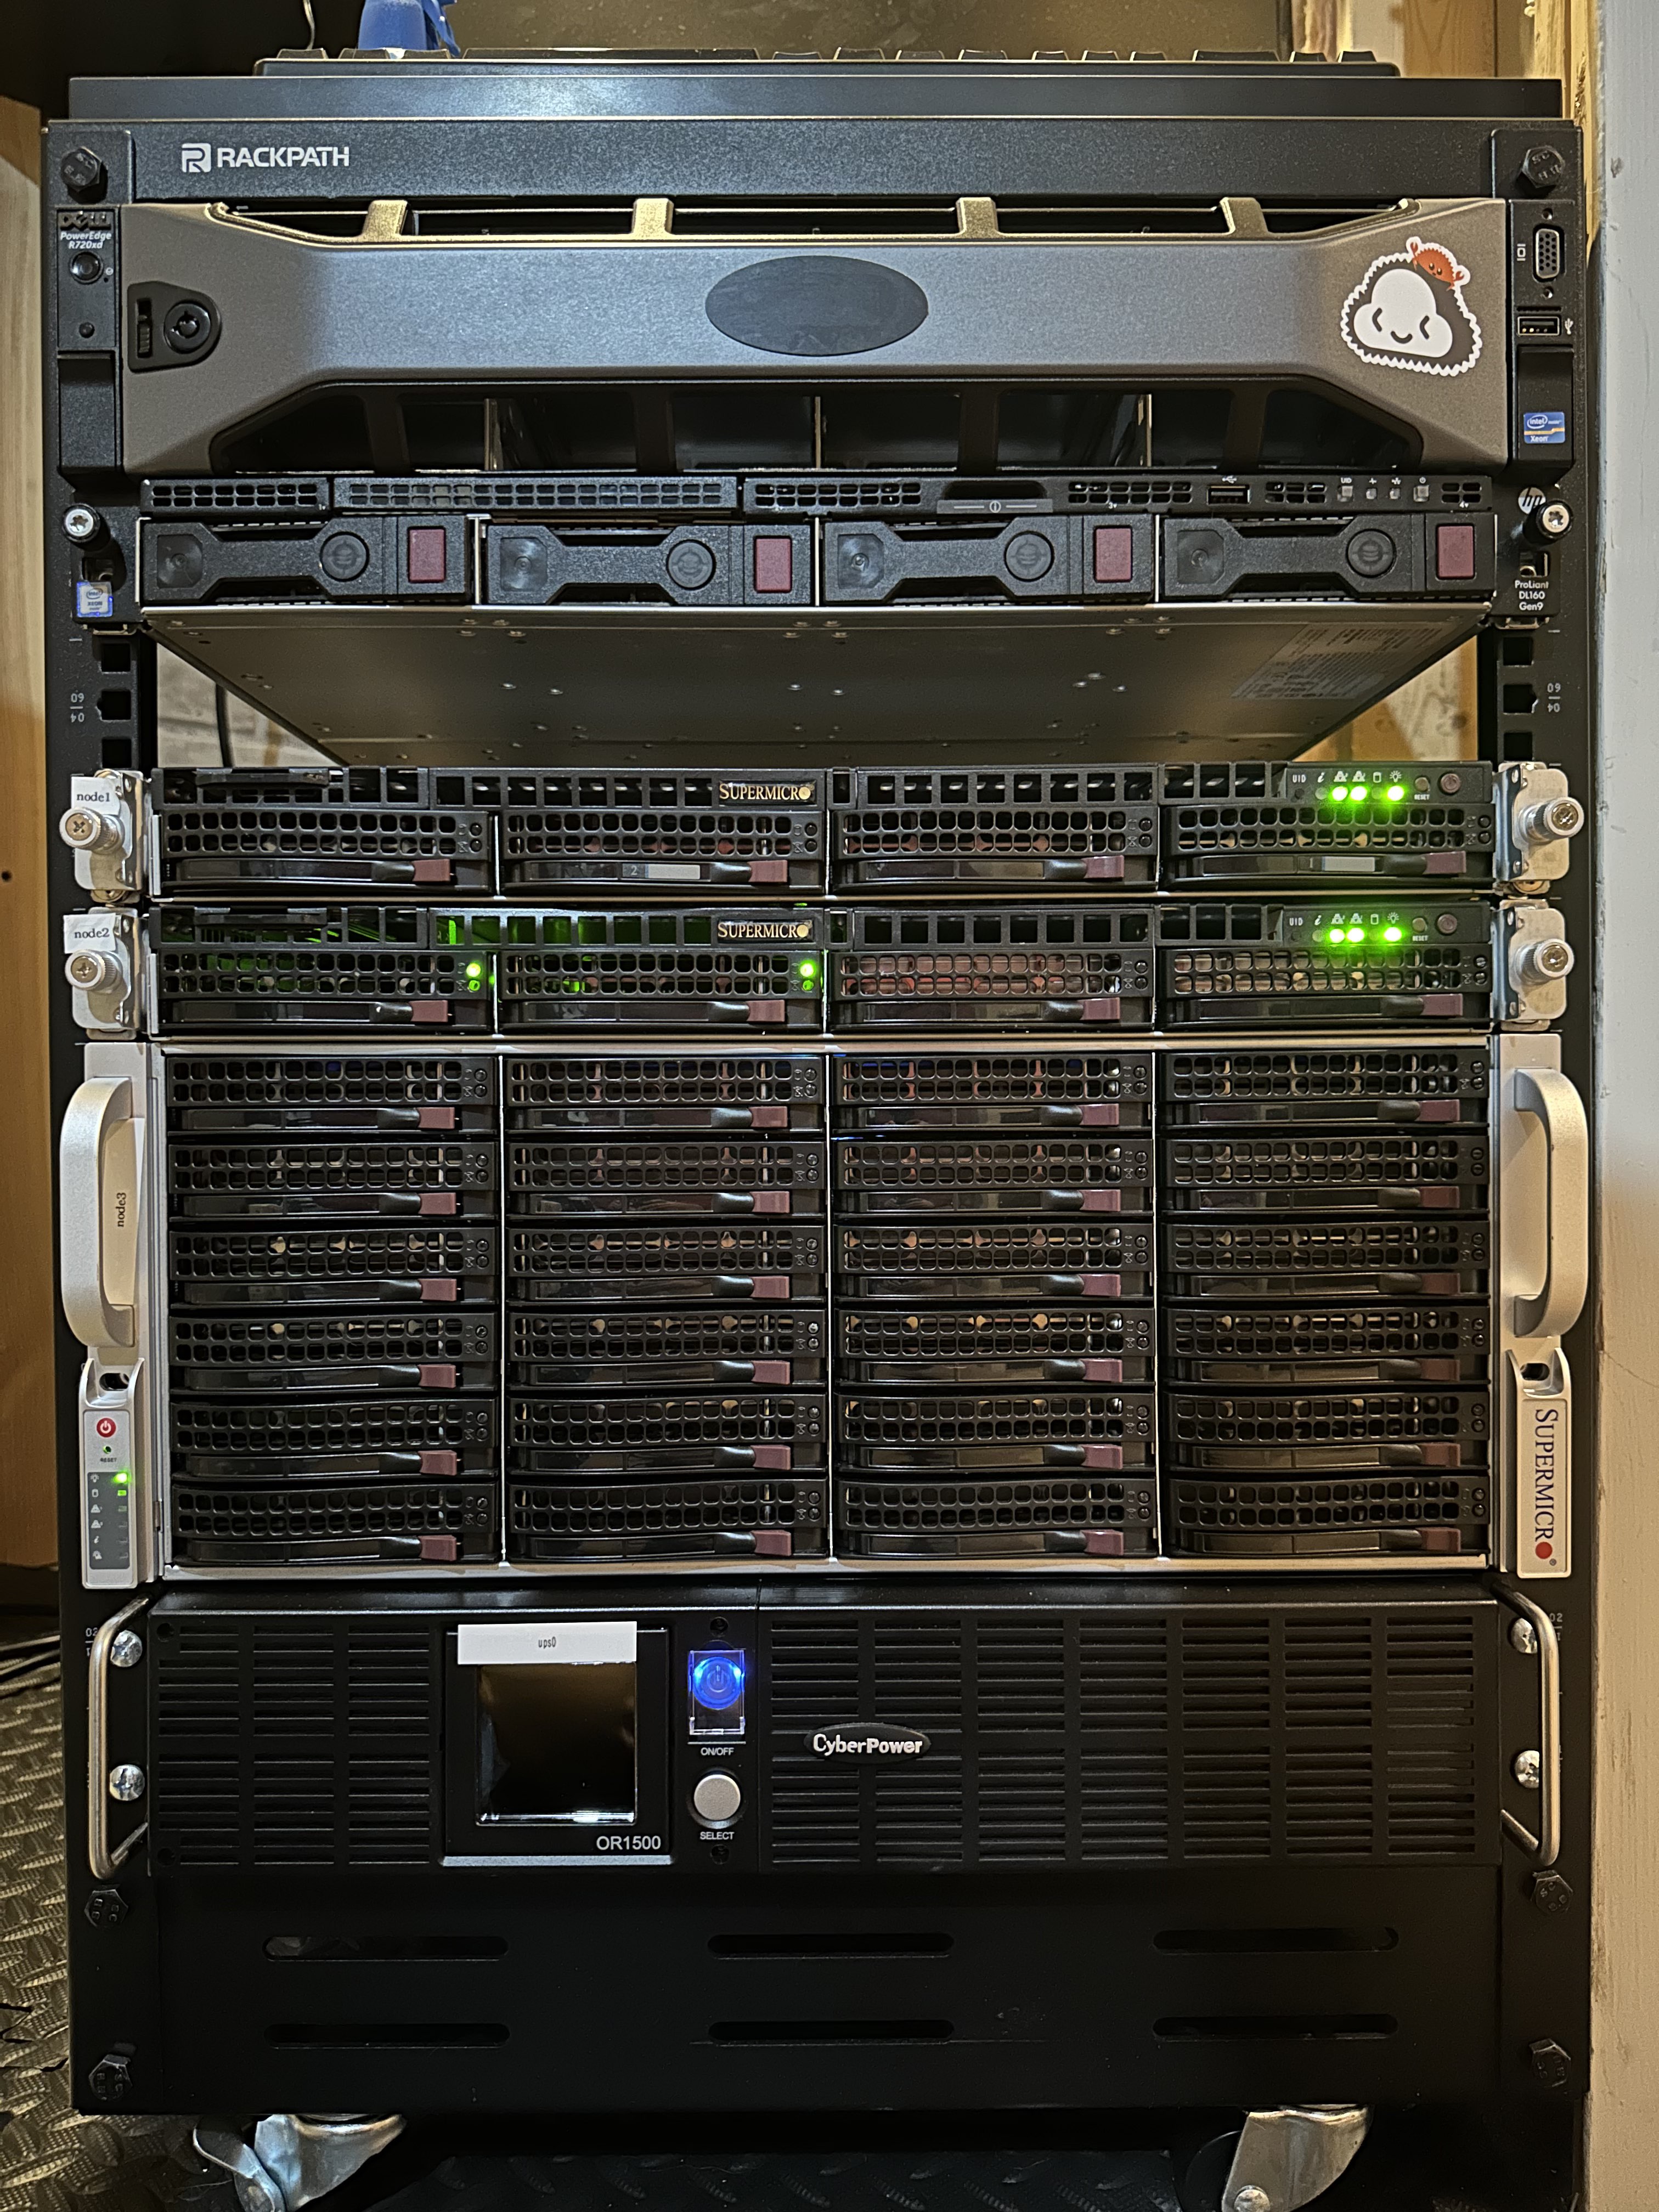
| Device | OS Disk | Data Disk | CPU | Memory | Purpose |
|---|---|---|---|---|---|
| Supermicro 1U | 2x 480Gb (RAID1) | 2x 480Gb (RAID1) | E5-2630v4 2.20GHZ | 8x 16GB DDR-4 (128GB) | HCI Node 1 |
| Supermicro 1U | 2x 1TB (RAID1) | 2x 20TB (RAID1) | E5-2630v4 2.20GHZ | 8x 16GB DDR-4 (128GB) | HCI Node 2 |
| Supermicro 4U | 2x 1TB (RAID1) | 12x 4Tb (RAID50) | E5-2630v4 2.20GHZ | 8x 16GB DDR-4 (128GB) | HCI Node 3 |
| Unifi Aggregation | - | - | - | - | 10G SFP+ Switch |
| CyberPower 1500VA UPS | - | - | - | - | Battery Backup |
Click to see the front of my lab rack!
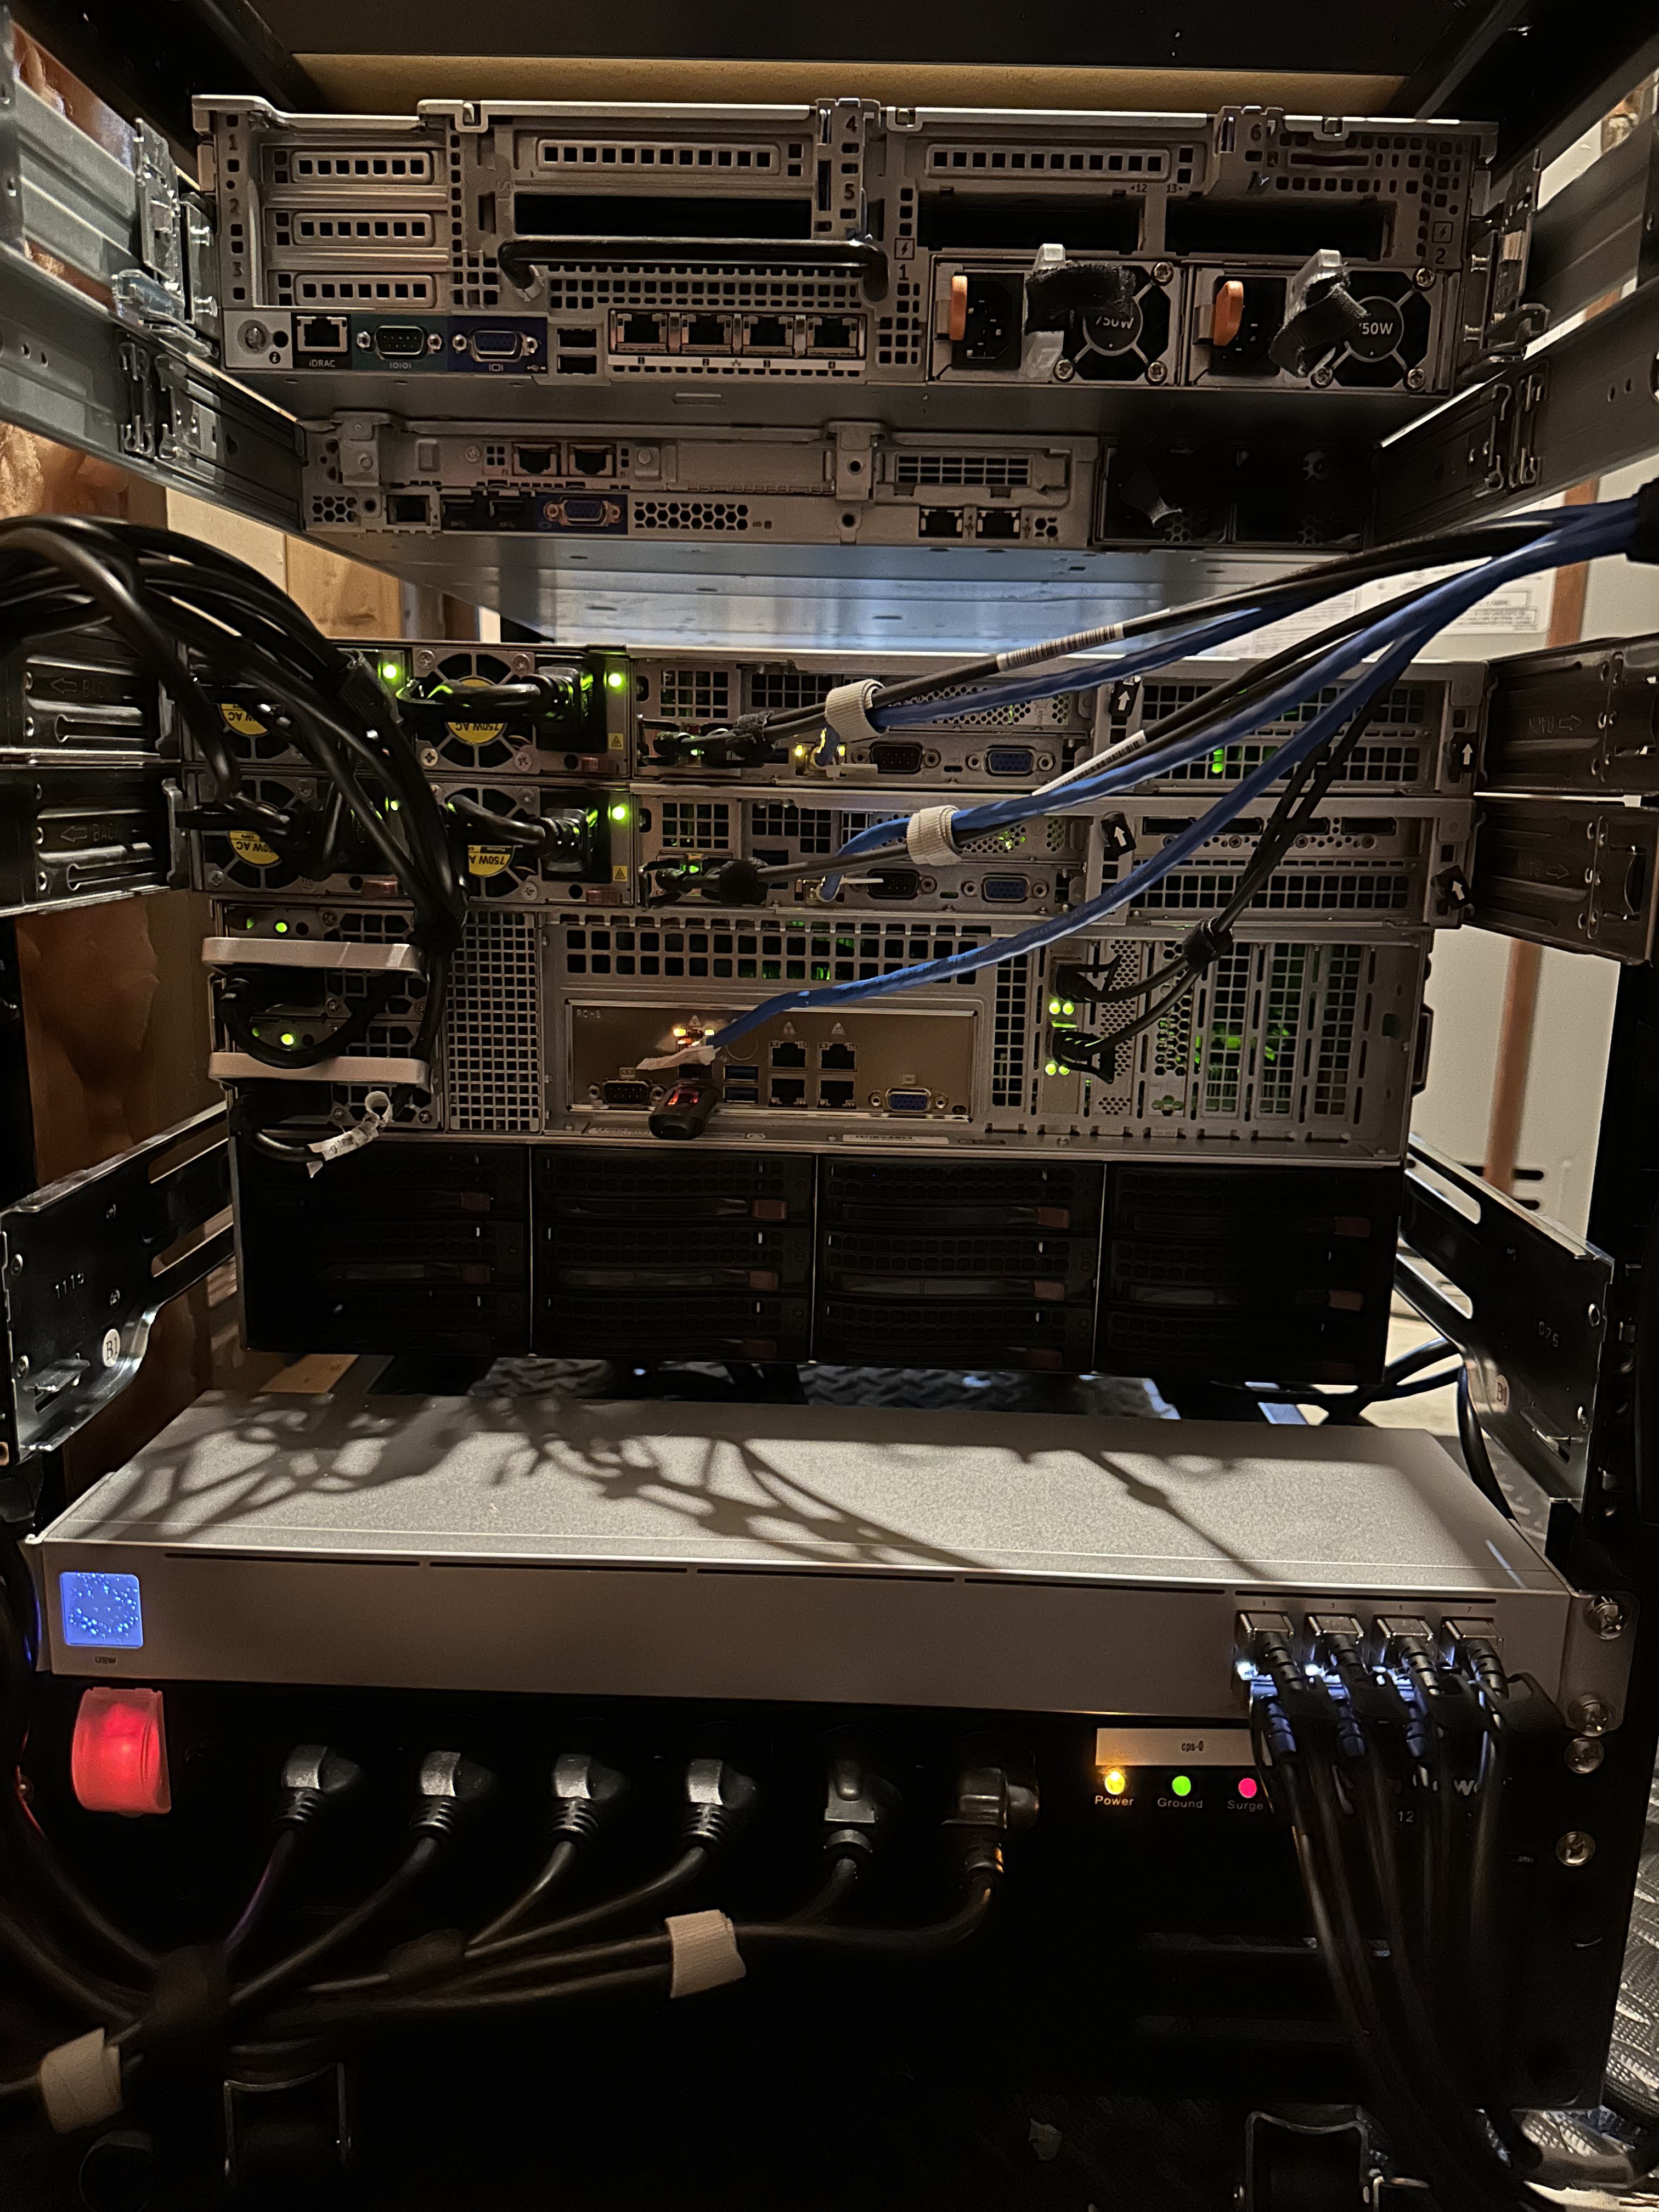
Click to see the back of my lab rack!
I'm leveraging some cloud dependencies to really make things easier and dodge the harder questions.
| tool | purpose | cost |
|---|---|---|
| IaC, CI/CD, & SSO. | free | |
| DNS & Proxy management. | ~$10/yr | |
| Cluster heartbeats. | free | |
| Backups, terraform state, secrets. | ~$10/yr | |
| Total: ~$20/yr |
Networking
Networking is provided by my Unifi Dream Machine Pro and the lab portion is managed via terraform. The citadel vlan on 192.168.10.* is allocated for the lab.
192.168.10.2 is reserved as a gateway IP for the harvester cluster. All other IPs are assigned via DHCP. Initial local dns to access rancher is configured via terraform to make rancher.tomnowak.work available.
Downstream kubernetes clusteres can create services of type Loadbalancer via the harvester cloud provider, and are assigned an IP address in the same citadel vlan. Internal cluster ingress is handled by a single ip requested by the internal nginx-ingress controller.
Once an ip has been assigned, the cluster-vars.env is updated to reflect that ip, and blocky consumes that to provide dns for the cluster to other networks.
Finally, the default vlan network is updated to provide the blocky loadbalancer ip for dns to all clients on the network, providing access to internal services and ad blocking.
Currently running Harvester v1.1.2.
For provisioning a new harvester node, follow the installation instructions here via USB. The USB stick is sitting on top of the rack :).
Once the node has joined the cluster, manually log in to the web UI and configure the host storage disk tags through the management interface with hdd and ssd tags. Unfortunately the terraform provider does not have functionality to facilitate host management.
I'm running seeder to manage basic BMC functionality on the nodes. In the future I hope to manage provisioning for the cluster via this tool.
After the hosts are manually provisioned, terraform is used to provision infrastructure via terragrunt. Currently, all the terraform code is tightly coupled, but I hope to generalize it in the future.
The infrastructure consists roughly of three parts:
- Network configures my local unifi network infrastructure with a VNET and maps the ports allocated to current and future use for this homelab to be dedicated to those ports.
- Harvester configuration of harvester, such as storage and virtual networks. You must download the harvester kubeconfig from this link to run this module.
- Rancher, which acts as the UI as the whole operation. Currently provisioned manually as a single node due to harvester lacking load balancing on vms or built-in rancher integration. Maybe in Harvester
v1.2.0. - Downstream Clusters, which finally run the useful stuff. The cluster module provisions a cluster with RKE2 through Rancher and bootstraps flux onto the cluster, creating a deploy directory in clusters/ which we can leverage to deploy workloads.
Simply run the following command to provision the infrastructure:
terragrunt run-all applyFlux handles deploying and managing workloads on the downstream clusters. Flux is installed on the cluster and watches the directory in this repository in the previous step, syncing the cluster with any manifests found there.
Internal cluster policy is handled entirely via vanilla kubernetes NetworkPolicy. The approach described here is to enable netpol to be implemented post deployment in a low-impact rollout.
The policy is implemented at the cluster and namespace level. Cluster network policy is described in the clusters/<cluster>/.network-policies directory.
Each subdirectory of .network-policies represents a specific policy. These polices are generic to the point that they should be applicable to every namespace and bound to specific pods via labels. Each policy should have a source and destination subdirectory, which contains the specific policy to be applied in a namespace. The policy is then included into namespaces as a kustomize component. Policies are connected to pods via labels like networking/<policy>.
For a specific example, lets look at .network-policies/allow-egress-to-postgres. Including the source subdirectory component in a namespace adds the policy, which matches the networking/allow-egress-to-postgres: "true" label. Apps should include this label to use postgres.
The allow-same-namespace policy can be included in a namespace as an 'on' switch for netpol in a namespace.
Heavily inspired by the Kubernetes @Home Discord community. Make sure to explore the kubernetes @ home search!
See LICENSE