
Read the articles...
Try the Work-in-Progress Demo...
Can we use Scratch / Blockly to code Zig programs, the drag-n-drop way?
Let's create a Visual Programming Tool for Zig that will generate IoT Sensor Apps with Apache NuttX RTOS.
Why limit to IoT Sensor Apps?
-
Types are simpler: Only floating-point numbers will be supported, no strings needed
-
Blockly is Typeless. With Zig we can use Type Inference to deduce the missing types
-
Make it easier to experiment with various IoT Sensors: Temperature, Humidity, Air Pressure, ...
Let's customise Blockly to generate Zig code...

Blockly is bundled with a list of Demos...
lupyuen3.github.io/blockly-zig-nuttx/demos
There's a Code Generation Demo that shows the code generated by Blockly for JavaScript, Python, Dart, ...
lupyuen3.github.io/blockly-zig-nuttx/demos/code
Let's add a tab that will show the Zig code generated by Blockly: demos/code/index.html
<!-- Inserted this to Load Messages: (Not sure why) -->
<script src="../../msg/messages.js"></script>
...
<tr id="tabRow" height="1em">
<td id="tab_blocks" class="tabon">...</td>
<td class="tabmin tab_collapse"> </td>
<!-- Inserted these two lines: -->
<td id="tab_zig" class="taboff tab_collapse">Zig</td>
<td class="tabmin tab_collapse"> </td>
...
<div id="content_blocks" class="content"></div>
<!-- Inserted this line: -->
<pre id="content_zig" class="content prettyprint lang-zig"></pre>We'll see the Zig Tab like this...
lupyuen3.github.io/blockly-zig-nuttx/demos/code
Blockly comes bundled with Code Generators for JavaScript, Python, Dart, ...
Let's create a Code Generator for Zig, by copying from the Dart Code Generator.
Copy generators/dart.js to generators/zig.js
Copy all files from generators/dart to generators/zig...
all.js
colour.js
lists.js
logic.js
loops.js
math.js
procedures.js
text.js
variables.js
variables_dynamic.js
Edit generators/zig.js and all files in generators/zig.
Change all Dart to Zig, preserve case.
Let's load our Zig Code Generator in Blockly...
Add the Zig Code Generator to demos/code/index.html...
<!--  Load Zig Code Generator  -->
<script src="../../zig_compressed.js"></script>Enable the Zig Code Generator in demos/code/code.js...
// Inserted `zig`...
Code.TABS_ = [
  'blocks', 'zig', 'javascript', 'php', 'python', 'dart', 'lua', 'xml', 'json'
];
...
// Inserted `Zig`...
Code.TABS_DISPLAY_ = [
  'Blocks', 'Zig', 'JavaScript', 'PHP', 'Python', 'Dart', 'Lua', 'XML', 'JSON'
];
...
Code.renderContent = function() {
  ...
  } else if (content.id === 'content_json') {
    var jsonTextarea = document.getElementById('content_json');
    jsonTextarea.value = JSON.stringify(
        Blockly.serialization.workspaces.save(Code.workspace), null, 2);
    jsonTextarea.focus();
  // Inserted this...
  } else if (content.id == 'content_zig') {
Code.attemptCodeGeneration(Blockly.Zig);Add our Code Generator to the Build Task: scripts/gulpfiles/build_tasks.js
 const chunks = [
   // Added this...
   {
      name: 'zig',
      entry: 'generators/zig/all.js',
      reexport: 'Blockly.Zig',
   }
];Now we compile our Zig Code Generator.
Blockly builds fine with Linux, macOS and WSL. (But not plain old Windows CMD)
To build Blockly with the Zig Code Generator...
git clone --recursive https://github.com/lupyuen3/blockly-zig-nuttx
cd blockly-zig-nuttx
npm install

## Run these steps when we change the Zig Code Generator
npm run build
npm run publish

## When prompted "Is this the correct branch?",
## press N

## Instead of "npm run publish" (which can be slow), we may do this...
## cp build/*compressed* .

## For WSL: We can copy the generated files to c:\blockly-zig-nuttx for testing on Windows
## cp *compressed* /mnt/c/blockly-zig-nuttx
This compiles and updates the Zig Code Generator in zig_compressed.js and zig_compressed.js.map
If we're using VSCode, here's the Build Task: .vscode/tasks.json
Browse to blockly-zig-nuttx/demos/code with a Local Web Server. (Like Web Server for Chrome)
We should see this...
lupyuen3.github.io/blockly-zig-nuttx/demos/code
Blockly will NOT render correctly with file://..., it must be http://localhost:port/...
Drag-and-drop some Blocks and click the Zig Tab.
The Zig Tab now shows the generated code in Dart (because we copied the Dart Code Generator).
(In case of problems, check the JavaScript Console. Ignore the storage.js error)
Now we modify our Code Generator to generate Zig code.
Let's generate the Zig code for setting a variable...
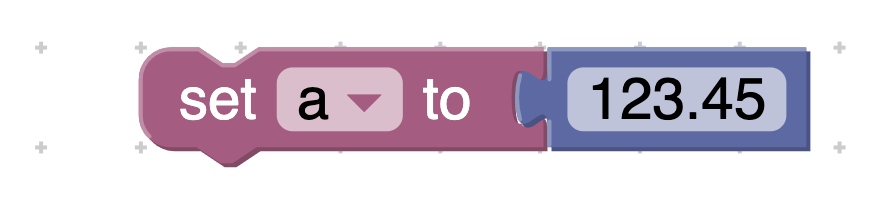
For simplicity we'll treat variables as constants...
const a: f32 = 123.45;This is how we generate the above code in the Zig Code Generator for Blockly (coded in JavaScript): generators/zig/variables.js
Zig['variables_set'] = function(block) {
  // Variable setter.
  ...
  return `const ${varName}: f32 = ${argument0};\n`;
};To print the value of an expression...

We'll generate this Zig code...
debug("a={}", .{ a });Here's how we implement this in the Zig Code Generator for Blockly: generators/zig/text.js
Zig['text_print'] = function(block) {
  // Print statement.
  ...
  return `debug("${msg}={}", .{ ${msg} });\n`;
};To run a repeating loop...
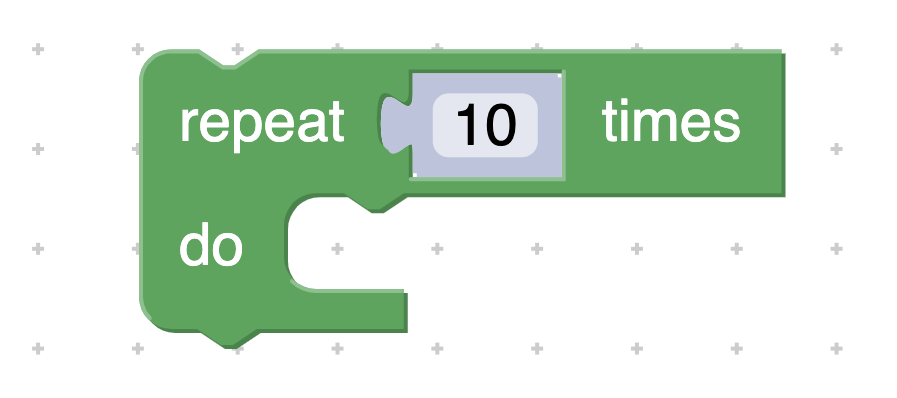
We'll generate this Zig code...
var count: usize = 0;
while (count < 10) : (count += 1) {
  ...
}
With this Zig Code Generator in Blockly: generators/zig/loops.js
Zig['controls_repeat_ext'] = function(block) {
  // Repeat n times.
  ...
  code += [
    `var ${loopVar}: usize = 0;\n`,
    `while (${loopVar} < ${endVar}) : (${loopVar} += 1) {\n`,
    branch,
    '}\n'
  ].join('');
  return code;
};
What happens if we have 2 repeat loops? Won't count clash?
Blockly will automatically generate another counter...
var count2: usize = 0;
while (count2 < 10) : (count2 += 1) {
  ...
}
(Try it out!)
The generated Zig code needs to be wrapped like this, to become a valid Zig program...
/// Import Standard Library
const std = @import("std");

/// Main Function
pub fn main() !void {
  // TODO: Generated Zig Code here
  ...
}

/// Aliases for Standard Library
const assert = std.debug.assert;
const debug  = std.log.debug;
We do this in the Zig Code Generator for Blockly: generators/zig.js
Zig.finish = function(code) {
  ...
  // Main Function
  code = [
    '/// Main Function\n',
    'pub fn main() !void {\n',
    code,
    '}',
  ].join('');

  // Convert the definitions dictionary into a list.
  ...

  // Compose Zig Header
  const header = [
    '/// Import Standard Library\n',
    'const std = @import("std");\n',
  ].join('');

  // Compose Zig Trailer
  const trailer = [
    '/// Aliases for Standard Library\n',
    'const assert = std.debug.assert;\n',
    'const debug  = std.log.debug;\n',
  ].join('');

  // Combine Header, Definitions, Code and Trailer
  return [
    header,
    '\n',
    // For Zig: No need to declare variables
    // allDefs.replace(/\n\n+/g, '\n\n').replace(/\n*$/, '\n\n\n'),
    code,
    '\n\n',
    trailer,
  ].join('');
};
We're ready to test our Zig Code Generator!
Follow the steps described earlier to build Blockly.
We browse to our local Blockly site...
lupyuen3.github.io/blockly-zig-nuttx/demos/code
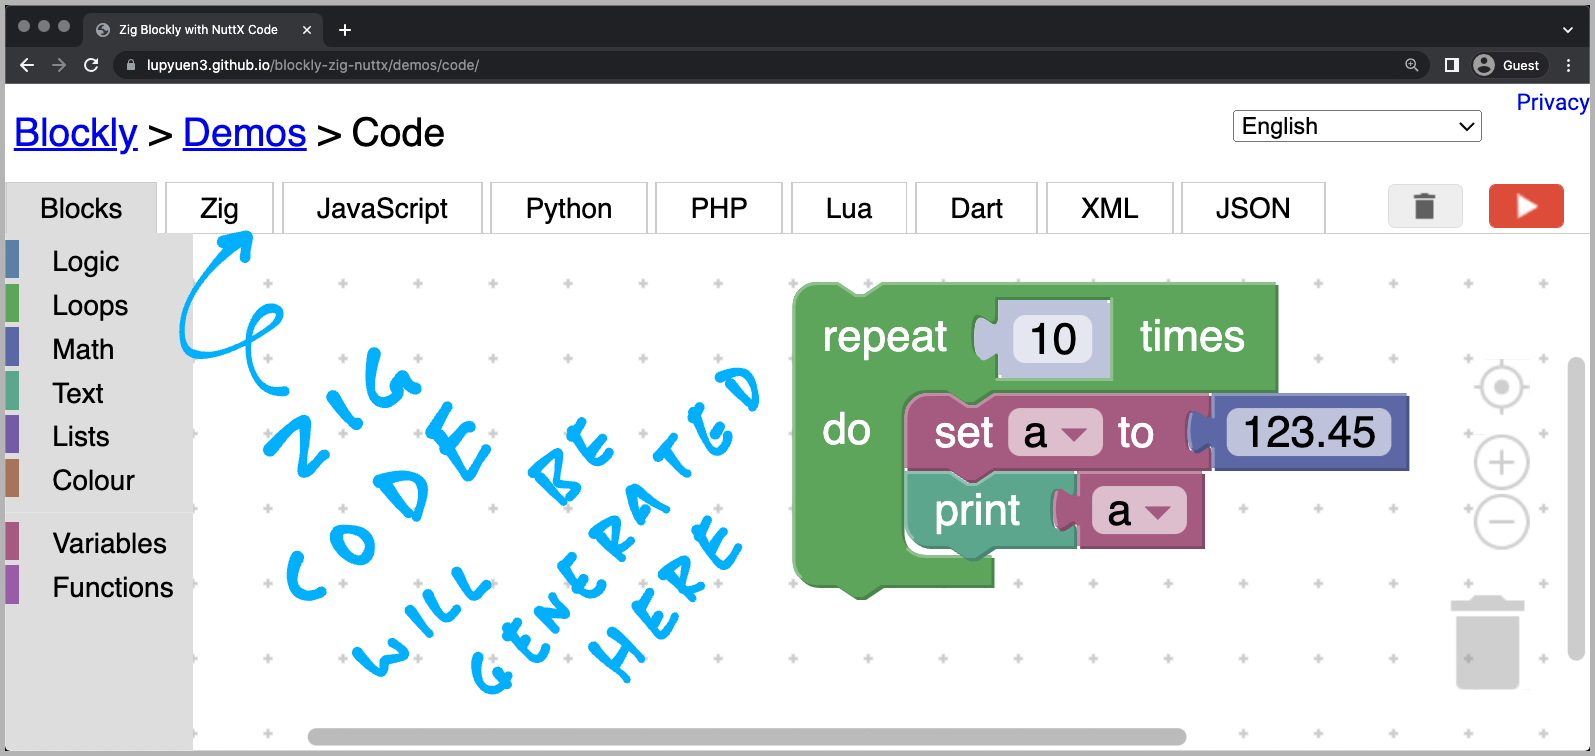
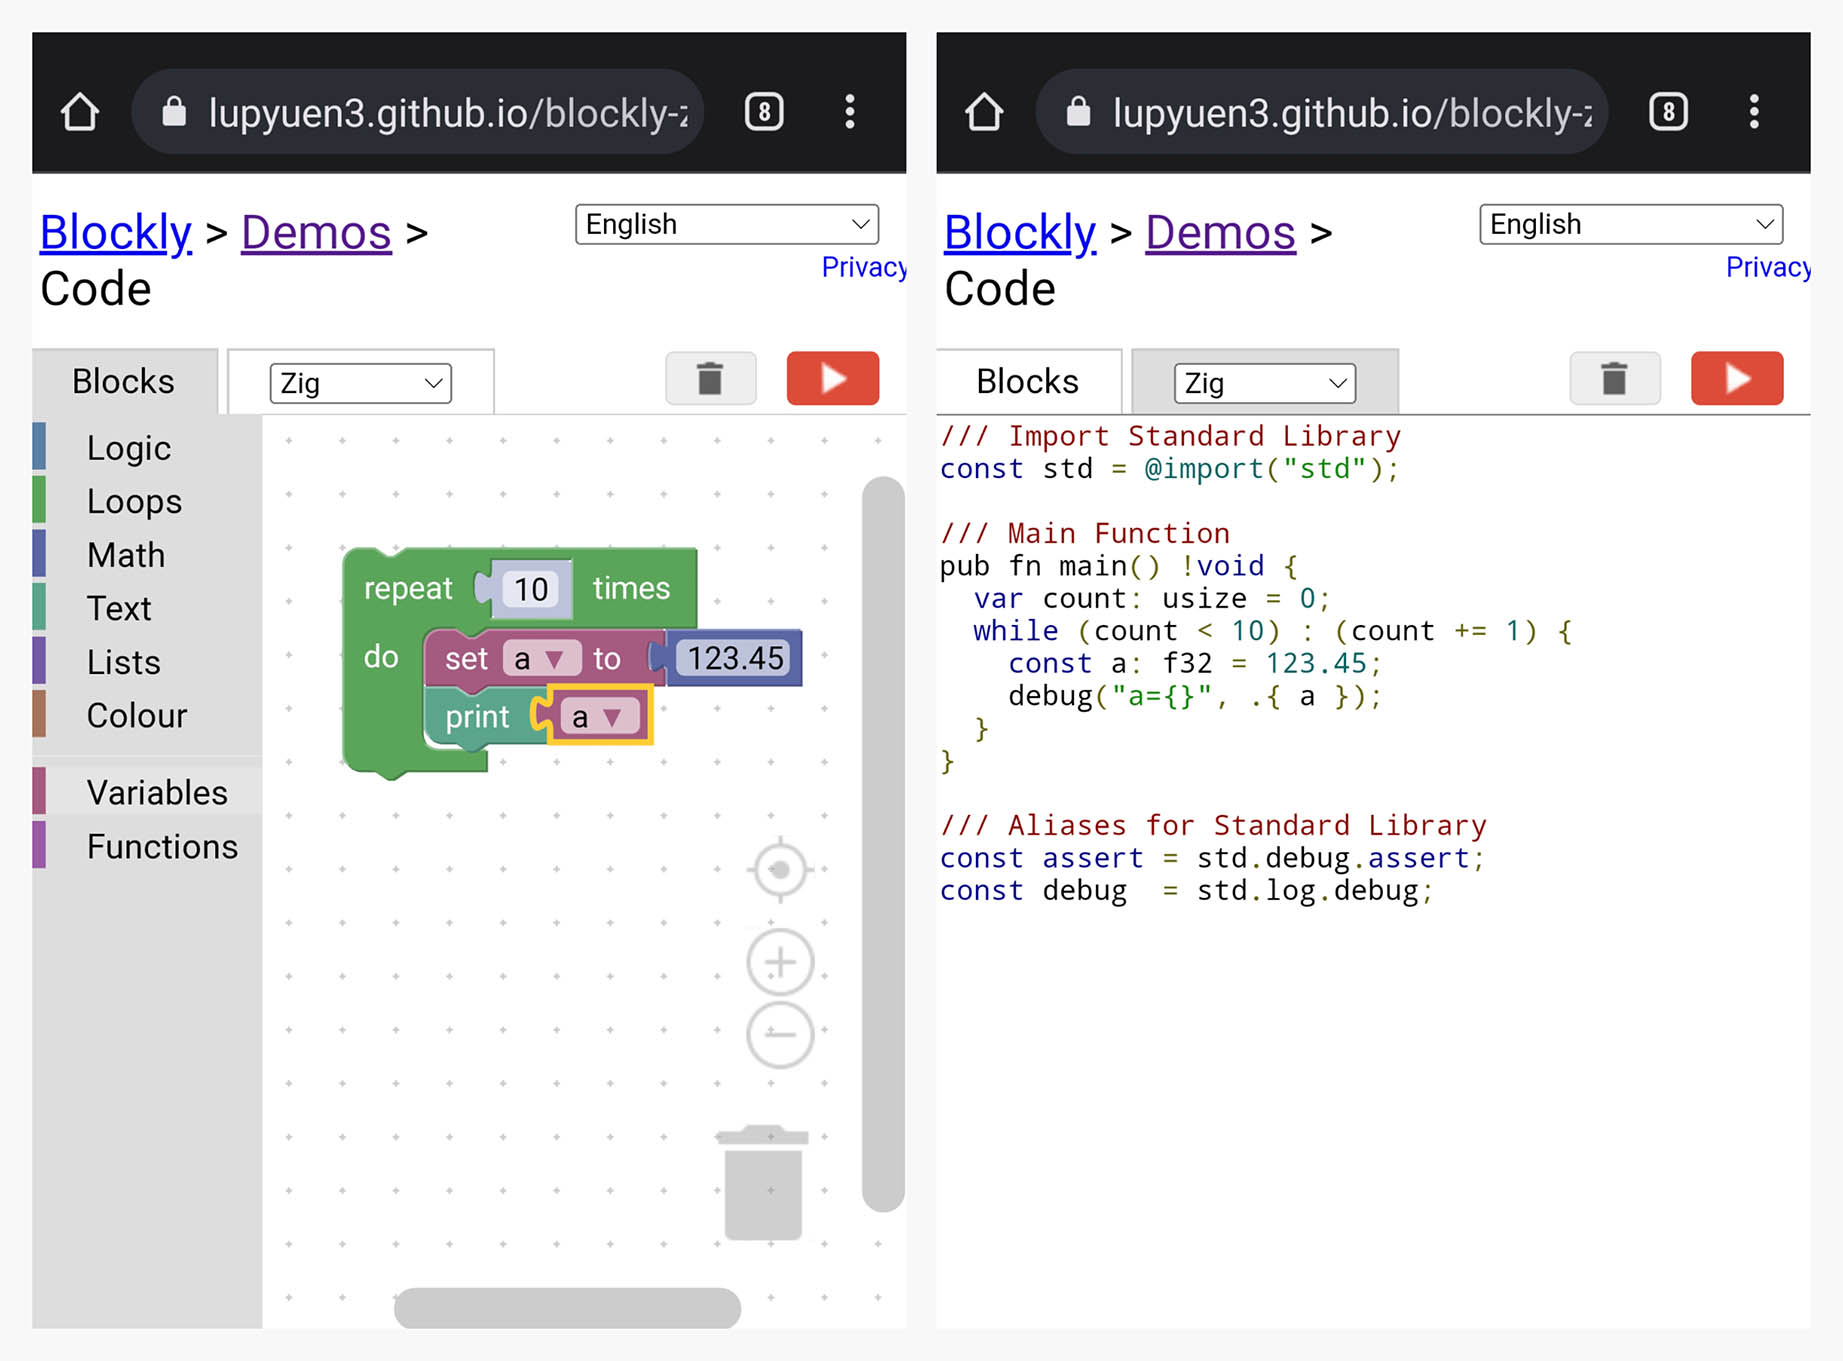
Then drag-and-drop the Blocks to create this Visual Program...
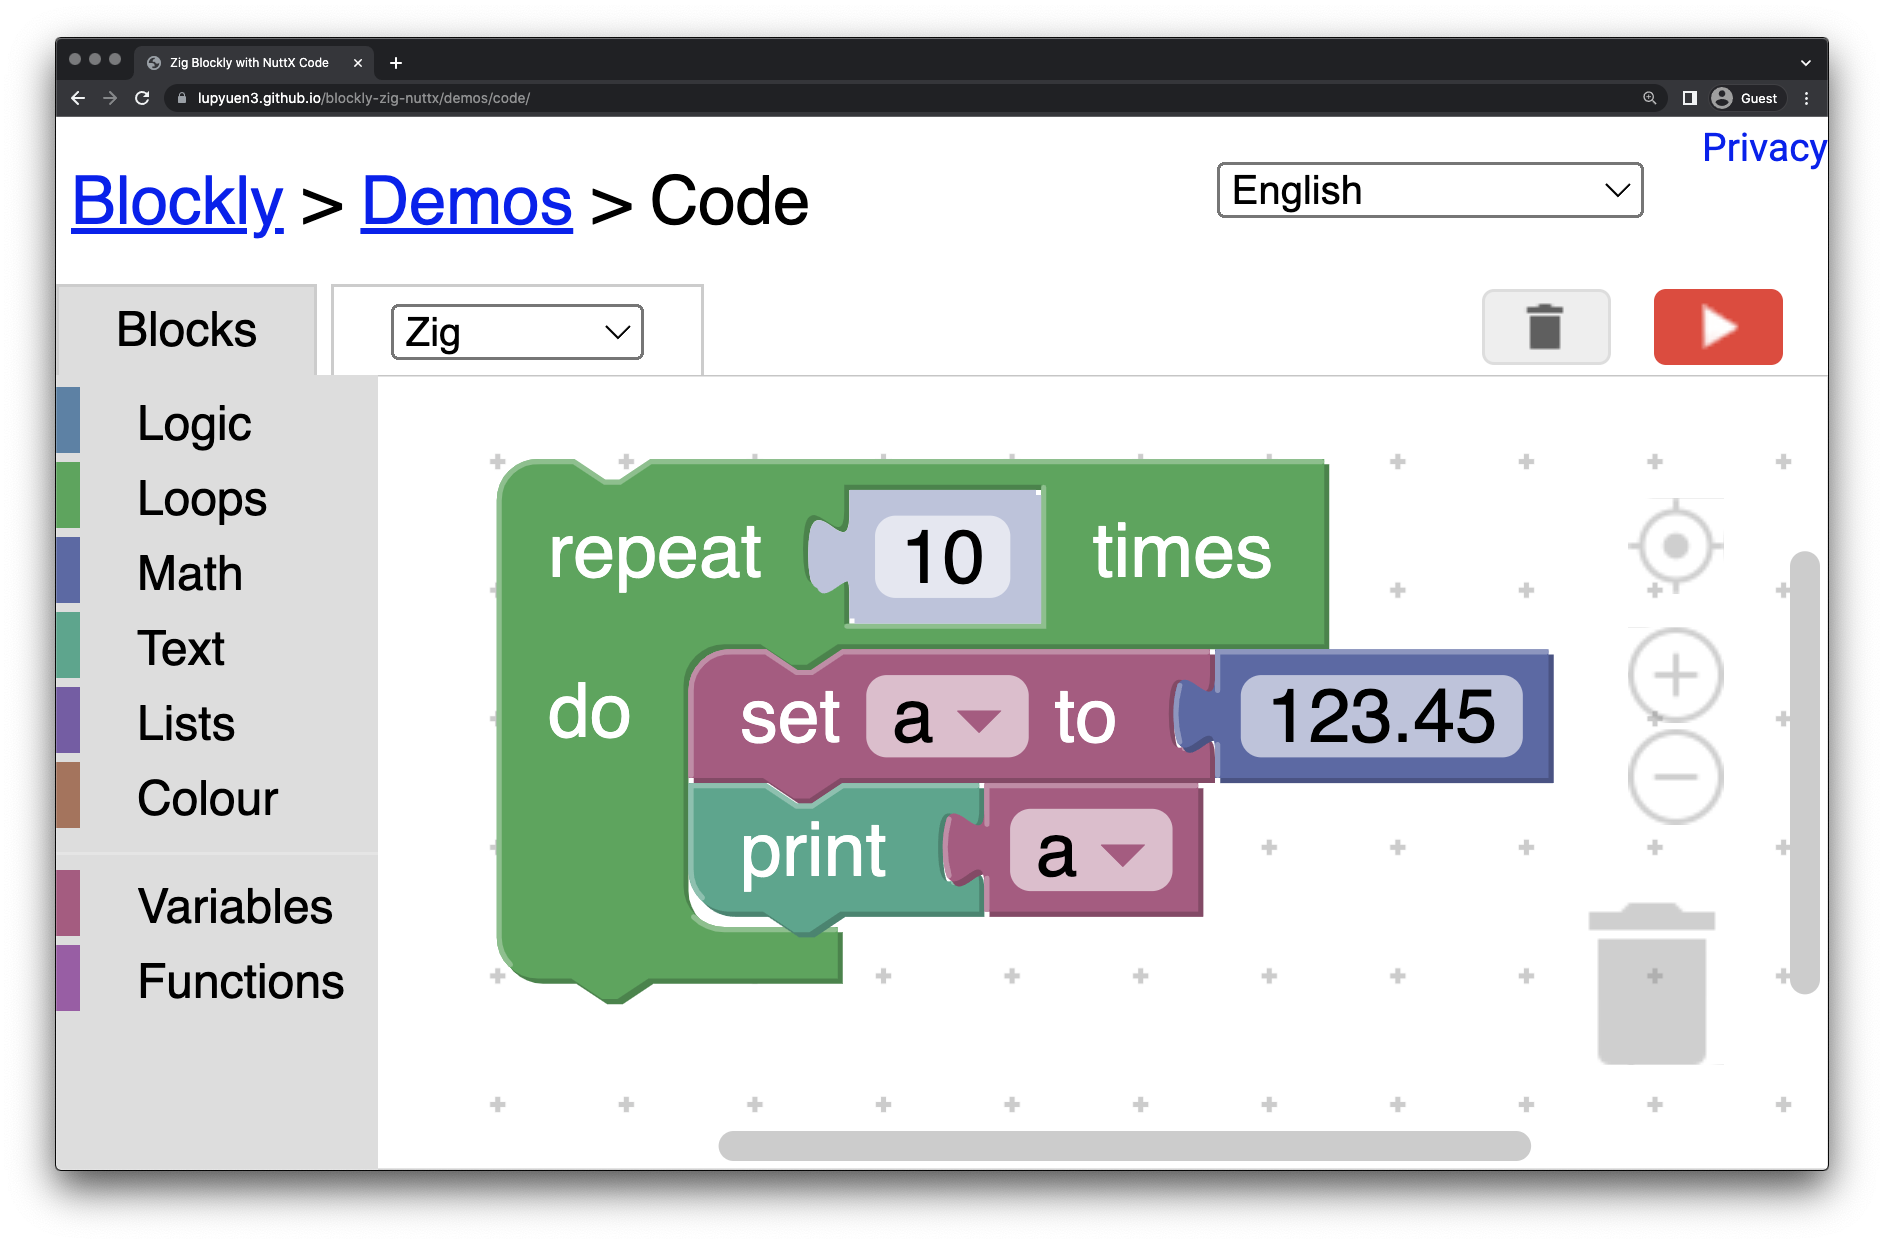
Click the Zig Tab to see the generated code...

Our Code Generator in Blockly generates this Zig code...
/// Import Standard Library
const std = @import("std");

/// Main Function
pub fn main() !void {
  var count: usize = 0;
  while (count < 10) : (count += 1) {
    const a: f32 = 123.45;
    debug("a={}", .{ a });
  }
}

/// Aliases for Standard Library
const assert = std.debug.assert;
const debug  = std.log.debug;
Which runs perfectly OK with Zig! 🎉
$ zig run a.zig
debug: a=1.23449996e+02
debug: a=1.23449996e+02
debug: a=1.23449996e+02
debug: a=1.23449996e+02
debug: a=1.23449996e+02
debug: a=1.23449996e+02
debug: a=1.23449996e+02
debug: a=1.23449996e+02
debug: a=1.23449996e+02
debug: a=1.23449996e+02
Blockly works OK with Mobile Web Browsers too...
lupyuen3.github.io/blockly-zig-nuttx/demos/code
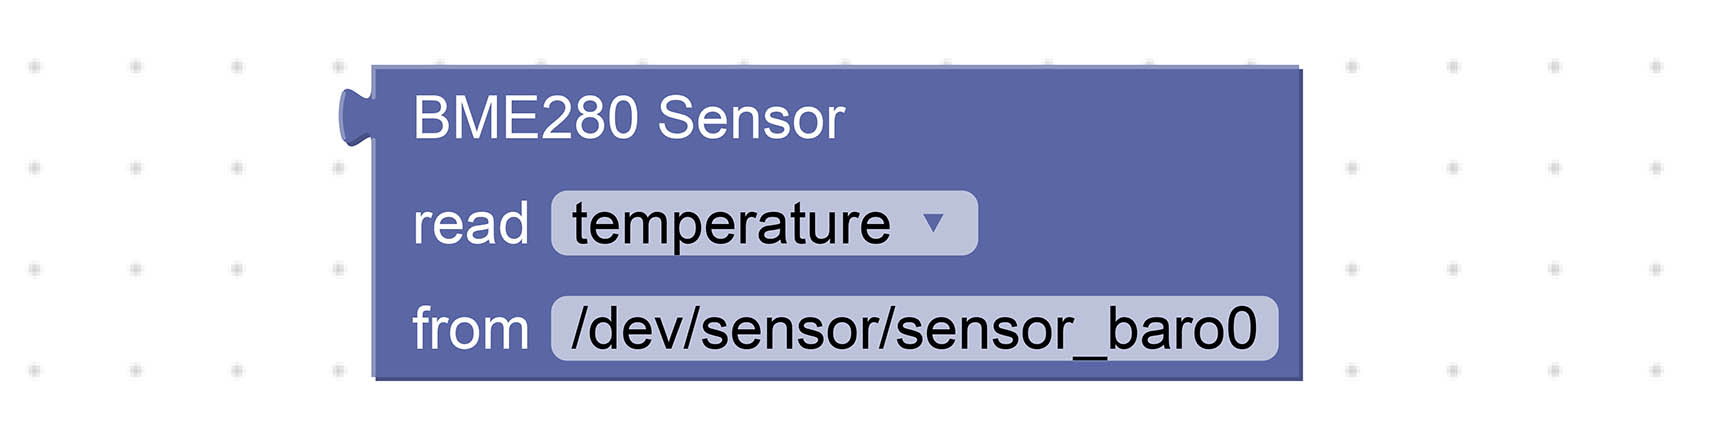
Let's create a Custom Block in Blockly for our Bosch BME280 Sensor...
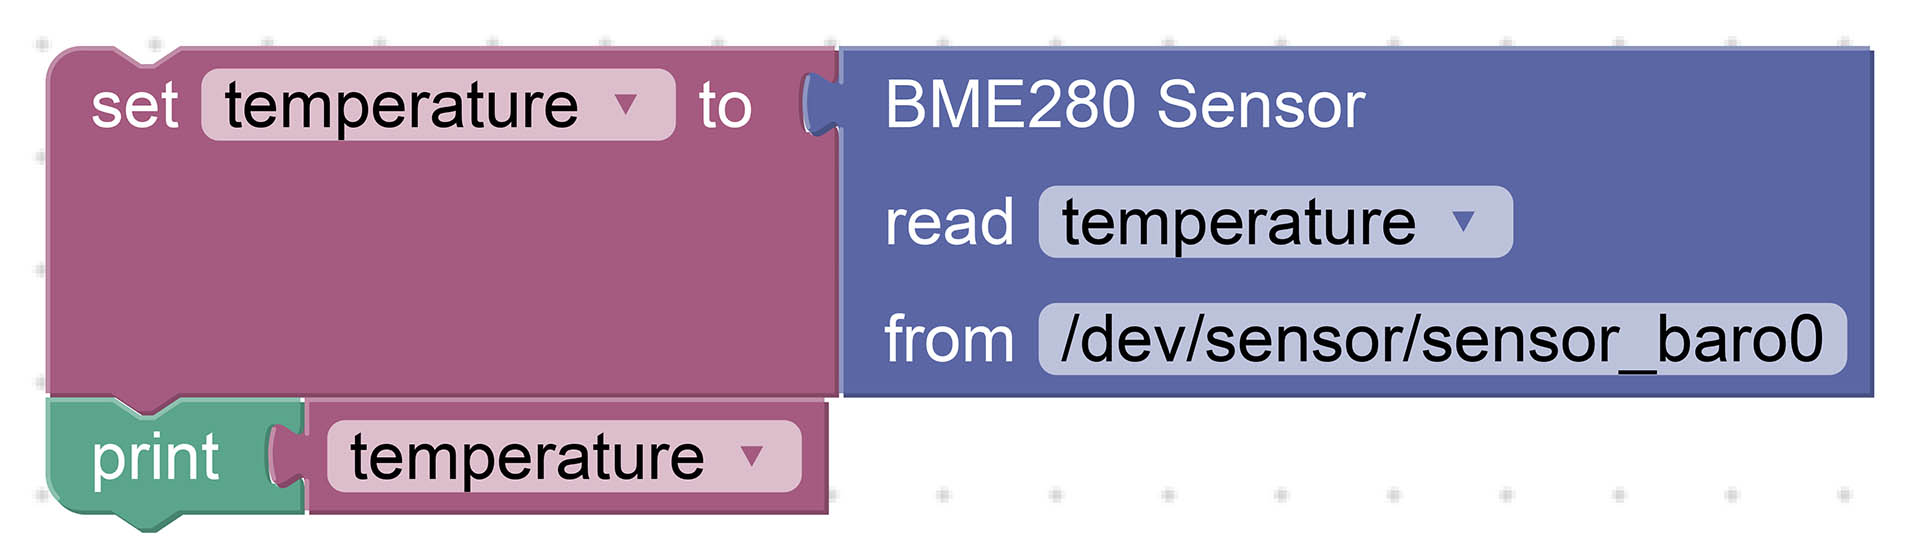
The Blocks above will generate this Zig code to read the Temperature from the BME280 Sensor...
// Read the Temperature from BME280 Sensor
const temperature = try sen.readSensor(  // Read BME280 Sensor
  c.struct_sensor_baro,       // Sensor Data Struct
  "temperature",              // Sensor Data Field
  "/dev/uorb/sensor_baro0"  // Path of Sensor Device
);

// Print the Temperature
debug("temperature={}", .{ temperature });(readSensor is explained here)
To create our Custom Block, browse to the Blockly Developer Tools...
blockly-demo.appspot.com/static/demos/blockfactory/index.html
Drag-and-drop from "Input", "Field" and "Type" to assemble our BME280 Sensor Block...
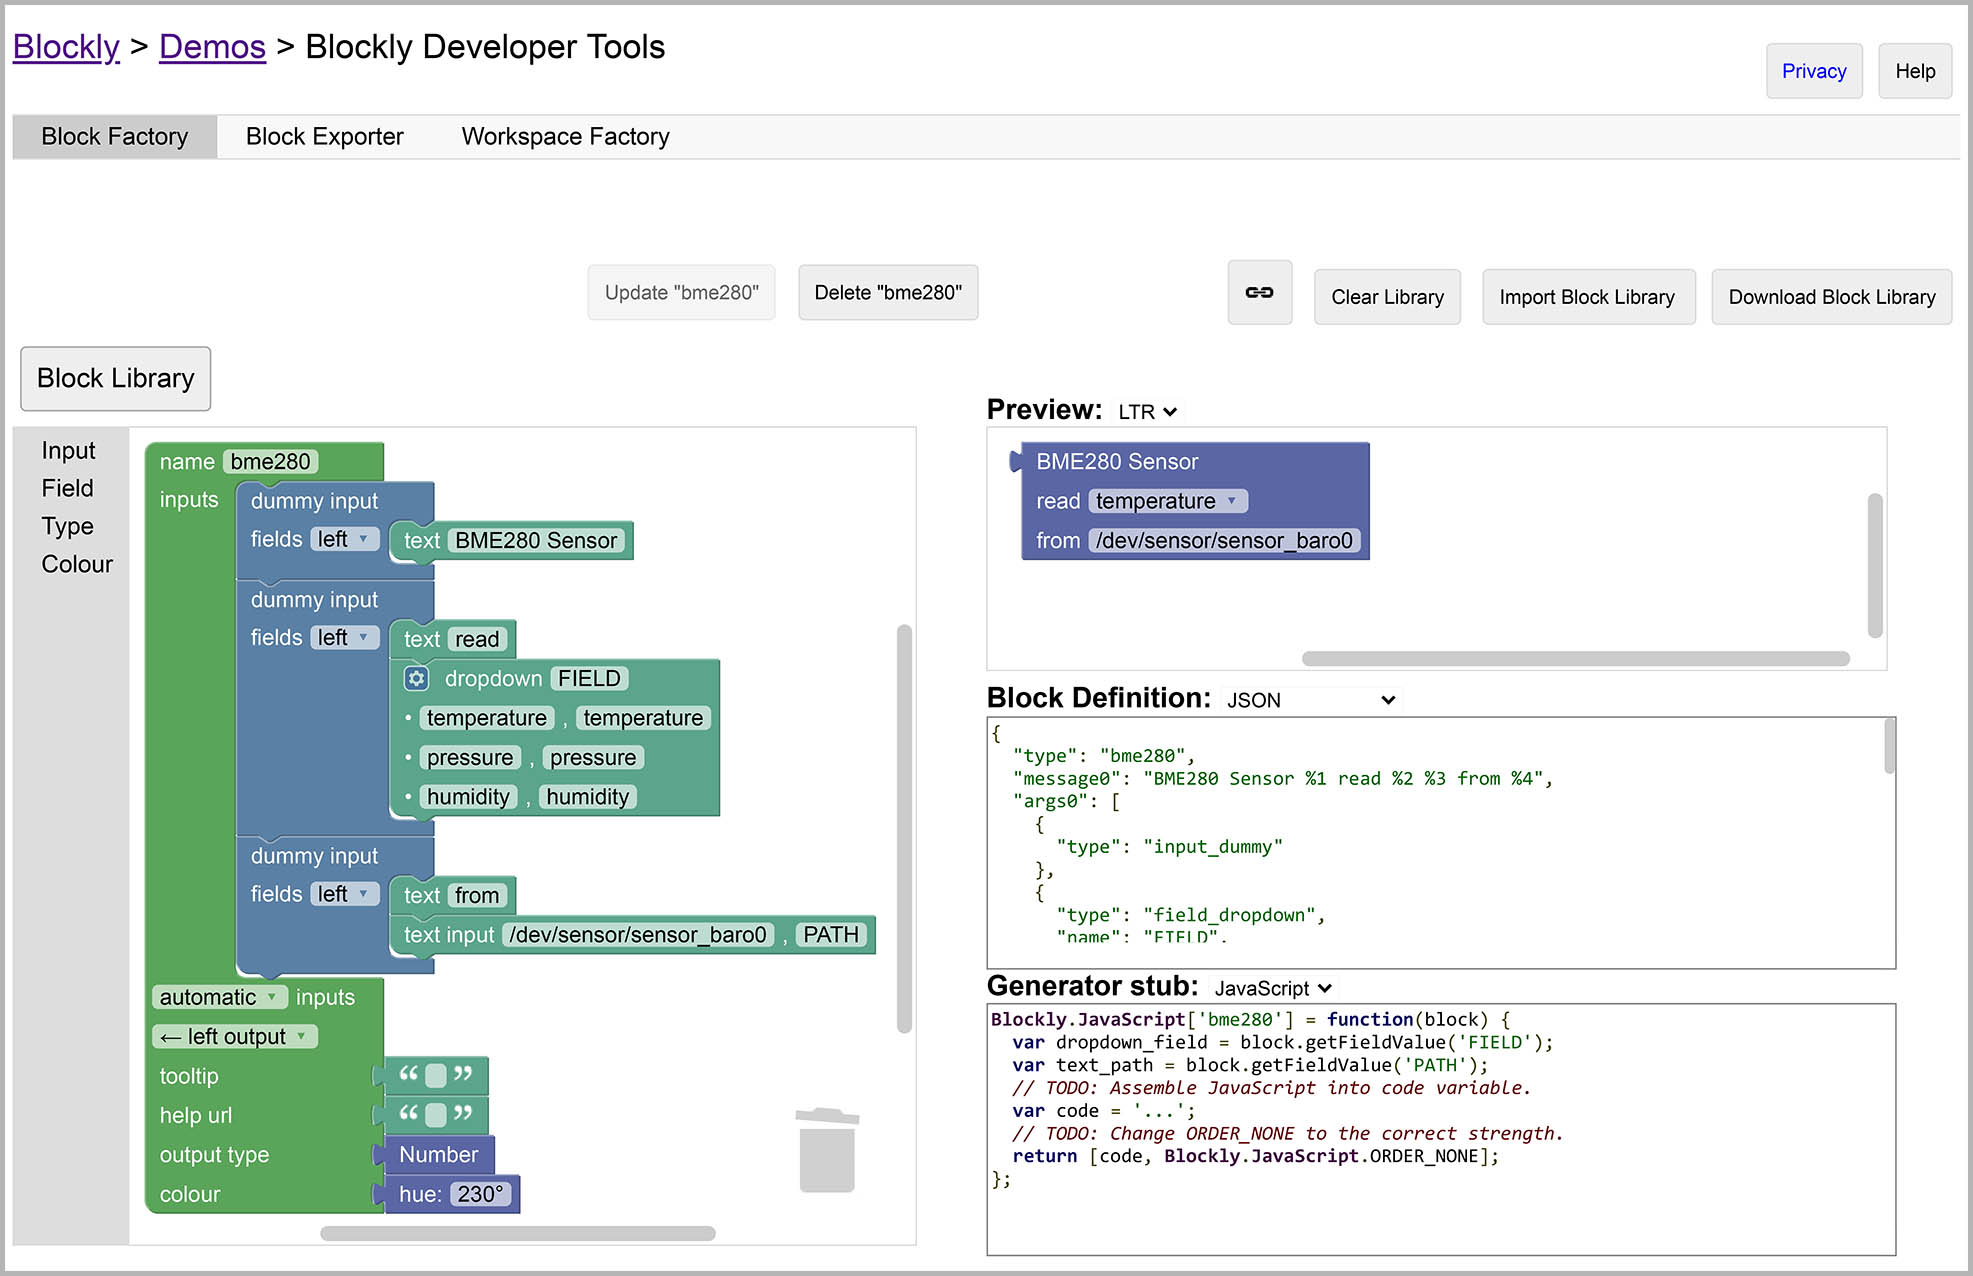
This creates a Custom Block that has the following fields...
-
Dropdown Field
FIELD: Select "temperature", "pressure" or "humidity" -
Text Input Field
PATH: For the NuttX Path of our BME280 Sensor, defaults to "/dev/uorb/sensor_baro0"
Click "Update BME280" to save the Custom Control.
To create another Block, click "Block Library".
When we're done, click "Download Block Library".
Save the downloaded XML so that we can "Import Block Library" and edit our Block in future...
generators/zig/zig_library.xml
Earlier we have created our BME280 Sensor Block in Blockly Developer Tools. Now we export the Block...
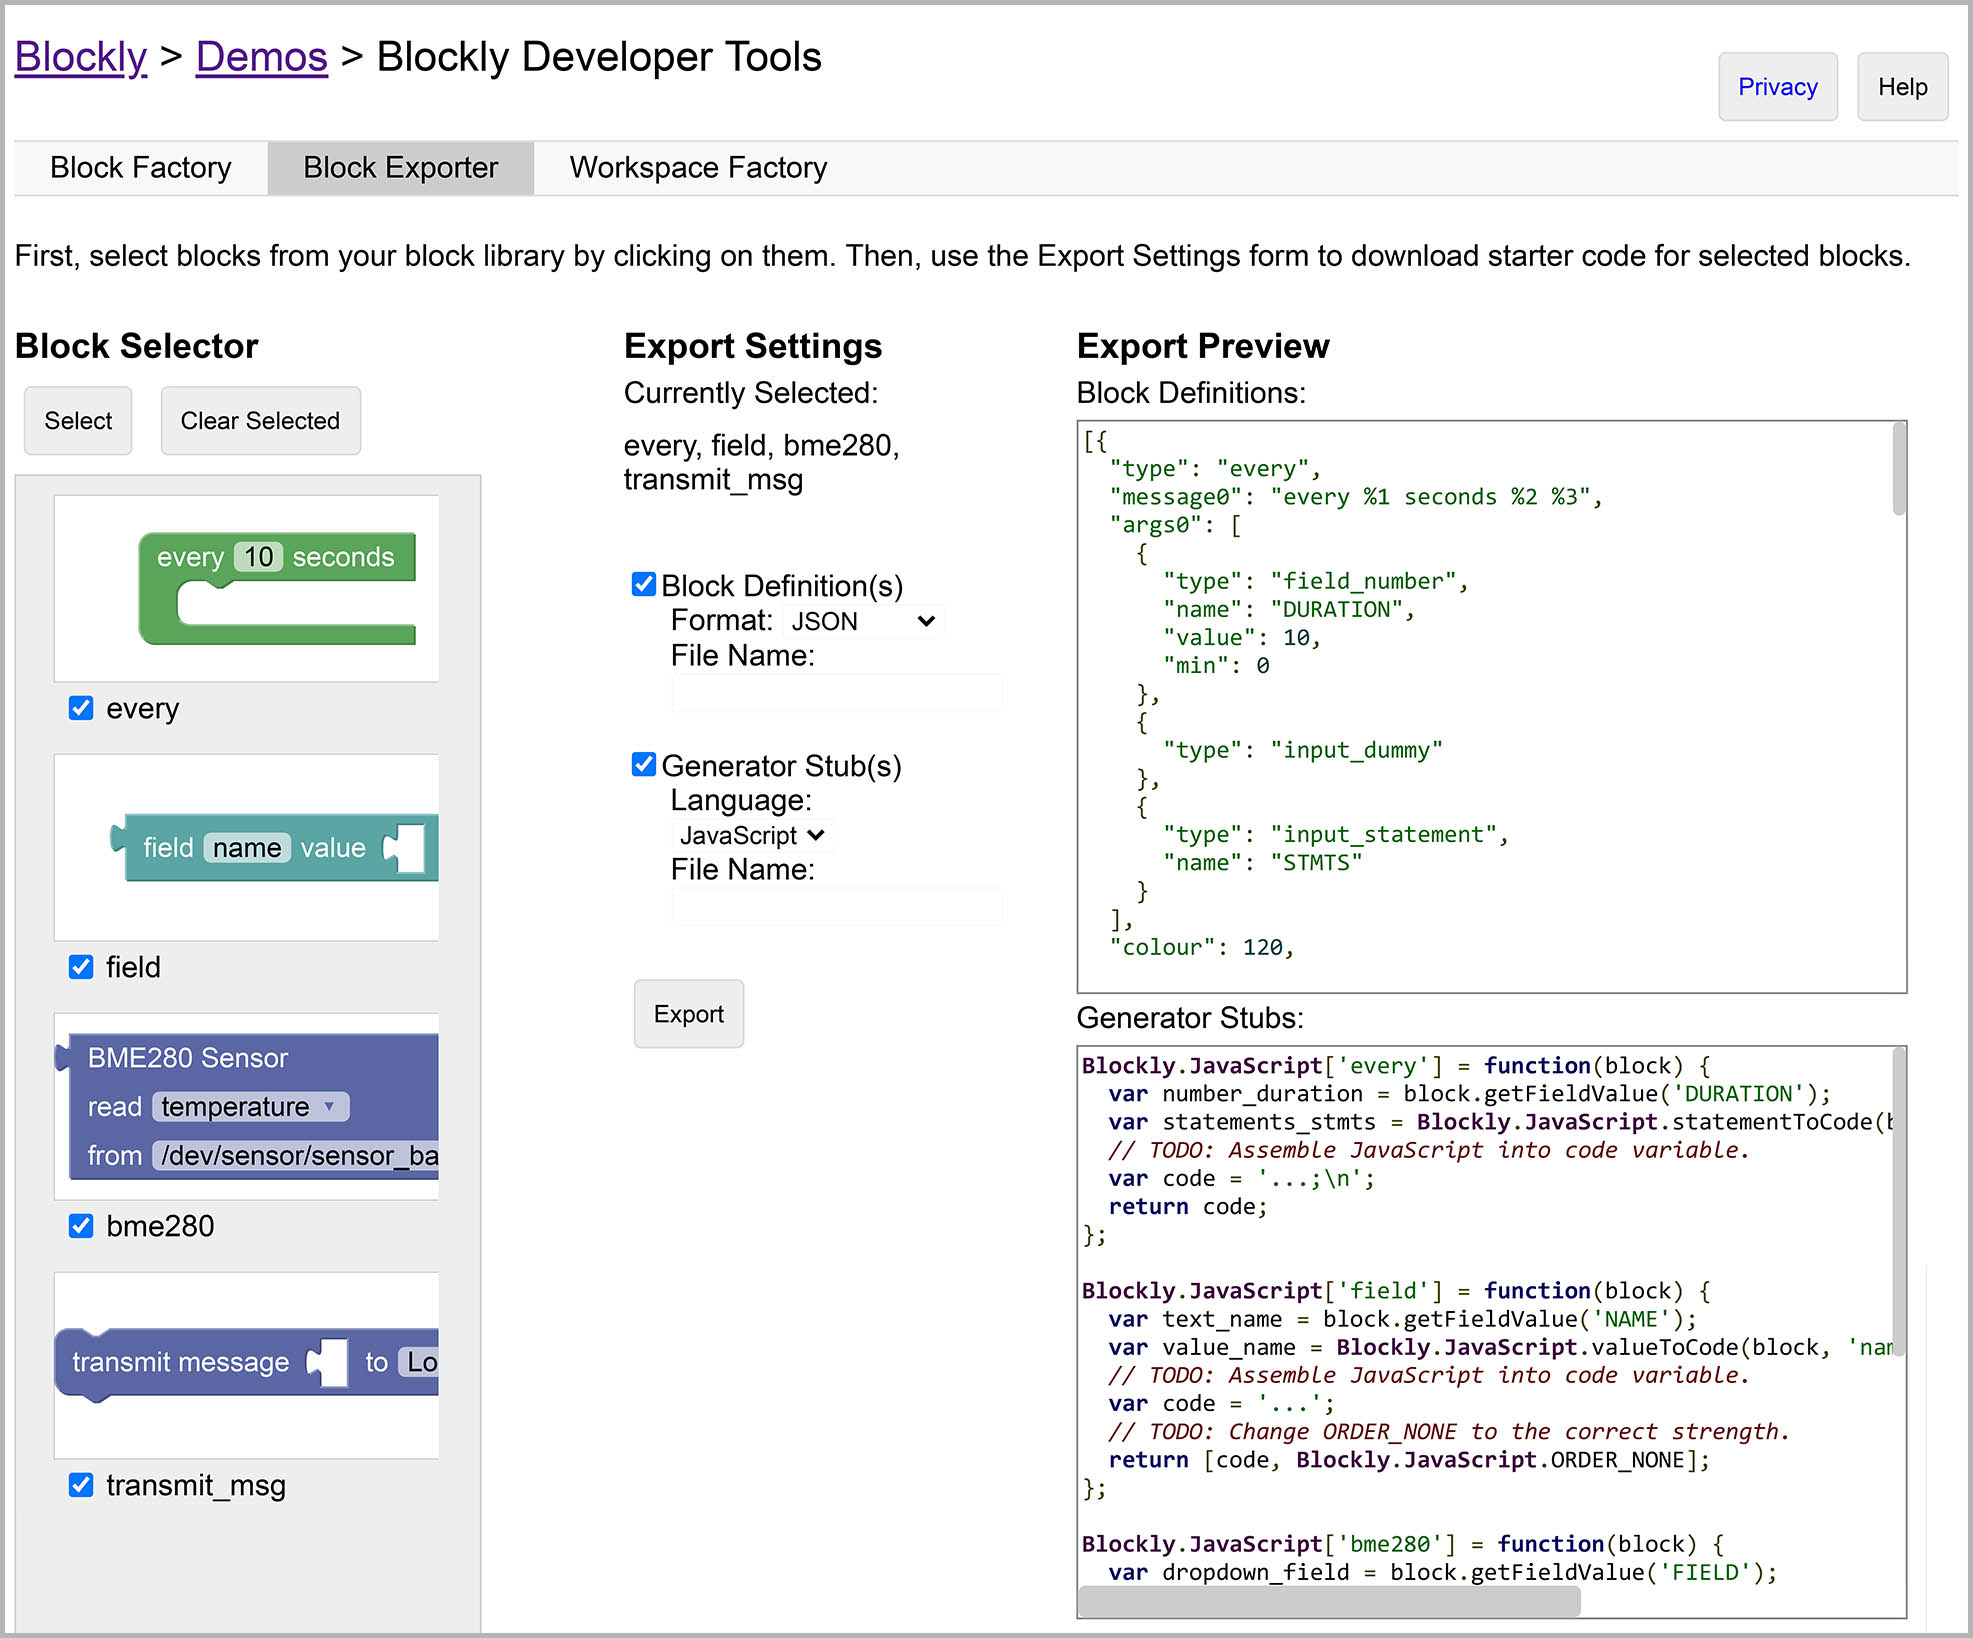
Click the "Block Exporter" Tab
Under "Block Selector", select all Blocks.
For "Export Settings" > "Block Definitions", select "JSON Format"
"Export Preview" shows our Custom Blocks exported as JSON.
Copy the Exported JSON and paste into the marked location here...
So it looks like this...
'use strict';
goog.module('Blockly.Zig.blocks');
const Zig = goog.require('Blockly.Zig');

/// Custom Blocks exported from Block Exporter based on zig_library.xml.
/// Exposed as Blockly.Zig.blocks. Read by demos/code/code.js.
/// See zig_functions.js for Code Generator Functions.
Zig['blocks'] =
// Begin Paste from Block Exporter
[{
  "type": "every",
  "message0": "every %1 seconds %2 %3",
  ...
},
{
  "type": "field",
  "message0": "field %1 %2 value %3",
  ...
},
{
  "type": "bme280",
  "message0": "BME280 Sensor %1 read %2 %3 from %4",
  ...
},
{
  "type": "transmit_msg",
  "message0": "transmit message %1 to %2",
  ...
}]
// End Paste from Block Exporter
;
This code goes into the JavaScript Module Blockly.Zig.blocks. We'll build this module in a while.
Previously we have exported our Custom Blocks to the JavaScript Module Blockly.Zig.blocks.
To load our Custom Blocks into Blockly, insert this code into demos/code/code.js...
  Code.loadBlocks('');

  //// TODO: Added code here
  //  Load the Zig Custom Blocks.
  var blocks = Blockly.Zig.blocks;  // From generators/zig/zig_blocks.js
  // For each Block...
  blocks.forEach(block => {
    // Register the Block with Blockly.
    Blockly.Blocks[block.type] = {
      init: function() {
        this.jsonInit(block);
        // Assign 'this' to a variable for use in the tooltip closure below.
        var thisBlock = this;
        // this.setTooltip(function() {
        //   return 'Add a number to variable "%1".'.replace('%1',
        //       thisBlock.getFieldValue('VAR'));
        // });
      }
    };
  });
  //// End of added code

  if ('BlocklyStorage' in window) {
...To show our Custom Block in the Blocks Toolbox, edit demos/code/index.html and insert this...
  <xml xmlns="https://developers.google.com/blockly/xml" id="toolbox" style="display: none">

    <!--  Begin: Sensors Category -->
    <category name="Sensors" colour="160">
      <block type="bme280"></block>
      <block type="every"></block>
      <block type="compose_msg"></block>
      <block type="field"></block>
      <block type="transmit_msg"></block>
    </category>
    <!--  End: Sensors Category -->

    <category name="%{BKY_CATLOGIC}" colour="%{BKY_LOGIC_HUE}">
...This creates a Toolbox Category named "Sensors" with our Custom Blocks inside.
Remember that our BME280 Sensor Block...
Will generate this Zig expression...
// Read the Temperature from BME280 Sensor
try sen.readSensor(  // Read BME280 Sensor
  c.struct_sensor_baro,       // Sensor Data Struct
  "temperature",              // Sensor Data Field
  "/dev/uorb/sensor_baro0"  // Path of Sensor Device
)
This is how we implement the Code Generator for our Custom Block: generators/zig/zig_functions.js
goog.module('Blockly.Zig.functions');

const Zig = goog.require('Blockly.Zig');

// Read BME280 Sensor
Zig['bme280'] = function(block) {
  // Get the Sensor Data Field: temperature / pressure / humidity
  const field = block.getFieldValue('FIELD');

  // Get the Sensor Device Path, like "/dev/uorb/sensor_baro0"
  // TODO: Validate that path contains "sensor_humi" for humidity
  const path = block.getFieldValue('PATH');

  // Struct name is "sensor_humi" for humidity, else "sensor_baro"
  const struct = (field == 'humidity')
    ? 'struct_sensor_humi'
    : 'struct_sensor_baro';

  // Compose the code
  const code = alignComments([
    `try sen.readSensor(  // Read BME280 Sensor`,
    Blockly.Zig.INDENT + `c.${struct},  // Sensor Data Struct`,
    Blockly.Zig.INDENT + `"${field}",  // Sensor Data Field`,
    Blockly.Zig.INDENT + `"${path}"  // Path of Sensor Device`,
    `)`,
  ]).join('\n');
  return [code, Blockly.Zig.ORDER_UNARY_POSTFIX];
};
The code above refers to the following fields that we have defined in our BME280 Sensor Block...
-
Dropdown Field
FIELD: Select "temperature", "pressure" or "humidity" -
Text Input Field
PATH: For the NuttX Path of our BME280 Sensor, defaults to "/dev/uorb/sensor_baro0"
This code goes into the JavaScript Module Blockly.Zig.functions. We'll build this module in the next section...
Earlier we have exported our Custom Blocks into the JavaScript Module Blockly.Zig.blocks. And the Code Generator for our Custom Blocks is defined in module Blockly.Zig.functions.
Let's add them to the Blockly Build: generators/zig/all.js
// Zig Custom Blocks and Code Generators
goog.require('Blockly.Zig.blocks');
goog.require('Blockly.Zig.functions');

// Compose Message Block
goog.require('Blockly.Zig.composeMessage');
Blockly.Zig.composeMessage is a Custom Extension / Mutator for Blockly that renders our "Compose Message" Block. We'll cover this in a while.
Rebuild Blockly according to the instructions posted above.
Browse to blockly-zig-nuttx/demos/code with a Local Web Server.
In the Blocks Toolbox, we should see the Sensors Category with our Custom Blocks inside...
lupyuen3.github.io/blockly-zig-nuttx/demos/code
Let's read the Temperature from BME280 Sensor and print it.
Drag-n-drop the BME280 Sensor Block as shown below...
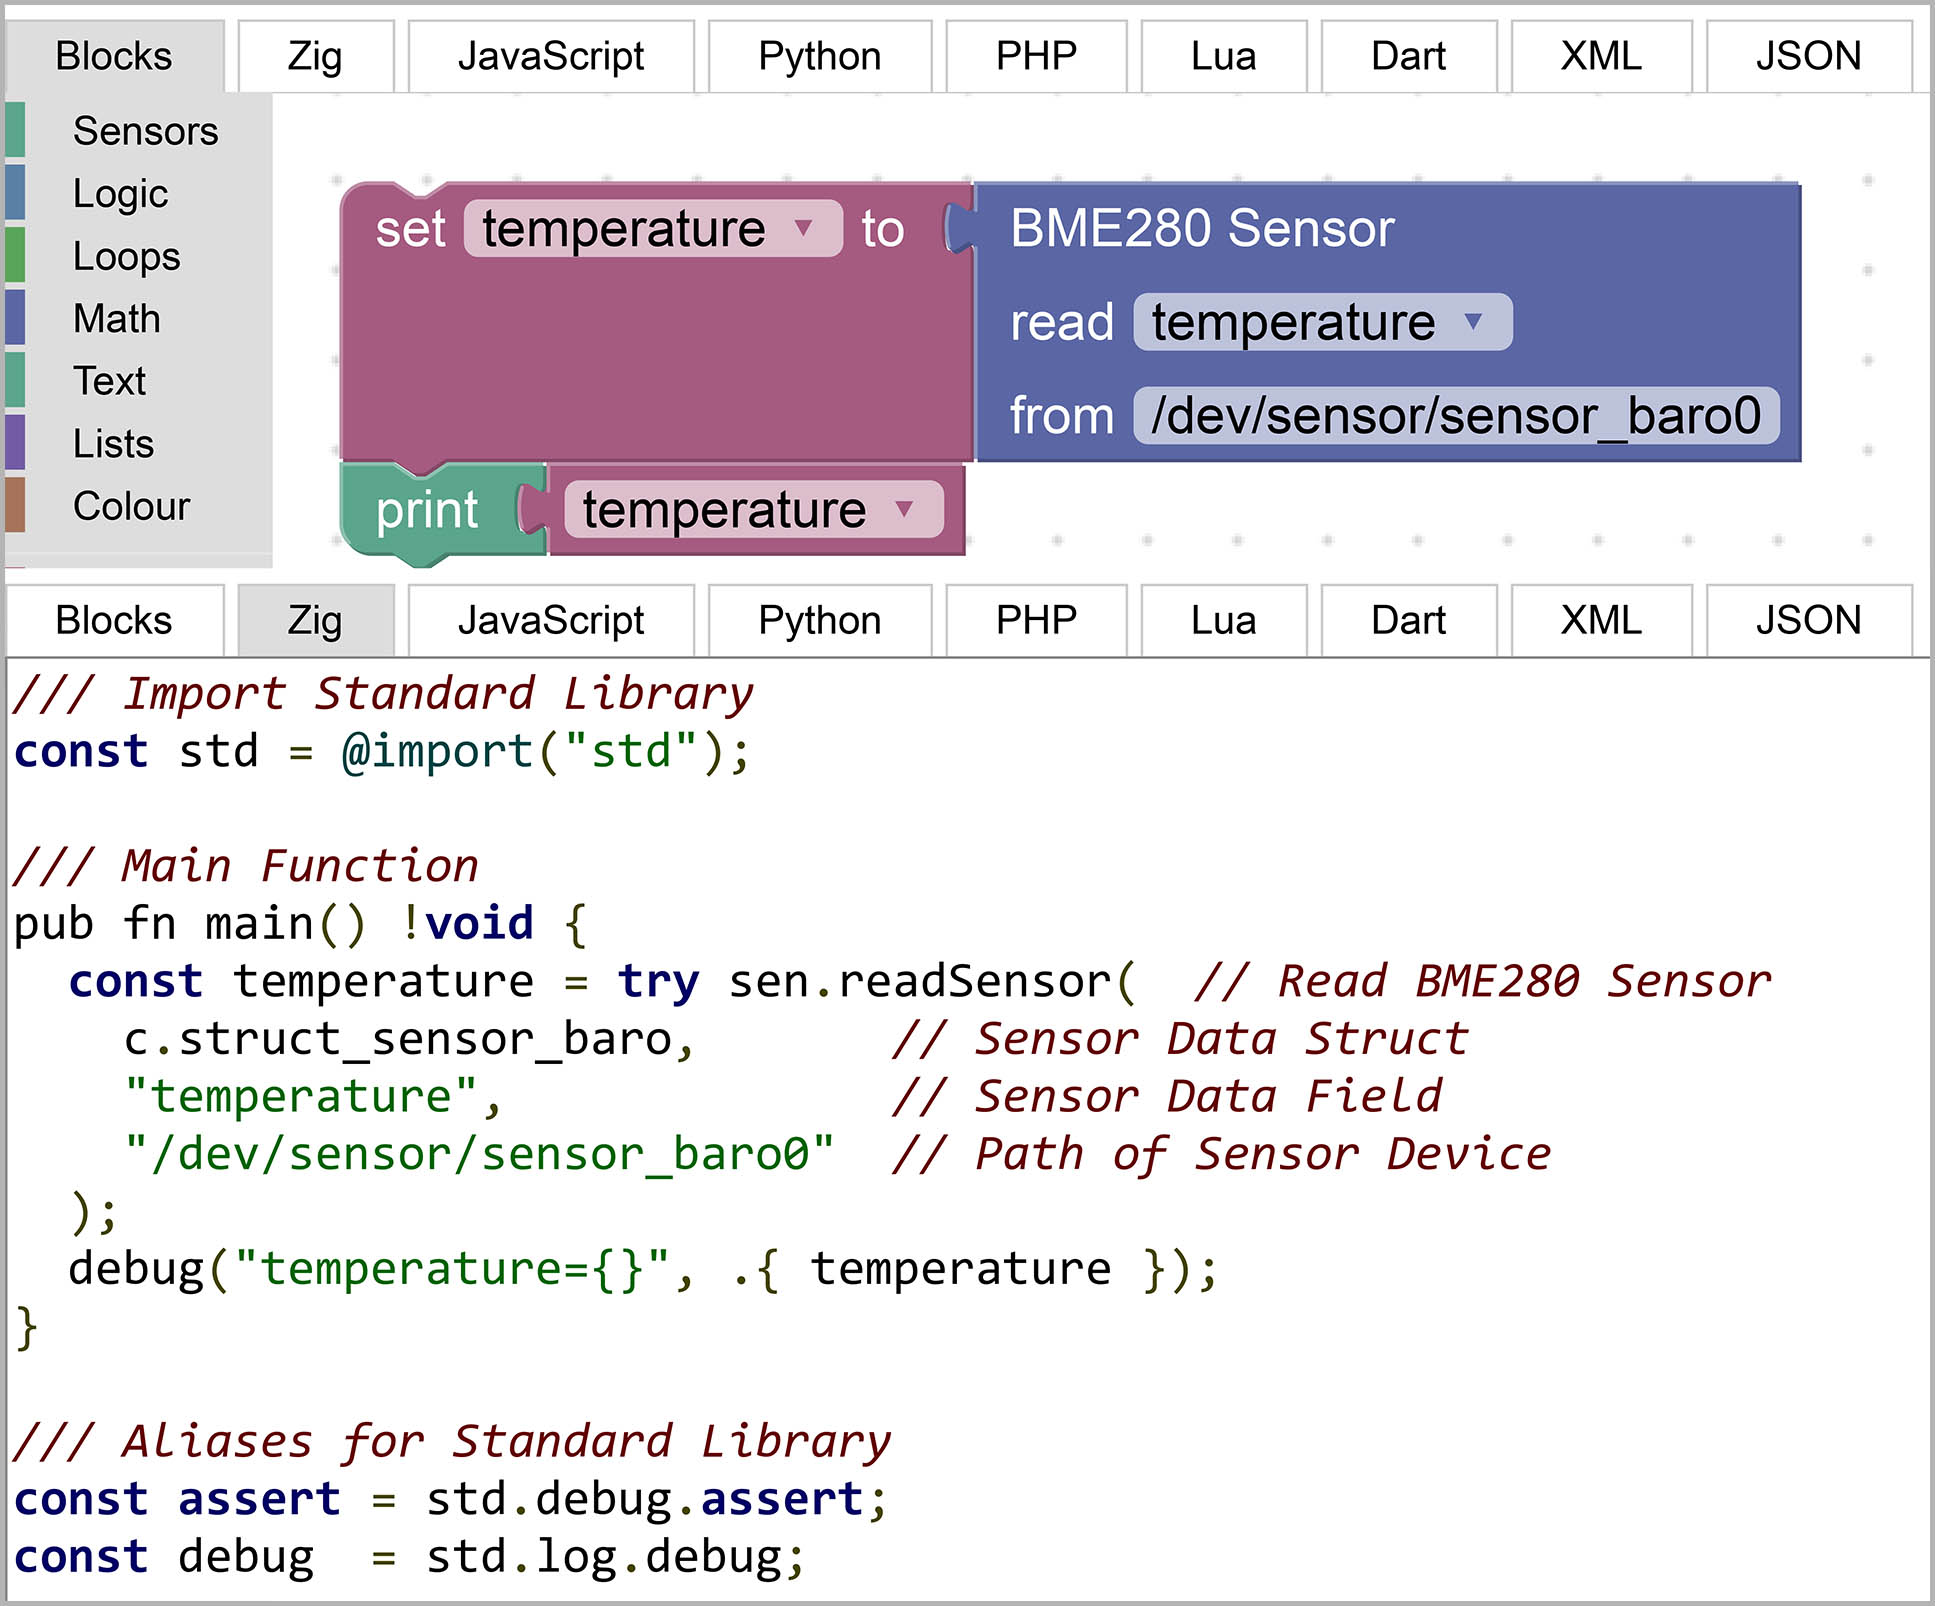
We should see this Zig code generated for our BME280 Sensor Block.
Copy the contents of the Main Function and paste here...
visual-zig-nuttx/blob/main/visual.zig
The generated Zig code should correctly read the Temperature from BME280 Sensor...
NuttShell (NSH) NuttX-10.3.0
nsh> sensortest visual
Zig Sensor Test
Start main
temperature=31.32
(Tested with NuttX and BME280 on BL602)
Our Compose Message Block needs a Custom Extension in Blockly because it has a variable number of slots (for the Message Fields)...
This is how we define the Blocks in our Custom Extension...
blockly-zig-nuttx/generators/zig/compose_msg.js
Lines 59 to 92 in b6dbd66
Our Custom Extension needs a Mutator that will save the attached Message Fields.
Here's the Mixin that implements the Mutator for our Custom Extension...
blockly-zig-nuttx/generators/zig/compose_msg.js
Lines 94 to 210 in b6dbd66
And here's our Custom Extension that bundles the above Blocks, Mutator and Mixin...
blockly-zig-nuttx/generators/zig/compose_msg.js
Lines 212 to 228 in b6dbd66
(We copied our Custom Extension from the Text Join Block)
(More about Blockly Extensions and Mutators)
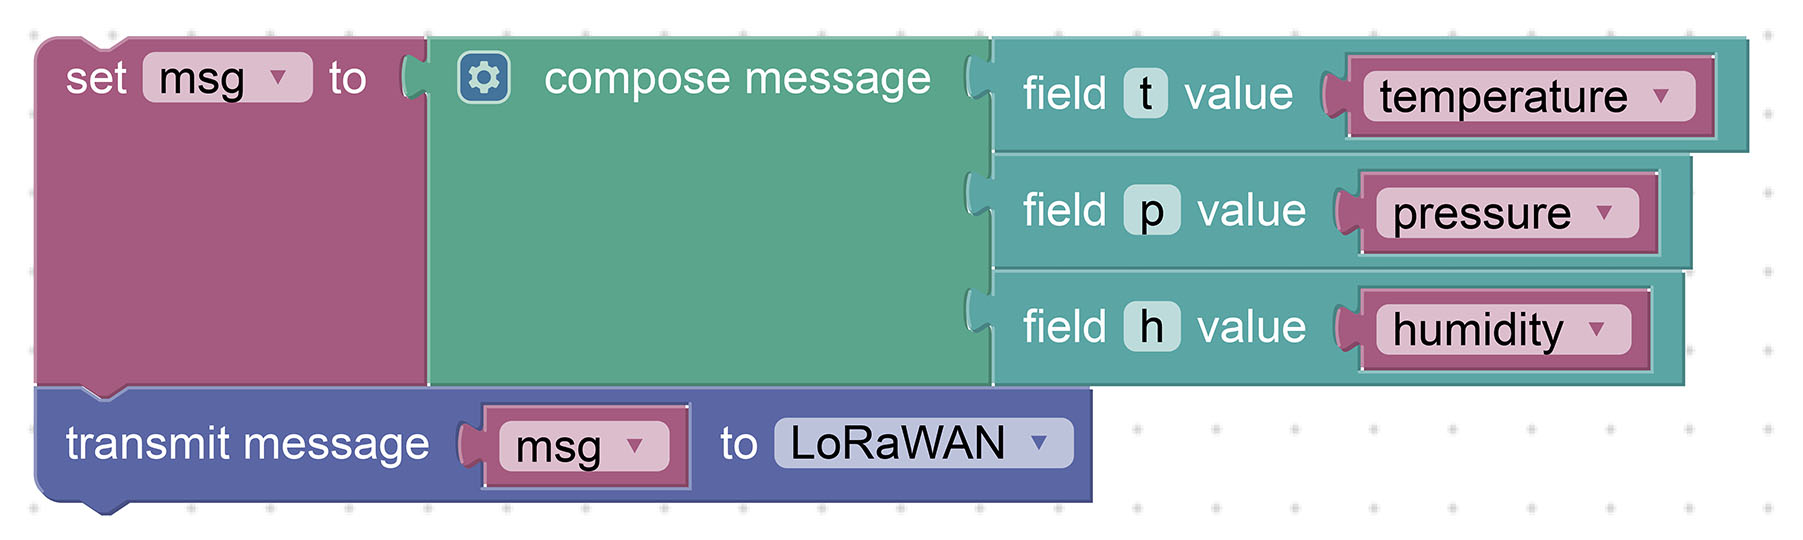
Our Custom Extension for Compose Message...
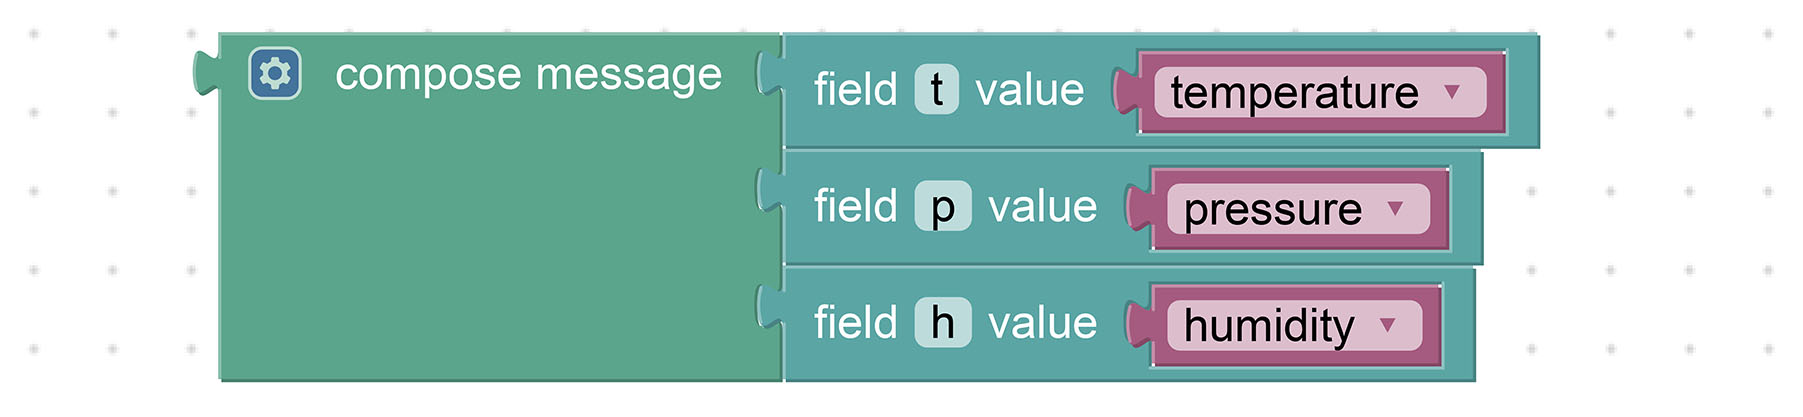
Will generate this Zig code...
const msg = try composeCbor(.{  // Compose CBOR Message
  "t", temperature,
  "p", pressure,
  "h", humidity,
});(composeCbor is explained here)
Here's the implementation of our Code Generator: generators/zig/zig_functions.js
// Generate CBOR Message
Zig['compose_msg'] = function(block) {

  // Convert each Message Field to Zig Code
  var elements = new Array(block.itemCount_);
  for (var i = 0; i < block.itemCount_; i++) {
    elements[i] = Blockly.Zig.valueToCode(block, 'ADD' + i,
      Blockly.Zig.ORDER_NONE) || '\'\'';
  }

  // Combine the Message Fields into a CBOR Message
  const code = [
    'try composeCbor(.{  // Compose CBOR Message',
    //  Insert the indented elements.
    Blockly.Zig.prefixLines(
      elements.join('\n'),
      Blockly.Zig.INDENT),
    '})',
  ].join('\n');
  return [code, Blockly.Zig.ORDER_UNARY_POSTFIX];
};
Each Message Field...

Will generate Zig code like this...
"t", temperature,Here's the implementation of our Code Generator: generators/zig/zig_functions.js
// Generate a field for CBOR message
Zig['field'] = function(block) {
  const name = block.getFieldValue('NAME');
  const value = Blockly.Zig.valueToCode(block, 'name', Blockly.JavaScript.ORDER_ATOMIC);
  const code = `"${name}", ${value},`;
  return [code, Blockly.Zig.ORDER_NONE];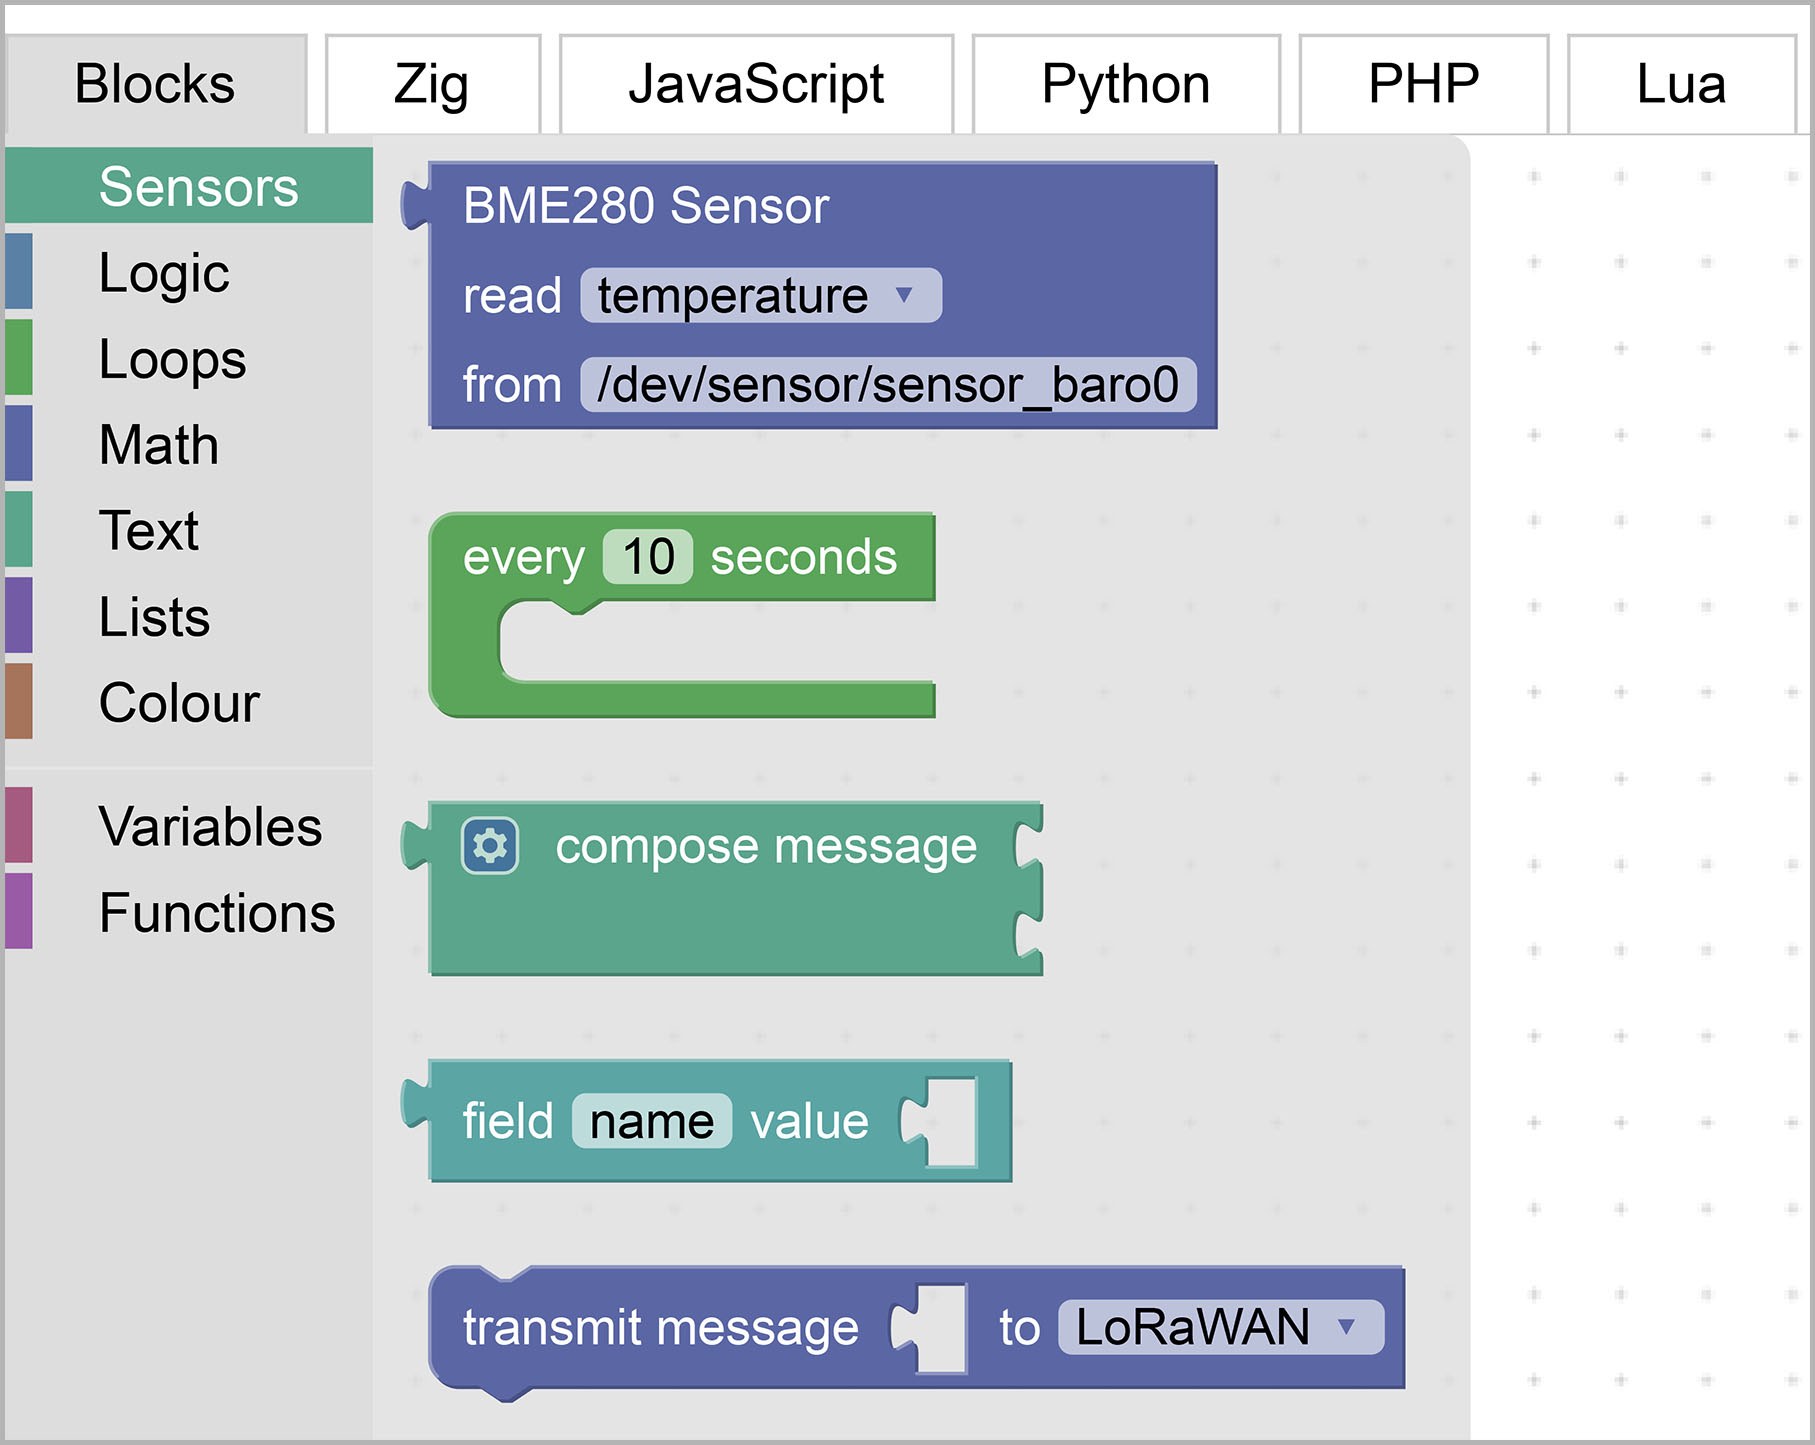
};To test our Custom Extension for Compose Message, let's build a Complex Sensor App that will read Temperature, Pressure and Humidity from BME280 Sensor, and transmit the values to LoRaWAN...
lupyuen3.github.io/blockly-zig-nuttx/demos/code
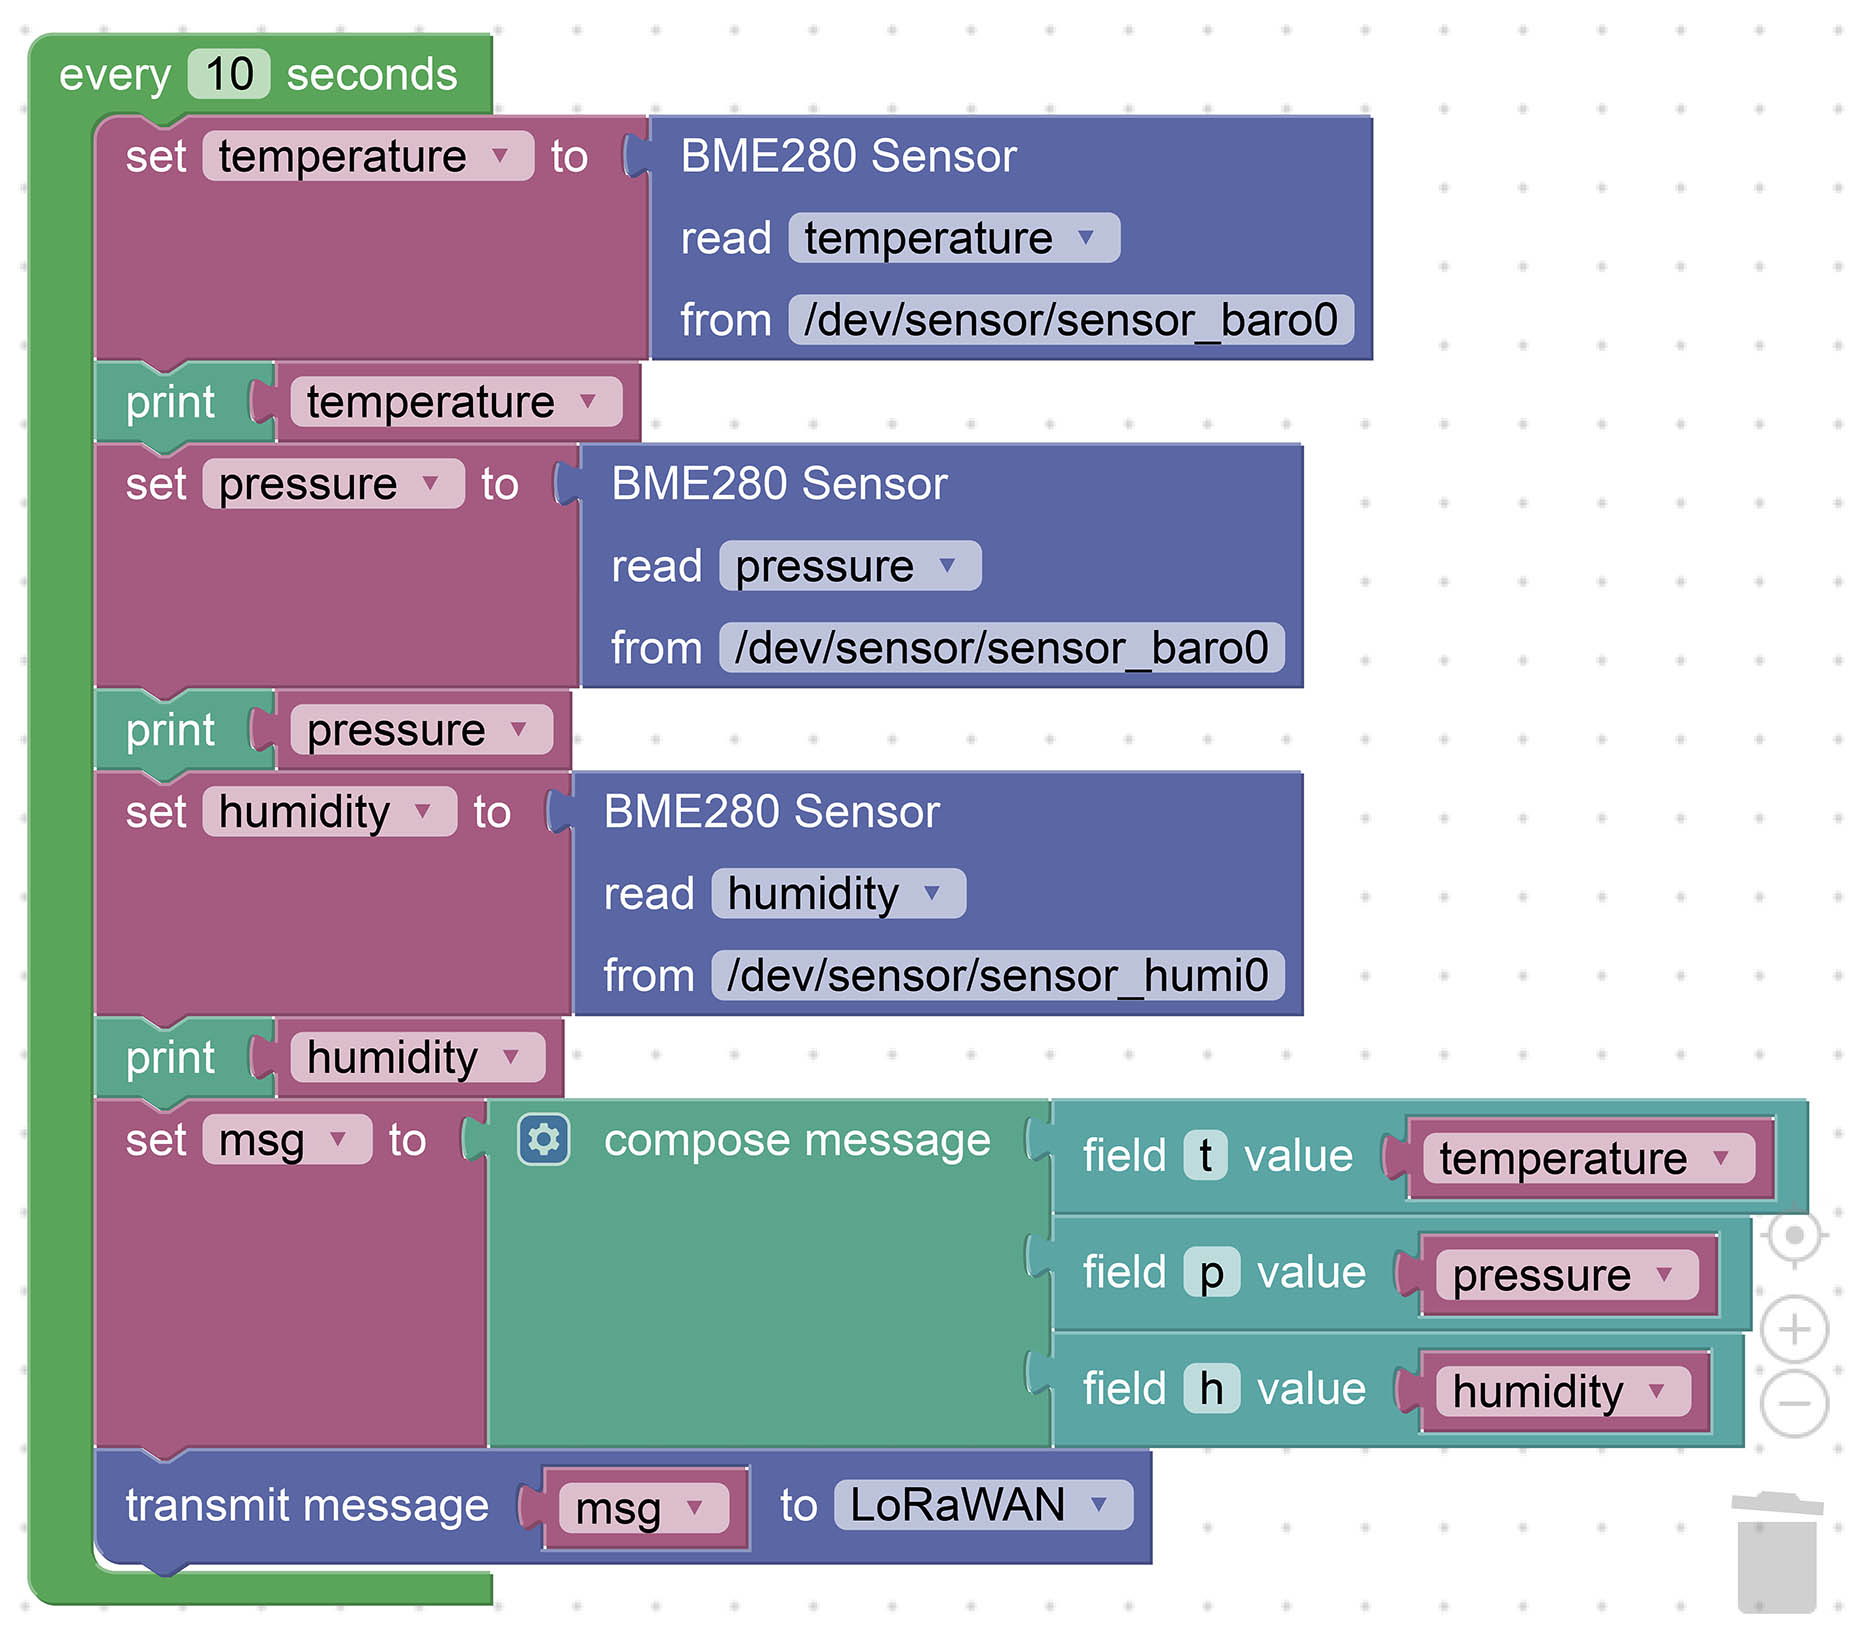
The Blocks above will emit this Zig program...
/// Main Function
pub fn main() !void {

  // Every 10 seconds...
  while (true) {
    const temperature = try sen.readSensor(  // Read BME280 Sensor
      c.struct_sensor_baro,       // Sensor Data Struct
      "temperature",              // Sensor Data Field
      "/dev/uorb/sensor_baro0"  // Path of Sensor Device
    );
    debug("temperature={}", .{ temperature });

    const pressure = try sen.readSensor(  // Read BME280 Sensor
      c.struct_sensor_baro,       // Sensor Data Struct
      "pressure",                 // Sensor Data Field
      "/dev/uorb/sensor_baro0"  // Path of Sensor Device
    );
    debug("pressure={}", .{ pressure });

    const humidity = try sen.readSensor(  // Read BME280 Sensor
      c.struct_sensor_humi,       // Sensor Data Struct
      "humidity",                 // Sensor Data Field
      "/dev/uorb/sensor_humi0"  // Path of Sensor Device
    );
    debug("humidity={}", .{ humidity });

    const msg = try composeCbor(.{  // Compose CBOR Message
      "t", temperature,
      "p", pressure,
      "h", humidity,
    });

    // Transmit message to LoRaWAN
    try transmitLorawan(msg);

    // Wait 10 seconds
    _ = c.sleep(10);
  }
}(composeCbor is explained here)
Copy the contents of the Main Function and paste here...
The generated Zig code should correctly read the Temperature, Pressure and Humidity from BME280 Sensor, and transmit the values to LoRaWAN...
NuttShell (NSH) NuttX-10.3.0
nsh> sensortest visual
Zig Sensor Test
Start main

temperature=31.05
pressure=1007.44
humidity=71.49
composeCbor
  t: 31.05
  p: 1007.44
  h: 71.49
  msg=t:31.05,p:1007.44,h:71.49,
transmitLorawan
  msg=t:31.05,p:1007.44,h:71.49,

temperature=31.15
pressure=1007.40
humidity=70.86
composeCbor
  t: 31.15
  p: 1007.40
  h: 70.86
  msg=t:31.15,p:1007.40,h:70.86,
transmitLorawan
  msg=t:31.15,p:1007.40,h:70.86,

temperature=31.16
pressure=1007.45
humidity=70.42
composeCbor
  t: 31.16
  p: 1007.45
  h: 70.42
  msg=t:31.16,p:1007.45,h:70.42,
transmitLorawan
  msg=t:31.16,p:1007.45,h:70.42,

temperature=31.16
pressure=1007.47
humidity=70.39
composeCbor
  t: 31.16
  p: 1007.47
  h: 70.39
  msg=t:31.16,p:1007.47,h:70.39,
transmitLorawan
  msg=t:31.16,p:1007.47,h:70.39,

temperature=31.19
pressure=1007.45
humidity=70.35
composeCbor
  t: 31.19
  p: 1007.45
  h: 70.35
  msg=t:31.19,p:1007.45,h:70.35,
transmitLorawan
  msg=t:31.19,p:1007.45,h:70.35,

temperature=31.20
pressure=1007.42
humidity=70.65
composeCbor
  t: 31.20
  p: 1007.42
  h: 70.65
  msg=t:31.20,p:1007.42,h:70.65,
transmitLorawan
  msg=t:31.20,p:1007.42,h:70.65,
(Tested with NuttX and BME280 on BL602)
To test the Zig program above on Linux / macOS / Windows (instead of NuttX), add the stubs below to simulate a NuttX Sensor...
/// Import Standard Library
const std = @import("std");

/// Main Function
pub fn main() !void {
    // TODO: Paste here the contents of Zig Main Function generated by Blockly
    ...
}

/// Aliases for Standard Library
const assert = std.debug.assert;
const debug  = std.log.debug;

///////////////////////////////////////////////////////////////////////////////
//  CBOR Encoding

/// TODO: Compose CBOR Message with Key-Value Pairs
/// https://lupyuen.github.io/articles/cbor2
fn composeCbor(args: anytype) !CborMessage {
    debug("composeCbor", .{});
    comptime {
        assert(args.len % 2 == 0);  // Missing Key or Value
    }

    // Process each field...
    comptime var i: usize = 0;
    var msg = CborMessage{};
    inline while (i < args.len) : (i += 2) {

        // Get the key and value
        const key   = args[i];
        const value = args[i + 1];

        // Print the key and value
        debug("  {s}: {}", .{
            @as([]const u8, key),
            floatToFixed(value)
        });

        // Format the message for testing
        var slice = std.fmt.bufPrint(
            msg.buf[msg.len..],
            "{s}:{},",
            .{
                @as([]const u8, key),
                floatToFixed(value)
            }
        ) catch { _ = std.log.err("Error: buf too small", .{}); return error.Overflow; };
        msg.len += slice.len;
    }
    debug("  msg={s}", .{ msg.buf[0..msg.len] });
    return msg;
}

/// TODO: CBOR Message
/// https://lupyuen.github.io/articles/cbor2
const CborMessage = struct {
    buf: [256]u8 = undefined,  // Limit to 256 chars
    len: usize = 0,
};

///////////////////////////////////////////////////////////////////////////////
//  Transmit To LoRaWAN

/// TODO: Transmit message to LoRaWAN
fn transmitLorawan(msg: CborMessage) !void {
    debug("transmitLorawan", .{});
    debug("  msg={s}", .{ msg.buf[0..msg.len] });
}

///////////////////////////////////////////////////////////////////////////////
//  Stubs

const c = struct {
    const struct_sensor_baro = struct{};
    const struct_sensor_humi = struct{};
    fn sleep(seconds: c_uint) c_int {
        std.time.sleep(@as(u64, seconds) * std.time.ns_per_s);
        return 0;
    }
};

const sen = struct {
    fn readSensor(comptime SensorType: type, comptime field_name: []const u8, device_path: []const u8) !f32
        { _ = SensorType; _ = field_name; _ = device_path; return 23.45; }
};

fn floatToFixed(f: f32) f32 { return f; }(composeCbor is explained here)
→ npm install

> fsevents@1.2.13 install blockly-zig-nuttx/node_modules/glob-watcher/node_modules/fsevents
> node install.js

make: Entering directory 'blockly-zig-nuttx/node_modules/glob-watcher/node_modules/fsevents/build'
  SOLINK_MODULE(target) Release/.node
  CXX(target) Release/obj.target/fse/fsevents.o
  SOLINK_MODULE(target) Release/fse.node
make: Leaving directory 'blockly-zig-nuttx/node_modules/glob-watcher/node_modules/fsevents/build'

> @hyperjump/json-pointer@0.9.2 postinstall blockly-zig-nuttx/node_modules/@hyperjump/json-pointer
> rm -rf dist


> @hyperjump/pact@0.2.1 postinstall blockly-zig-nuttx/node_modules/@hyperjump/pact
> rm -rf dist


> @hyperjump/json-schema-core@0.23.6 postinstall blockly-zig-nuttx/node_modules/@hyperjump/json-schema-core
> rm -rf dist


> @hyperjump/json-schema@0.18.4 postinstall blockly-zig-nuttx/node_modules/@hyperjump/json-schema
> rm -rf dist

npm WARN optional SKIPPING OPTIONAL DEPENDENCY: google-closure-compiler-windows@20220301.0.0 (node_modules/google-closure-compiler-windows):
npm WARN notsup SKIPPING OPTIONAL DEPENDENCY: Unsupported platform for google-closure-compiler-windows@20220301.0.0: wanted {"os":"win32","arch":"x64"} (current: {"os":"darwin","arch":"x64"})
npm WARN optional SKIPPING OPTIONAL DEPENDENCY: google-closure-compiler-linux@20220301.0.0 (node_modules/google-closure-compiler-linux):
npm WARN notsup SKIPPING OPTIONAL DEPENDENCY: Unsupported platform for google-closure-compiler-linux@20220301.0.0: wanted {"os":"linux","arch":"x64,x86"} (current: {"os":"darwin","arch":"x64"})

added 1026 packages from 1074 contributors and audited 1031 packages in 67.757s

69 packages are looking for funding
  run `npm fund` for details

found 12 vulnerabilities (6 moderate, 5 high, 1 critical)
  run `npm audit fix` to fix them, or `npm audit` for details

→ npm run build

> blockly@8.0.4 build blockly-zig-nuttx
> gulp build

[12:30:30] Using gulpfile ~/pinecone/blockly-zig-nuttx/gulpfile.js
[12:30:30] Starting 'build'...
[12:30:30] Starting 'buildLangfiles'...
[12:30:30] Starting 'buildDeps'...
[12:30:31] Finished 'buildLangfiles' after 1.1 s
WARNING in blockly-zig-nuttx/tests/mocha/test_helpers/common.js at 39, 3: Bounded generic semantics are currently still in development
WARNING in blockly-zig-nuttx/tests/mocha/test_helpers/common.js at 40, 3: Bounded generic semantics are currently still in development
WARNING in blockly-zig-nuttx/tests/mocha/test_helpers/common.js at 75, 3: Bounded generic semantics are currently still in development
WARNING in blockly-zig-nuttx/tests/mocha/test_helpers/common.js at 91, 3: Bounded generic semantics are currently still in development
WARNING in blockly-zig-nuttx/tests/mocha/test_helpers/common.js at 92, 3: Bounded generic semantics are currently still in development
[12:30:43] Finished 'buildDeps' after 13 s
[12:30:43] Starting 'buildCompiled'...
[12:30:58] Finished 'buildCompiled' after 15 s
[12:30:58] Finished 'build' after 28 s

→ npm run publish

> blockly@8.0.4 publish blockly-zig-nuttx
> gulp publish

[12:31:09] Using gulpfile ~/pinecone/blockly-zig-nuttx/gulpfile.js
[12:31:09] Starting 'publish'...
[12:31:09] Starting 'cleanBuildDir'...
[12:31:09] Finished 'cleanBuildDir' after 33 ms
[12:31:09] Starting 'buildLangfiles'...
[12:31:09] Starting 'buildDeps'...
[12:31:10] Finished 'buildLangfiles' after 726 ms
WARNING in blockly-zig-nuttx/tests/mocha/test_helpers/common.js at 39, 3: Bounded generic semantics are currently still in development
WARNING in blockly-zig-nuttx/tests/mocha/test_helpers/common.js at 40, 3: Bounded generic semantics are currently still in development
WARNING in blockly-zig-nuttx/tests/mocha/test_helpers/common.js at 75, 3: Bounded generic semantics are currently still in development
WARNING in blockly-zig-nuttx/tests/mocha/test_helpers/common.js at 91, 3: Bounded generic semantics are currently still in development
WARNING in blockly-zig-nuttx/tests/mocha/test_helpers/common.js at 92, 3: Bounded generic semantics are currently still in development
[12:31:23] Finished 'buildDeps' after 14 s
[12:31:23] Starting 'buildCompiled'...
[12:31:36] Finished 'buildCompiled' after 13 s
[12:31:36] Starting 'checkinBuilt'...
[12:31:36] Finished 'checkinBuilt' after 272 ms
[12:31:36] Starting 'checkBuildDir'...
[12:31:36] Finished 'checkBuildDir' after 456 μs
[12:31:36] Starting 'cleanReleaseDir'...
[12:31:36] Finished 'cleanReleaseDir' after 1.63 ms
[12:31:36] Starting 'packageIndex'...
[12:31:36] Starting 'packageSources'...
[12:31:36] Starting 'packageCompressed'...
[12:31:36] Starting 'packageBrowser'...
[12:31:36] Starting 'packageNode'...
[12:31:36] Starting 'packageCore'...
[12:31:36] Starting 'packageNodeCore'...
[12:31:36] Starting 'packageBlockly'...
[12:31:36] Starting 'packageBlocks'...
[12:31:36] Starting 'packageJavascript'...
[12:31:36] Starting 'packagePython'...
[12:31:36] Starting 'packageLua'...
[12:31:36] Starting 'packageDart'...
[12:31:36] Starting 'packagePHP'...
[12:31:36] Starting 'packageLocales'...
[12:31:36] Starting 'packageMedia'...
[12:31:36] Starting 'packageUMDBundle'...
[12:31:36] Starting 'packageJSON'...
[12:31:36] Starting 'packageReadme'...
[12:31:36] Starting 'packageDTS'...
[12:31:36] Finished 'packageJSON' after 37 ms
[12:31:36] Finished 'packageIndex' after 189 ms
[12:31:36] Finished 'packageNode' after 189 ms
[12:31:36] Finished 'packageBlockly' after 189 ms
[12:31:36] Finished 'packageJavascript' after 190 ms
[12:31:36] Finished 'packagePython' after 190 ms
[12:31:36] Finished 'packageBlocks' after 191 ms
[12:31:36] Finished 'packageNodeCore' after 191 ms
[12:31:36] Finished 'packageDart' after 191 ms
[12:31:36] Finished 'packageBrowser' after 195 ms
[12:31:36] Finished 'packageLua' after 195 ms
[12:31:36] Finished 'packageCore' after 196 ms
[12:31:36] Finished 'packagePHP' after 196 ms
[12:31:36] Finished 'packageReadme' after 196 ms
[12:31:36] Finished 'packageUMDBundle' after 230 ms
[12:31:36] Finished 'packageDTS' after 279 ms
[12:31:36] Finished 'packageCompressed' after 321 ms
[12:31:36] Finished 'packageMedia' after 325 ms
[12:31:37] Finished 'packageLocales' after 691 ms
[12:31:37] Finished 'packageSources' after 954 ms
[12:31:37] Starting 'checkBranch'...
You are on 'master'. Is this the correct branch? [y/n]: n

Google's Blockly is a library that adds a visual code editor to web and mobile apps. The Blockly editor uses interlocking, graphical blocks to represent code concepts like variables, logical expressions, loops, and more. It allows users to apply programming principles without having to worry about syntax or the intimidation of a blinking cursor on the command line. All code is free and open source.
Blockly has many resources for learning how to use the library. Start at our Google Developers Site to read the documentation on how to get started, configure Blockly, and integrate it into your application. The developers site also contains links to:
Help us focus our development efforts by telling us what you are doing with Blockly. The questionnaire only takes a few minutes and will help us better support the Blockly community.
Blockly is available on npm.
npm install blocklyFor more information on installing and using Blockly, see the Getting Started article.
- Report a bug or file a feature request on GitHub
- Ask a question, or search others' questions, on our developer forum. You can also drop by to say hello and show us your prototypes; collectively we have a lot of experience and can offer hints which will save you time. We actively monitor the forums and typically respond to questions within 2 working days.
We have a number of resources such as example code, demos, and plugins in another repository called blockly-samples. A plugin is a self-contained piece of code that adds functionality to Blockly. Plugins can add fields, define themes, create renderers, and much more. For more information, see the Plugins documentation.
Want to make Blockly better? We welcome contributions to Blockly in the form of pull requests, bug reports, documentation, answers on the forum, and more! Check out our Contributing Guidelines for more information. You might also want to look for issues tagged "Help Wanted" which are issues we think would be great for external contributors to help with.
The next major release will be during the last week of March 2022.
We release by pushing the latest code to the master branch, followed by updating the npm package, our docs, and demo pages. We typically release a new version of Blockly once a quarter (every 3 months). If there are breaking bugs, such as a crash when performing a standard action or a rendering issue that makes Blockly unusable, we will cherry-pick fixes to master between releases to fix them. The releases page has a list of all releases.
Releases are tagged by the release date (YYYYMMDD) with a leading major version number and a trailing '.0' in case we ever need a major or patch version (such as 2.20190722.1). Releases that have breaking changes or are otherwise not backwards compatible will have a new major version. Patch versions are reserved for bug-fix patches between scheduled releases.
We now have a beta release on npm. If you'd like to test the upcoming release, or try out a not-yet-released new API, you can use the beta channel with:
npm install blockly@betaAs it is a beta channel, it may be less stable, and the APIs there are subject to change.
There are two main branches for Blockly.
master - This is the (mostly) stable current release of Blockly.
develop - This is where most of our work happens. Pull requests should always be made against develop. This branch will generally be usable, but may be less stable than the master branch. Once something is in develop we expect it to merge to master in the next release.
other branches: - Larger changes may have their own branches until they are good enough for people to try out. These will be developed separately until we think they are almost ready for release. These branches typically get merged into develop immediately after a release to allow extra time for testing.
Once a new API is merged into master it is considered beta until the following release. We generally try to avoid changing an API after it has been merged to master, but sometimes we need to make changes after seeing how an API is used. If an API has been around for at least two releases we'll do our best to avoid breaking it.
Unreleased APIs may change radically. Anything that is in develop but not master is subject to change without warning.
We typically triage all bugs within 2 working days, which includes adding any appropriate labels and assigning it to a milestone. Please keep in mind, we are a small team so even feature requests that everyone agrees on may not be prioritized.
Upcoming release - The upcoming release milestone is for all bugs we plan on fixing before the next release. This typically has the form of year_quarter_release (such as 2019_q2_release). Some bugs will be added to this release when they are triaged, others may be added closer to a release.
Bug Bash Backlog - These are bugs that we're still prioritizing. They haven't been added to a specific release yet, but we'll consider them for each release depending on relative priority and available time.
Icebox - These are bugs that we do not intend to spend time on. They are either too much work or minor enough that we don't expect them to ever take priority. We are still happy to accept pull requests for these bugs.
- Cross-browser Testing Platform and Open Source <3 Provided by Sauce Labs
- We support IE11 and test it using BrowserStack