
This is a small Windows application to help you create a certificate for your domain using Let’s Encrypt service. It aims at static sites provided by GitLab pages, and in the future GitHub pages when it supports HTTPS with custom domains... actually, you can use it with any site you can write to. You name it... for example, Microsoft Windows Azure. It's ok. If you settup your Windows Azure with Git publish you're done.
The application is very simple. You fill all the fields with your information, click a button and it does everything that's needed to create the certificate.
The only step that is not automatic is the setup of the DNS. You must have knowledge on how to get your registrar to point to your site at GitLab pages or at GitHub, or wherever your site is. I recommend that you do this before using the wizard, but if you don't, it does not matter, the process will stop in the middle, and wait for you do point the DNS server to your site location.
When you open the program you will see this window:
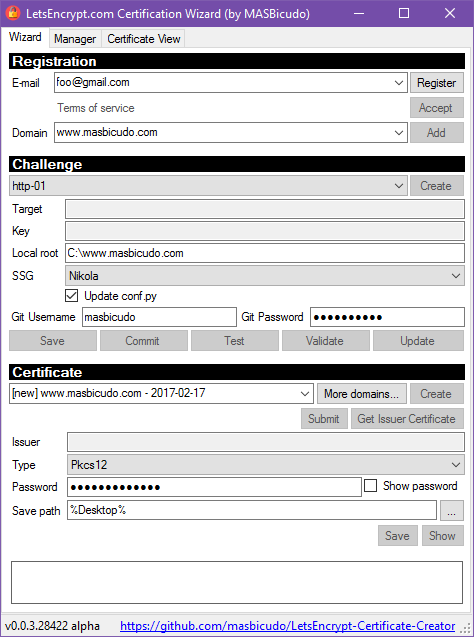
- E-mail: your e-mail, Let's Encrypt never sent me an e-mail, but they may use it
for legal reasons if they need to contact you. You don't need to click the
Registerbutton now. You can fill everything first, and then click it to start the whole process. - Terms of Service: click this link if you want to read Let's Encrypt ToS.
- Domain: the domain you want to create a certificate for.
At this moment, there will be no domains in the list, so you must add one.
Again, you don't need to click
Addbutton now.
- Type: the first box is the type of the challenge. At this moment, only HTTP challenge is supported. Select it.
- Target and Key are just there for information. They get filled when the challenge is created.
- Local root: is the root of your static site repository. Point to that repository so the files that are needed for the challenge are created for you.
- SSG: is the static site generator being used. Each SSG needs it's own set of files and patches so that the challenge file is exposed. If your SSG is not in the list, open an issue, and consider creating a pull request. =D Also, you can always do this step manually, creating only the challenge file and setting up the SSG manually.
- Git username: the username that will be used to push the needed files back to the origin (e.g. GitHub or GitLab).
- Git password: guess what
buttons
- Save: saves the needed files into your repository.
- Commit: ta-da... it commits and pushes to the origin.
- Test: tests the target URL before asking Let's Encrypt to do so. If this test fail, you will not be allowed to continue. It means that the needed files are not publicly visible. Maybe you forgot to setup your DNS server to point to where your site is hosted.
- Validate: asks Let's Encrypt to validate the challenge, showing that you really controll that domain.
- Update: validation can take some time. So the program needs to update the request status to know whether Let's Encrypt accepted it or not. You can use this button if you wish at any moment.
After demonstrating to Let's Encrypt that you own the domains you have added, you can start creating certificates for them.
- Name: the first field is the certificate name. You can create multiple certificates if you wish. You can create one certificate per domain, multiple certificates per domain, or even a single certificate for many domains.
- More domains...: this button opens a list that allows the inclusion of other domains in the current certificate.
- Type: a certificate can be represented in multiple ways,
and is composed of multiple parts. At this point the certificate
is already save, you just need to tell what format and part
of it that you want.
- PEM files: base64 representation of the parts of the certificate.
- DER files: I dunno... it's there if you need it. =D
- Pkcs12: used for backup and transportation.
- Password: only the
Pkcs12file format allows you to encrypt the file with a password. This is the best way to transport or to backup the certificate. - Save path: where you want to save the certificate data. If don't save it... don't worry, the certificate is already stored. Saving now means making a copy of the certificate or part of it.
buttons
- Create: create the certificate for the given domains.
- Submit: send certificate to Let's Encrypt so that they can sign it.
- Get issuer certificate: get the signed certificate back from Let's Encrypt and store it.
- Save: save the signed certificate, or parts of it, in the specified format.
- Show: shows the base64 text. Only PEM format is encoded as text in base64 format.
In this tutorial I will guide you in the process of creating a certificate for a site hosted at GitLab pages. The focus will be the usage of the tool, and not GitLab pages.
... soon ...
Apache 2.0