


Torpedo is a Python package (which also comes as a GUI application) that helps user to send personalized emails (mostly for email marketing) using their own SMTP server (or maybe their Gmail account). The target user base are the people who cannot (or unwilling to) buy a dedicated email marketing service available online.
-
Send personalized messages with variables in
{{ variable }}format and Torpedo will replace them while sending. -
Supports both plain text and html emails.
-
Supports attachments (image, audio and other binary file formats) of 119+ formats (limited to 119 for the GUI application) if not mentioned otherwise. Check list of file formats for exceptions.
-
Supports CSV files of all common delimiters and Microsoft Excel files for getting user database.
-
Log files for every task started.
-
Can send up to 80 emails a minute.
-
Resumability in case of disrupted emails (available only on windows).
-
Can automate emails with only 6 (or maybe 0 if using GUI) lines of code.
-
Can easily be integrated with any Python application.
Torpedo is made a way so that people can focus on their goal instead of caring too much about the codes. User needs to write down the email body and link the attachment and database files. Rest will be done by Torpedo, flawlessly!
Torpedo uses more than a couple of external Python packages to work properly-
-
OpenPyXL to retrieve and process data from Windows Excel documents.
-
BeautifulSoup4 to check availability of HTML content in email body.
-
PyInstaller to compile the GUI into one windows executable file.
And of course you will need Python 3.6+ installed (not required for the GUI) in your PC to run the package.
To install from PyPI run the following code on your command prompt-
For windows users:
pip install mailtorpedoFor Linux and MacOS users:
pip3 install mailtorpedoInstallation is not required for the GUI application. Download Torpedo-1.1.0.exe from BackBlaze. Your antivirus might consider it as a suspicious file. Better make an exception folder and save it there.
There is another way to use the GUI without using the executable but that requires Python (3.6+) and other dependencies installed. Run the following commands on command prompt or terminal to get the GUI running.
Clone the repository, change directory to the cloned folder and install dependencies-
git clone --depth=3 "https://github.com/pptx704/torpedo"
cd torpedo
pip3 install -r requirements.txt
Run the GUI using Python
python3 -m torpedo-guiClone the repository and change directory to the cloned folder-
git clone --depth=3 "https://github.com/pptx704/torpedo"
cd torpedo
pip install -r requirements.txt
Run the GUI using Python
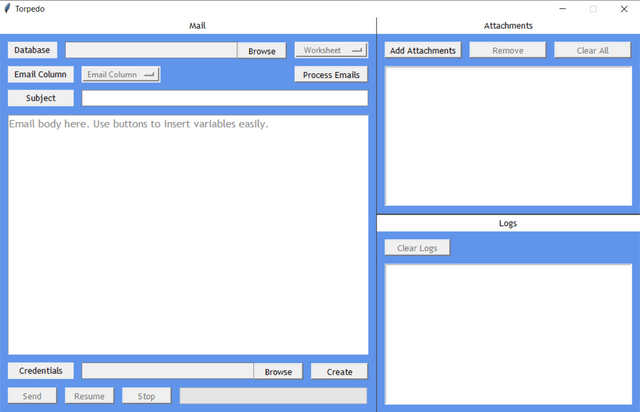
python -m torpedo-guiEither way you get the executable, successfully running that will present you the following window-
If you are going to use Gmail to send emails, make sure you enable access to login into your Gmail account. Check enabling access for guides.
This tutorial assumes that user has beginner level knowledge about python and tells it that way. It is recommended to follow the full guideline even if you feel more comfortable into precise documentation. You can skip to classes and skip the later part too if you want. If you want to skip Python based usage and use the GUI instead, check GUI Usage
Before we start, we will assume a folder having all the mail sending related files.
Base Folder
    |- Files
        |- subscription.png
    |- test_database.csv
    |- test_database.xlsx
    |- credentials.json
    |- mail_body_1.txt
    |- mail_body_2.txt
    |- main.py
Here, test_database.csv and test_database.xlsx are the database files.
The test_database.csv file has the following data-
| Name | Username | Email Address | Subscription |
|---|---|---|---|
| Alice | user1_alice | alice@example.com | Pro |
| Bob | user2_bob | bob@example.com | Basic |
| Charlie | user3_charlie | charlie@example.com | Enterprise |
The test_database.xlsx file has two sheets consisting following data-
Rank Sheet:
| Name | Username | Rank | |
|---|---|---|---|
| Alpha | user_alpha | alpha@example.com | Amateur |
| Bravo | user_bravo | bravo@example.com | Master |
| Charlie | user_charlie | charlie@example.com | Legend |
Subscriber Sheet:
| Name | Username | Subscription | |
|---|---|---|---|
| Alice | user1_alice | alice@example.com | Pro |
| Bob | user2_bob | bob@example.com | Basic |
| Charlie | user3_charlie | charlie@example.com | Enterprise |
The credentials.json has the credentials we need to log in to our SMTP server. For now we assume it's a Gmail account and so the data inside will be the following-
{
    "HOST": "smtp.gmail.com",
    "PORT": "587",
    "USER": "example@gmail.com",
    "PASSWORD": "p@$$W0rd"
}
Please make sure that your credential file consists exactly the above data with replaced value.
The mail_body_1.txt and mail_body_2.txt will have the texts to be used as email body.
mail_body_1.txt-
Hello {{ Name }},

Thank you for upgrading your service plan to {{ Subscription }}. Please check the dashboard of your username {{ Username }} to see changes.

Thank you
mail_body_2.txt-
Hello {{ Username }},

Congratulations on reaching {{ Rank }} on OUR_APP.

Thank you for being with us!
Note how we used {{ }} to make a template where {{ column_name }} will be replaced by the value of column_name in associated row.
The files/subscription.png is an image that will be sent with the email on mail_body_1.txt
And lastly the main.py, the Python file that will consist the codes to interact Torpedo and send emails. But before that, we should know some of the Torpedo classes.
Torpedo consists of a number of classes but a user needs to deal with only 4 of them- ExcelReader/CSVReader, Snippet, Template and Sender. These four makes Torpedo extremely easy to use.
Inherits Reader class. This class does all the computation to be done with a Microsoft Excel file to generate emails.
Usage: ExcelReader(filename: str, email_column: str, sheet: str)
filename: path to the file to the csv file or other sort of delimiter separated values file.
email_field: Column name where the email addresses are located.
sheet: Name of the sheet to work with. By default Torpedo works with the first sheet present. User can use the index number (starting index = 0) if they don't want to use sheet name.
Also inherits Reader class. This class is responsible for all the necessary works you need to do with a database having data type csv, tsv or any other delimiter separated values.
Usage: CSVReader(filename: str, email_field: str, encoding :str = 'utf-8')
filename: path to the file to the csv file or other sort of delimiter separated values file.
email_field: Column name where the email addresses are located
<optional> encoding: Encoding of the file.
This class deals with all sort of data you need to send with your email, dynamically. The data might be plaintext or html as email body, or image, audio, text or other attachments.
Usage: Snippet(content: str, snippet_type: str = None)
content: A string containing email body or path to a file to attach with the email.
<optional> snippet_type: A string that contains the type of the snippet. Options are- plain, html, image, audio and bin.
plain: For email body written as plaintext
html: For email body to be rendered as html
image: For image attachments
audio: For audio attachments
bin for other types of attachments
Torpedo automatically decides the snippet type unless it is instructed to use other formats. For example, a plaintext email body having some html codes inside needs to be marked as plain with snippet_type = 'plain' argument, otherwise your email will be rendered as HTML while sending. If the bin file is not a common file type decided by Torpedo, it needs to be mentioned in the argument. Check file formats for Torpedo's behavior on different attachment files. It is to be noted that, Torpedo will raise an error if file marked as disallowed is attached as a snippet.
This class compiles all your snippets and generates your perfect email (also known as mime) with a cool subject.
Usage: Template(subject: str)
subject: String that will be used as subject of the emails sent.
Template.add_snippet method is required to be called to add email body and attachments to the email.
Usage: add_snippet(*args: Snippet)
This class adds spices to all the previous classes and starts cooking. It is the one responsible for sending emails, resuming unfinished tasks and generating logs.
Usage: Sender(creds: str, reader: Union[CSVReader, ExcelReader], template: Template)
creds: File path of the .json file where credentials are stored. Credential json must have the following keys-
USER: Username for the SMTP server. (Gmail id for Gmail's smtp for example)
PASSWORD: Password to login into SMTP server
HOST: Link of the SMTP server. (smtp.gmail.com for Gmail's)
PORT: Port used for SMTP. Recommended 587 since Torpedo uses TLS connections.
reader: A CSVReader or ExcelReader object that was already initialized with a database.
template: A Template object that was already initialized and snippets were attached to it.
Sender.resumable method can be invoked to check if some mailing task was incomplete previously.
Sender.send() and Sender.resume() method is used to start a new mailing task and resume an incomplete task, consecutively.
Now since we have known all about our classes, now it's the time we start coding.
Here we will talk about two situations. In the first one, we will use the test_database.csv file and send our subscribers emails about their subscription. We will attach a subscription.png file with that too. And in the second case, we will use the test_database.xlsx and send every user from Rank Sheet updates about their ranks.
The first thing we have to do is to import mailtorpedo package and import all the necessary classes. We will also import the os module to get our files easily and without any hardcoding.
import os
from mailtorpedo import CSVReader, Snippet, Template, Sender
Here we did not import ExcelReader class because we will not deal with any Microsoft Excel file in this example.
The next thing to do is to get the folder where our main.py is located. We will use the os.path.dirname function here. But you can always hardcode this using the absolute file path (D:/Torpedo/Base Folder or \home\Torpedo\Base Folder for example).
And then we will load our test_database.csv file with the CSVReader class, and mention the column where all the email fields are. For the csv file it is Email Address column.
base_dir = os.path.dirname(__file__)
#__file__ refers to the file executing this code. main.py for this case

reader = CSVReader(
	os.path.join(base_dir, 'test_database.csv'),
    'Email Address'
)
#os.path.join function to create the filepath without caring about the os
Now we need to create two snippets- one with the email body and another with the image file used as attachment.
with open(os.path.join(base_dir, 'mail_body_1.txt'), 'r') as file: #opening the text file to read data
    body_snippet = Snippet(file.read())
    #file.read() returns a string consisting all the texts from the text file
attachment_snippet = Snippet(os.path.join(base_dir, 'Files', 'subscription.png'))
After creating the snippets, we have to create the Template, having the email subject and attach the snippets with it.
template = Template("Subscription confirmed")
template.add_snippet(body_snippet, attachment_snippet)
And now finally the sender object. To compile our template and database and start sending-
sender = Sender(
	os.path.join(base_dir, credentials.json),
    reader,
    template
)

sender.send()
That's it. Torpedo will start sending the emails. You will find the log files in the same directory your database file is present.
Complete program -
import os
from mailtorpedo import CSVReader, Snippet, Template, Sender

base_dir = os.path.dirname(__file__)

reader = CSVReader(
	os.path.join(base_dir, 'test_database.csv'),
    'Email Address'
)
with open(os.path.join(base_dir, 'mail_body_1.txt'), 'r') as file:
    body_snippet = Snippet(file.read())
attachment_snippet = Snippet(os.path.join(base_dir, 'Files', 'subscription.png'))

template = Template("Subscription confirmed")
template.add_snippet(body_snippet, attachment_snippet)

sender = Sender(
	os.path.join(base_dir, credentials.json),
    reader,
    template
)
sender.send()The initialization will be the same for this example too. Import mailtorpedo and get path of the base directory.
from os import path
from mailtorpedo import ExcelReader, Snippet, Template, Sender

base_dir = path.dirname(__file__)
Now initialize an ExcelReader object with email column Email and sheet named Rank Sheet.
reader = ExcelReader(
	path.join(base_dir, 'test_database.xlsx'),
	'Email',
	'Rank Sheet'
)
The later part will be the same as the previous example, but this time attachment_snippet will not be used.
with open(os.path.join(base_dir, 'mail_body_1.txt'), 'r') as file:
    body = Snippet(file.read())

template = Template("Rank update")
template.add_snippet(body)

sender = Sender(
	os.path.join(base_dir, credentials.json),
    reader,
    template
)
But instead of just sending the emails, we will check first if there was some incomplete task previously. If so, we will resume it, otherwise, start sending.
if sender.resumable():
	sender.resume()
else:
    sender.send()
And that's it!
Full code-
from os import path
from mailtorpedo import ExcelReader, Snippet, Template, Sender

base_dir = path.dirname(__file__)

reader = ExcelReader(
	path.join(base_dir, 'test_database.xlsx'),
	'Email',
	'Rank Sheet'
)

with open(os.path.join(base_dir, 'mail_body_1.txt'), 'r') as file:
    body = Snippet(file.read())

template = Template("Rank update")
template.add_snippet(body)

sender = Sender(
	os.path.join(base_dir, credentials.json),
    reader,
    template
)
if sender.resumable():
	sender.resume()
else:
sender.send()Before we start, we will assume a folder having all the mail sending related files.
Base Folder
    |- files
        |- subscription.png
    |- test_database.csv
    |- test_database.xlsx
Here, test_database.csv and test_database.xlsx are the database files.
The test_database.csv file has the following data-
| Name | Username | Email Address | Subscription |
|---|---|---|---|
| Alice | user1_alice | alice@example.com | Pro |
| Bob | user2_bob | bob@example.com | Basic |
| Charlie | user3_charlie | charlie@example.com | Enterprise |
The test_database.xlsx file has two sheets consisting following data-
Rank Sheet:
| Name | Username | Rank | |
|---|---|---|---|
| Alpha | user_alpha | alpha@example.com | Amateur |
| Bravo | user_bravo | bravo@example.com | Master |
| Charlie | user_charlie | charlie@example.com | Legend |
Subscriber Sheet:
| Name | Username | Subscription | |
|---|---|---|---|
| Alice | user1_alice | alice@example.com | Pro |
| Bob | user2_bob | bob@example.com | Basic |
| Charlie | user3_charlie | charlie@example.com | Enterprise |
The files/subscription.png is an image that will be sent with the email on the first example.
We will work on two examples here. We will work with the csv file only. Working with Microsoft Excel files will have almost the same procedures..
First of all, open the GUI application. The following window will pop up if everything goes well-
Now browse the test_database.csv file and you will see changes in the dropdown menu of Email Column and some buttons will arrive below the Subject field.

Now select the column where the email addresses are stored in the csv file, and write subject line and the body. While writing the email body, you can use either HTML or plaintext. Clicking the buttons below the subject field will add a placeholder in the email field. Torpedo will replace the placeholders while sending the emails. After writing the emails, click on the Add Attachments button and select the subscription.png file.
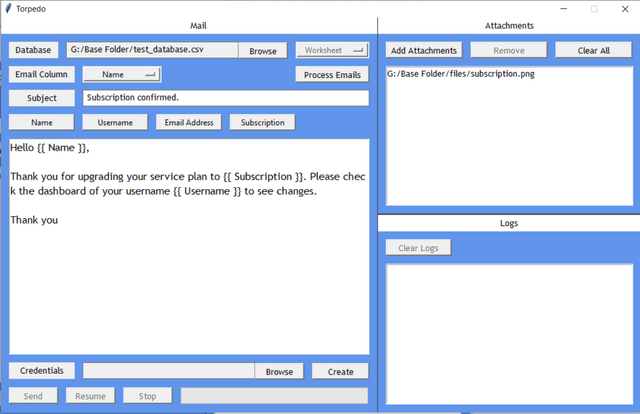
Here the {{ Name }}, {{ Subscription }} and {{ Username }} values are added by clicking on Name, Subscription and Username button respectively.
Now that we have our emails ready. This is time for us to add SMTP Credentials. The credentials should be in a json file having USER, PASSWORD, HOST and PORT keys and their values. If you don't have such file, don't worry. Press the Create button and you will get a pop up window.
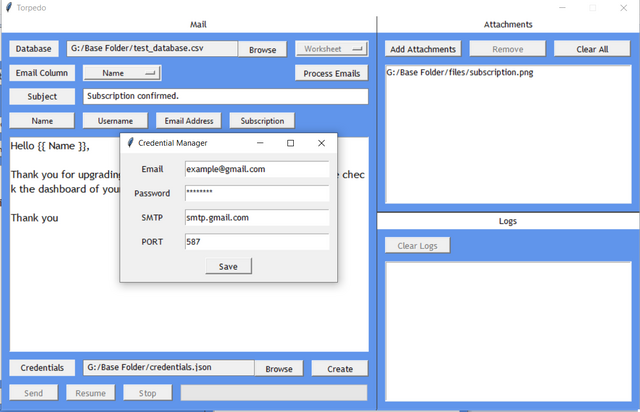
Here the Email field refers to the login username for your SMTP Server. Check your docs if they need you to use an username in email format or just traditional username.
After you are done, click on Process Emails button and the Send button will be enabled. If Torpedo founds a resumable task, Resume button will be available too.
Gmail might not let you connect through Torpedo. In that case, you have to enable less secure app access. Go to this link to enable access. It would be better to disable captcha for some times. You can do thit by going to this link.
This might happen when you send too many emails in a short time. Usually Gmail's limit is 40 emails per hour. Exceeding that will disconnect you from Gmail's server. If you get disconnected, wait for some time. Click on Process Emails button and you will see the Resume button activated. That's it!
The usual Gmail's sending limit is 500 a day. If you send a lot of emails, the limit will be increased gradually. If you hit your daily limit, you won't be able to continue sending anymore that day.
Torpedo currently supports the following file formats that it detects automatically. In case an attachment you want to send attachments having extensions other than the below, you have to explicitly tell Torpedo about that. But for GUI, these are the only available file extensions and you cannot add anything else.
3fr, ari, arw, bay, bmp, cap, cr2, cr3, crw, dcr, dcs, dds, dib, dng, drf, eip, emf, erf,fff, gif, ico, ief, iiq, jfif, jpe, jpeg, jpg, jxr, k25, kdc, mef, mos, mrw, nef, nrw, orf, ori, pbm, pef, pgm, png, pnm, ppm, ptx, pxn, raf, ras, raw, rgb, rw2, rwl, sr2, srf, srw, svg, tif, tiff, wdp, webp, wmf, x3f, xbm, xpm, xwd
aac, ac3, adt, adts, aif, aifc, aiff, au, ec3, flac, lpcm, m3u, m4a, mid, midi, mka, mp2, mp3, mpa, oga, ogg, opus, ra, rmi, snd, wav, wax, weba, wma
csv, doc, docm, docx, htm, html, ods, odt, pdf, pps, ppsm, ppsx, ppt, pptm, pptx, rtf, txt, wps, xlr, xls, xlsb, xlsm, xlsx, xlw, xml, xps
Some file extensions are strictly not allowed by Torpedo. Trying to add those as file extensions will raise SnippetParsingError.
ade, adp, apk, appx, appxbundle, bat, cab, chm, cmd, com, cpl, dll, dmg, ex, ex_, exe, hta, ins, iso, isp, jar, js, jse, lib, lnk, mde, msc, msi, msix, msixbundle, msp, mst, nsh, pif, ps1, scr, sct, shb, sys, vb, vbe, vbs, vxd, wsc, wsf, wsh
Check CONTRIBUTING.md for details.
If you have any questions, email me at rafeedm.bhuiyan@gmail.com.
In case you have improvement suggestions, or you have found some sort of bug, please create an issue here.