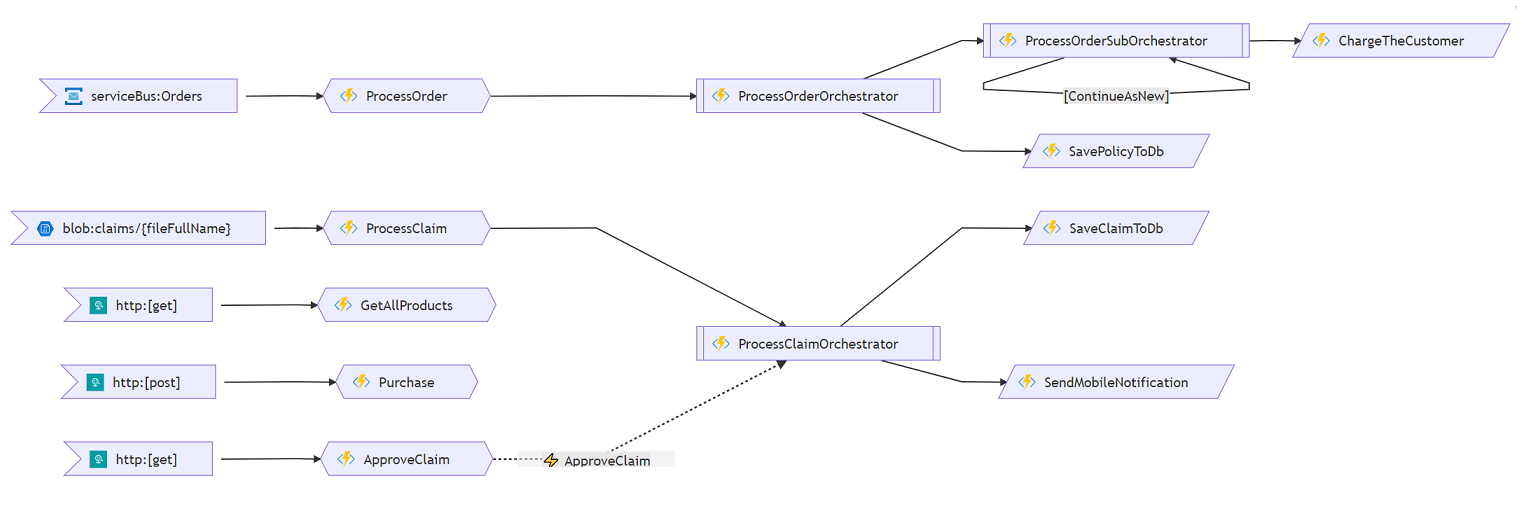
Visualizes your Azure Functions project in form of a graph. Accepts links to git repos (GitHub, Azure DevOps) or local paths.
UPD1: is now also a part of Durable Functions Monitor VsCode extension. Command Palette -> Visualize Functions as a Graph...
UPD2: is now also available as a VsCode web extension. Install it in your browser once - and it will then automatically visualize Functions in every GitHub repo you're observing with VsCode for the Web (by pressing . on a GitHub repo).
Just install it from the Marketplace. Then every time you open a Functions project (a project with host.json file in it) the graph will appear automatically. Alternatively click on a host.json file and use the az-func-as-a-graph: Show... command.
Because it is a web extension, you only need to install it once - then it will live in your browser and work on every Azure Functions project you open. Of course, you can also install it into your normal VsCode instance and/or into a GitHub Codespace.
For this to work you'll need to have GitHub Codespaces enabled for your org.
-
Click on this button:

(If you don't see it, it means that GitHub Codespaces are not enabled)
-
Once a Codespace instance is started, type
func startin Terminal window. -
Click on this button:

az-func-as-a-graph's UI will be opened in a separate browser tab.
-
Enter a link to any Azure Functions project (e.g.
https://github.com/scale-tone/az-func-as-a-graph) into there and press 'Visualize'.
This repo is also a custom GitHub action, so you can run it as part of your workflow like this:
    steps:

    - uses: scale-tone/az-func-as-a-graph@github-action-v1.3
      with:
        projectFolder: ${{ github.workspace }}/path-to-my-function-project
        outputFile: my-function-graph.htm
        templateFile: my-custom-html-template.htm
        doNotRenderFunctions: false
        doNotRenderProxies: false
All parameters are optional.
Install this Azure DevOps extension into your org and then add az-func-as-a-graph task into your pipeline:

This mode allows to programmatically generate diagrams out of your source code, e.g. as part of your build pipeline.
Clone this repo, then type the following from the project root folder:
npm install
node az-func-as-a-graph {path-to-my-functions-project-folder} {output-file-name} {json-file-with-settings}
This now became possible thanks to mermaid-cli NPM package (which will be locally installed by az-func-as-a-graph script at its first run).
npm install is only needed once, of course.
{path-to-my-functions-project-folder} can be either local folder or link to a GitHub repo. If it is a link, then it can as well point to a particular branch or tag and/or include a relative path. E.g. https://github.com/scale-tone/WhatIfDemo/tree/20190516.1/WhatIfDemo-Functions.
{output-file-name} should be a file name with local path.
- If its extension is
.svg, the graph will be written to this file in SVG format. - If its extension is
.htm, a static HTML page will be generated. The tool will also try its best to make that page interactive, so that e.g. when you click on a graph node, the relevant Function's source code is shown. Here is an example of such a page. If the project link contains a branch/tag, the links to sources will be relative to that branch/tag. - If its extension is
.json, a Functions Map file will be generated and saved as JSON. Then you can upload this file to your Durable Functions Monitor standalone/injected instance, to make it show you an interactive animated Functions Graph. - If its extension is
.md, a Markdown file with embedded graph will be generated.
{json-file-with-settings} is an optional path to an optional JSON file with optional settings. Like this one:
{
    "templateFile": "path-to-my-custom-template-file",
    "repoInfo": {
        "originUrl": "e.g. https://github.com/scale-tone/repeating-map-reduce-sample",
        "repoName": "e.g. repeating-map-reduce-sample",
        "branchName": "e.g. main",
        "tagName": "e.g. v1.2.3"
    },
    "doNotRenderFunctions": true,
    "doNotRenderProxies": true
}
templateFile specifies a custom HTML or Markdown template to be used, when generating HTML pages or Markdown files. If omitted, this default one will be used for HTML and this default one will be used for Markdown.
repoInfo setting provides a way to customize source code repo information, when needed. It is only used for mapping and rendering links to source code. If omitted, this data will be retrieved automatically with relevant git commands. E.g. you might want to explicitly specify repoInfo.originUrl to point source code links to GitHub CodeSpaces (https://github.dev) instead of https://github.com.
doNotRenderFunctions hides functions from the graph.
doNotRenderProxies hides proxies from the graph.
The above button will deploy these sources into your newly created Function App instance. Note that it will be in AppService pricing tier. Keep an eye on the cost of it and don't forget to remove it once not needed anymore.
This tool is itself an Azure Function (written in TypeScript), so to run it you'll need:
- Azure Functions Core Tools package installed globally (
npm i -g azure-functions-core-tools).
Clone this repo to your devbox, then type the following from the project root folder:
npm install
npm run build
func start
Then navigate to http://localhost:7071 with your browser, specify either local path or link to a github repo and press 'Visualize'.