PowerShell Sensors that use CIM for PRTG Network Monitoring
This PowerShell cmdlet can be used to update the PRTG HTTPS certificate utilzing a PFX file or already separated Base64 formatted certificate files
# The below example displays an example value for using the PFX cmdlet paramters
Update-PRTGCertificate -CertPath "C:\Temp\cert.pem" -KeyPath "C:\Temp\key.pem" -CAPath "C:\Temp\root.pem"

# The below example displyas an example value for using the certificate Path cmdlet parameters
Update-PRTGCertificate -PfxCertificate "C:\Temp\ssl-cert.pfx" -KeyPassword (ConvertTo-SecureString -AsPlainTest -Force -String 'Str0ngK3yP@ssw0rd!')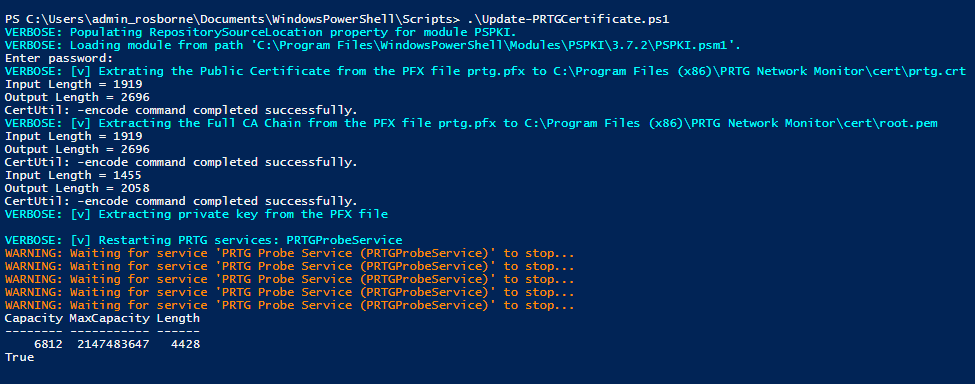
This is an EXEXML Advanced Sensor for PRTG. I created this sensor to condense the output of RAM, Disk Usage, and CPU Load into one sensor for easy viewing and for getting the most out of the PRTG Network Monitoring Tool. The XML needs to be exact if you are going to make any changes. PRTG translates integers once they are received. Sometimes you need to multiply or divied by 1MB or 1GB to get the correct format. Best to use this sensor as is.
The below values are extras that can be added to your monitoring. It is not suggested to select every available option with -ResourceMonitors. The reason for this is that PRTG states "the fewer XML results returned, the better the chance they do not get convoluted during data transfer back to PRTG". PRTG claims a max of 50 results but they do not gurantee them. This means for example that your disk total returned information can get placed in your memory free percentage column in the PRTG application. If you wish to attempt using all of the monitors available in this cmdlet I suggest using the -IgnoreWarningMessage switch parameter with it.
- TotalDisks
- TotalCPUs
- Memory Bytes In Use
- Memory Bytes Free
The values I suggest using this monitor to notify on are included in the sensor list below.
- CPU # Load
- Memory Free Percentage
- Memory In Use Percentage
- Total Memory
- Total Space Drive ?:\
- Percentage Free on Drive ?:\
By default the Warning and Critical triggers are set on the following.
- Percentage Free on Drive ?:\ below WARN: 20% and CRITICAL: 10%
- Memory In Use Percentage above WARN: 85% and CRITICAL: 95%
- CPU Loads: WARN: 85% and CRITICAL: 95%
- Error for sensor shows up if Total Memory shows as 0. This is to know whether or not a connect was successfully made to the remote machine.
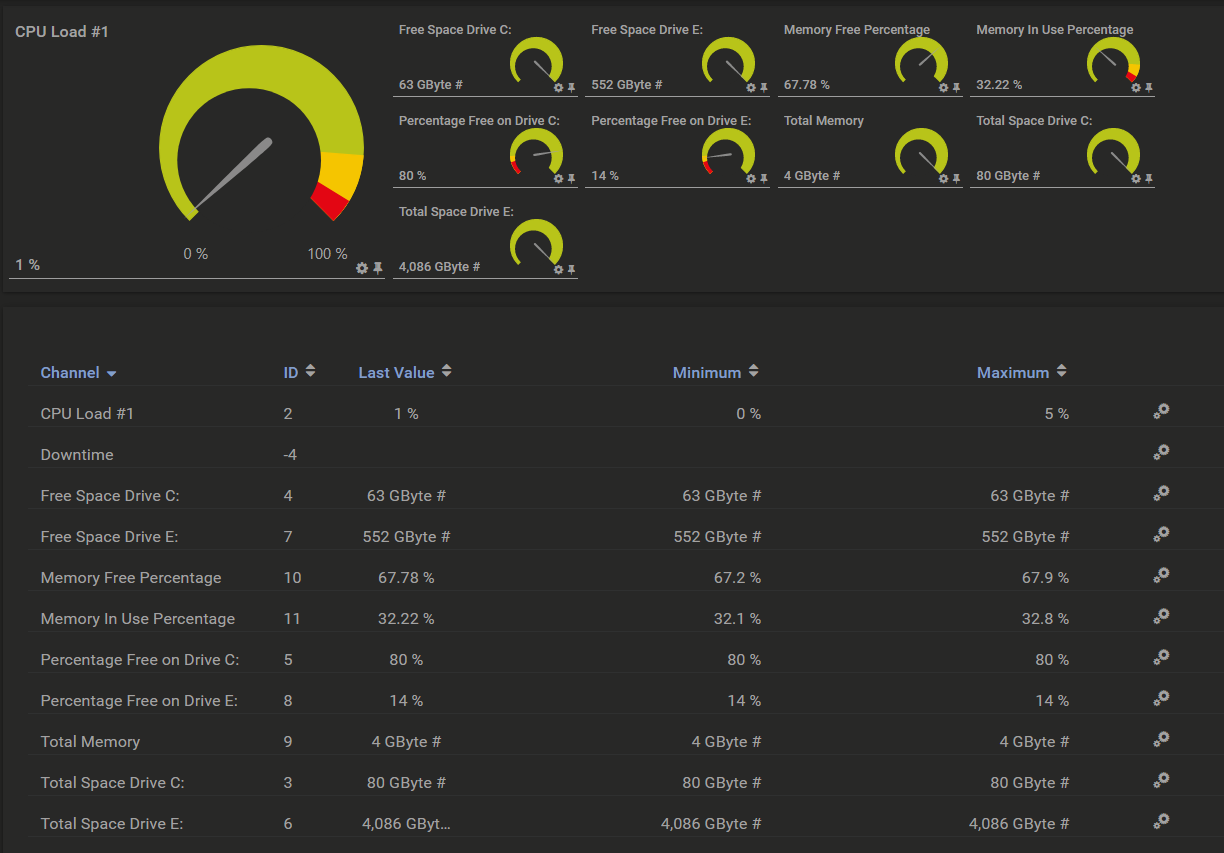
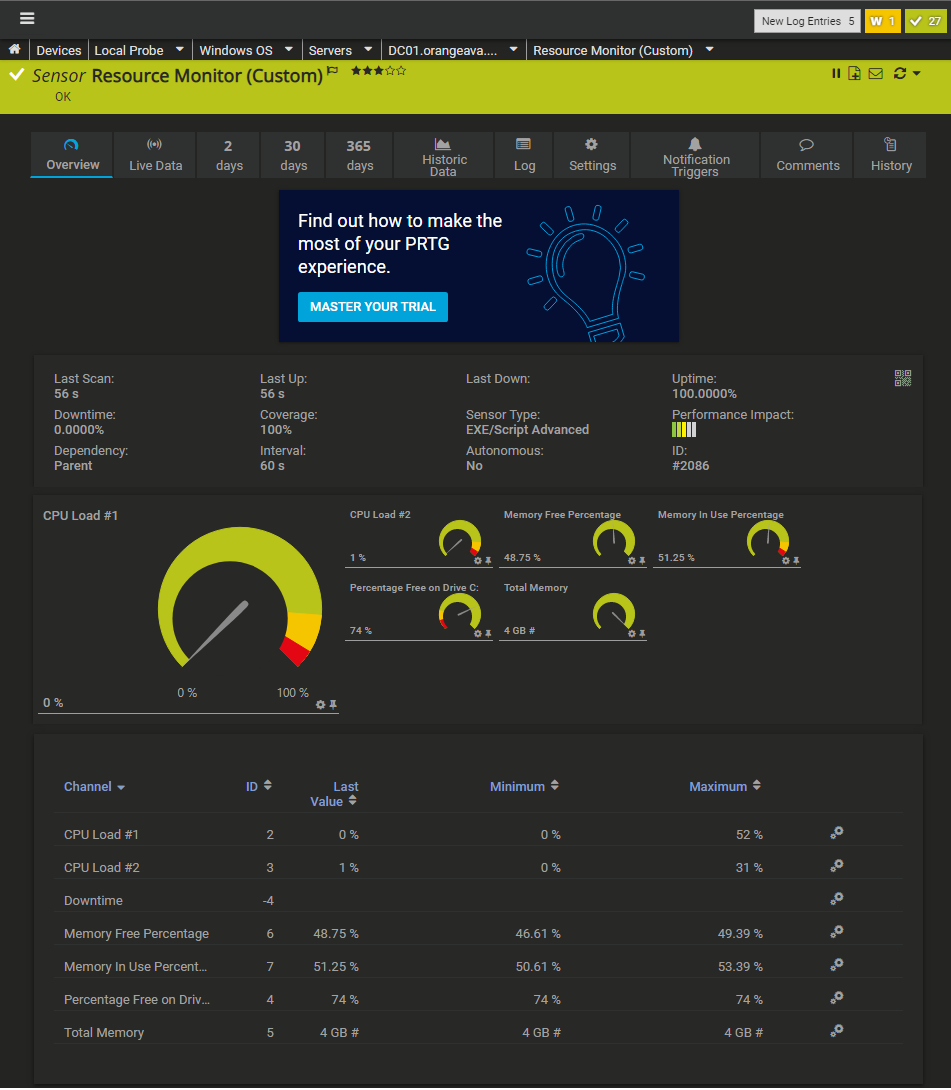
An image of the output can be seen below.
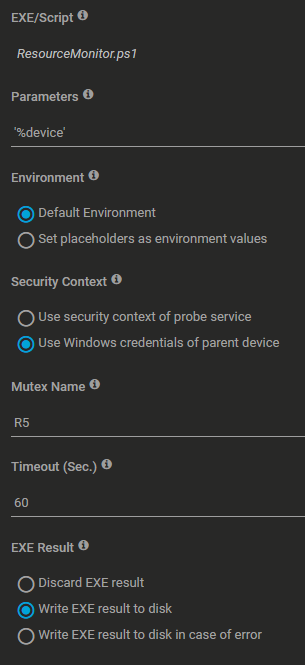
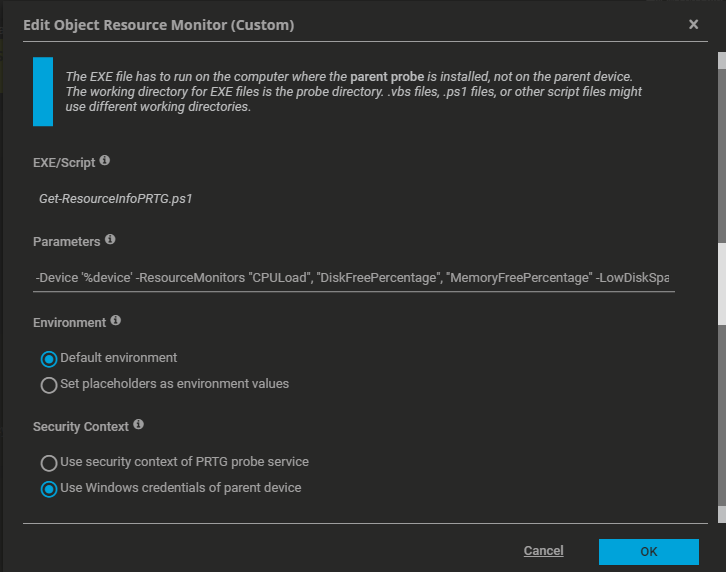
An image of the configuration can be listed below. It is crucial that the following requirements are met for this sensor to work.
- Device Name needs to be set to a FQDN like hostname.domain.com when using WinRM over HTTPS or use the -SkipCNChecks switch parameter. This defines what remote machine is being communicated with
- Configure the parent level of the devices you are adding this sensor to. We want them to use Windows Authentication with an account that can access LDAP and issue remote commands with WinRM.
- Parameter needs to mirror the following text exactly in order to fill in the device variable parameter: '%device'. In the image I am using '%device' which is a PRTG placeholder value for the device name. You can specify other options as you would specifying powersehll argumets such as in the example below.
-ComputerName '%device' -ResourceMonitors "CPULoad", "CPUCount", "DiskFreePercentage", "DiskFreeGigabytes", "TotalDisks", "MemoryFreePercentage", "MemoryFreeGigaByte" -LowDiskSpaceWarningThreshold 20 -LowDiskSpaceCriticalThreshold -CpuUsageWarningThreshold 85 -CpuUsageCriticalThreshold 95 -MemoryWarningThreshold 85 -MemoryCriticalThreshold 95 -IgnoreWarningMessage -UseSSL- Ensure use Windows Credentials of parents device is selected and configured with the account I mentioned above.
- If this will run on a bunch of machines it is best to create a mutext record. This allows more than one instance of the script to run. It is easier than making more files with a slightly different name.
- Select the Log EXE option to disk when first enabling the sensor. This will keep a log of the most recent result to help with troubleshooting.
I am pretty sure I covered everything. If you have questions or suggestions feel free to reach out to me at info@osbornepro.com
If you experience issues the troubleshooting data can be found in this location under one of the syquentially named txt files.
C:\ProgramData\Paessler\PRTG Network Monitor\Logs (Sensors)
In order to view your script in the PRTG GUI you will need to place the .ps1 file in the following location.
C:\Program Files (x86)\PRTG Network Monitor\Custom Sensors\EXEXML